Publish Application Logs to the Oracle Cloud Infrastructure Logging Service
This guide describes how to use the Graal Development Kit for Micronaut (GDK) to create an application that publishes logs to the Oracle Cloud Infrastructure Logging service.
Typically, application logs are written to stdout and to files, but the Micronaut® Logging module supports multiple logging frameworks such as Logback, and logging to various other appenders, to email, a database, or other destinations.
Oracle Cloud Infrastructure Logging service is a highly scalable and fully managed single pane of glass for all the logs in your tenancy. Logging provides access to logs from Oracle Cloud Infrastructure resources. These logs include critical diagnostic information that describes how resources are performing and being accessed.
Prerequisites
-
JDK 25 or higher. See Setting up Your Desktop.
-
An Oracle Cloud Infrastructure account. See Setting up Your Cloud Accounts.
-
An Oracle Cloud Infrastructure compartment with appropriate permissions to manage Logs granted to your Oracle Cloud Infrastructure user account.
-
The GDK CLI. See Setting up Your Desktop. (Optional)
Follow the steps below to create the application from scratch. However, you can also download the completed example:

The application ZIP file will be downloaded in your default downloads directory. Unzip it and proceed to the next steps.
A note regarding your development environment
Use the editor or IDE of your choice together with the GDK Launcher or GDK CLI to create, build, and test your application locally.
Note: If you use IntelliJ IDEA, enable annotation processing.
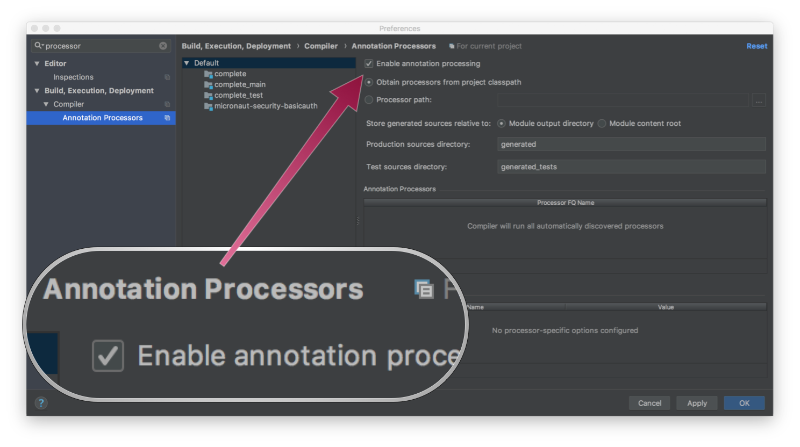
Windows platform: The GDK guides are compatible with Gradle only. Maven support is coming soon.
1. Create the Application
Create an application using the GDK Launcher.
-
Open the GDK Launcher in advanced mode.
- Create a new project using the following selections.
- Project Type: Application (Default)
- Project Name: oci-logging-demo
- Base Package: com.example (Default)
- Clouds: OCI
- Build Tool: Gradle (Groovy) or Maven
- Language: Java (Default)
- Test Framework: JUnit (Default)
- Java Version: 25 (Default)
- Micronaut Version: (Default)
- Cloud Services: Logging
- Features: GraalVM Native Image (Default)
- Sample Code: Yes (Default)
- Click Generate Project, then click Download Zip. The GDK Launcher creates an application with the package
com.examplein a directory named oci-logging-demo. The application ZIP file will be downloaded to your default downloads directory. Unzip it, open it in your code editor, and proceed to the next steps.
Alternatively, use the GDK CLI as follows:
Open the micronaut-cli.yml file, you can see what features are packaged with the application:
features: [app-name, gdk-bom, gdk-license, gdk-oci-cloud-app, gdk-oci-logging, graalvm, http-client, java, java-application, junit, logback, maven, maven-enforcer-plugin, micronaut-configuration-validation-gradle-plugin, micronaut-http-validation, micronaut-processing-compiler-args, native-image-properties, netty-server, properties, readme, serialization-jackson, shade, static-resources]The GDK Launcher creates a multi-module project with two subprojects: oci for Oracle Cloud, and lib for common code and configuration shared across cloud platforms. You develop the application logic in the lib subproject, and keep the Oracle Cloud-specific configurations in the oci subproject.
The Micronaut Logging service that you selected at the project generation step bundles Logback, Jackson Databind, Oracle Cloud Infrastructure Logging, and other necessary dependencies. The Logback appender publishes logs to Oracle Cloud Infrastructure.
1.1. Controller Class
The example code includes a controller in a file named oci/src/main/java/com/example/LogController.java, which enables you to send POST requests to publish a message to a log:
package com.example;

import io.micronaut.http.annotation.Body;
import io.micronaut.http.annotation.Controller;
import io.micronaut.http.annotation.Post;
import org.slf4j.Logger;
import org.slf4j.LoggerFactory;

@Controller
class LogController {

    private static final Logger LOG = LoggerFactory.getLogger(LogController.class);

    @Post("/log")
    void log(@Body String message) {
        LOG.info(message);
    }
}
2. Get Started with the Oracle Cloud Infrastructure Logging Service
3. Configure Appender
The GDK Launcher provided a file named oci/src/main/resources/logback.xml containing the configuration for an appender that publishes log statements to the Oracle Cloud Logging service. Update the file to include the OCI of the custom Log you copied earlier. Replace this line:
<logId><!-- TODO set the value of the Oracle Cloud Infrastructure log OCID here --></logId>with the OCID of the Log:
<logId>ocid1.log.oc1.iad.ama...</logId>Note: You can un-comment the STDOUT appender as the 'emergency' appender. See the file for details.
Having configured the appender, you can proceed to run the application, publishing the logs.
4. Run the Application, Publish and View Logs
To run the application, use the following command, which starts the application on port 8080.
Send some curl requests to test logging:
curl -id '{"message":"your message here"}' \
  -H "Content-Type: application/json" \
  -X POST http://localhost:8080/log
In the Oracle Cloud console, open the navigation menu, go to Observability & Management. Under Logging, click Logs, then click the name of the new custom log to view the logs published by your application.
5. Generate a Native Executable Using GraalVM
The GDK supports compiling Java applications ahead-of-time into native executables using GraalVM Native Image. You can use the Gradle plugin for GraalVM Native Image building/Maven plugin for GraalVM Native Image building. Packaged as a native executable, it significantly reduces application startup time and memory footprint.
Prerequisites: Make sure you have installed a GraalVM JDK. The easiest way to get started is with SDKMAN!. For other installation options, visit the Downloads section.
-
To generate a native executable, use the following command:
-
You can then run the native executable with the following command:
You can customize the name of the resulting binary by updating the Maven/Gradle plugin for GraalVM Native Image configuration.
6. Run and Test the Native Executable
Run the native executable, and then perform the same request as in step 4.
Summary
This guide demonstrated how to use the GDK to create an application that publishes logs to the Oracle Cloud Infrastructure Logging service. Then, using the Oracle Cloud Infrastructure Logging service, you viewed the logs produced by the application. Finally, you saw how to build a native executable for this application with GraalVM Native Image, and ran it to test publishing logs to Oracle Cloud Infrastructure Logging.