Create a Micronaut Application to Collect Metrics and Monitor Them on Amazon CloudWatch
This guide describes how to use the Graal Development Kit for Micronaut (GDK) to create a Micronaut® application that collects standard and custom metrics, then publishes and monitors them on Amazon CloudWatch Metrics, using the Micronaut AWS integration.
The application stores book information in a database and provides endpoints to query books. The application collects metrics for the whole application and measures total computation time for a particular endpoint.
Amazon CloudWatch Metrics is an observability and monitoring service that gives you a unified view of operational health and complete visibility of your AWS resources. This enables you to monitor your applications, optimize resource utilization, and respond to system-wide performance changes.
Micronaut AWS provides integration between Micronaut and Amazon Web Services (AWS), including CloudWatch.
The application uses Micronaut Micrometer to expose application metric data with Micrometer.
Prerequisites
-
JDK 25 or higher. See Setting up Your Desktop.
-
An Amazon Web Services (AWS) account. See Setting up Your Cloud Accounts.
-
The AWS CLI.
-
A Docker-API compatible container runtime such as Rancher Desktop or Docker installed to run MySQL and to run tests using Testcontainers.
-
The GDK CLI. See Setting up Your Desktop. (Optional.)
Follow the steps below to create the application from scratch. However, you can also download the completed example:

The application ZIP file will be downloaded in your default downloads directory. Unzip it and proceed to the next steps.
A note regarding your development environment
Use the editor or IDE of your choice together with the GDK Launcher or GDK CLI to create, build, and test your application locally.
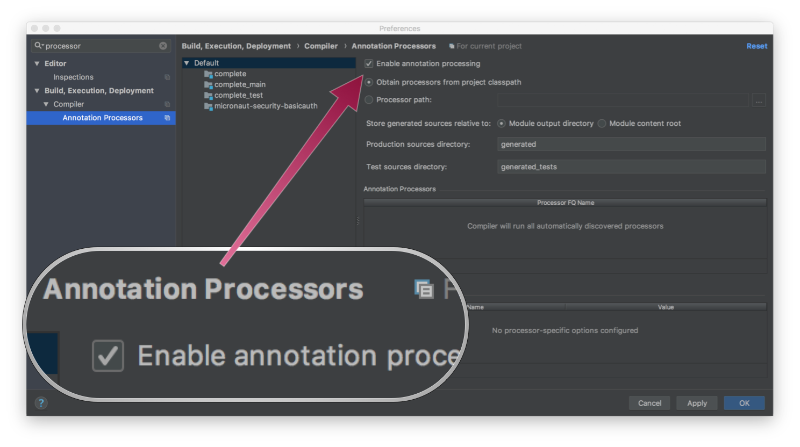
Note: If you use IntelliJ IDEA, enable annotation processing.
Windows platform: The GDK guides are compatible with Gradle only. Maven support is coming soon.
1. Create the Application
Create an application using the GDK Launcher.
-
Open the GDK Launcher in advanced mode.
- Create a new project using the following selections.
- Project Type: Application (Default)
- Project Name: aws-metrics-demo
- Base Package: com.example (Default)
- Clouds: AWS
- Build Tool: Gradle (Groovy) or Maven
- Language: Java (Default)
- Test Framework: JUnit (Default)
- Java Version: 25 (Default)
- Micronaut Version: (Default)
- Cloud Services: Metrics, Database
- Features: GraalVM Native Image, Flyway Database Migration
- Sample Code: No
- Click Generate Project, then click Download Zip. The GDK Launcher creates an application with the package
com.examplein a directory named aws-metrics-demo. The application ZIP file will be downloaded to your default downloads directory. Unzip it, open it in your code editor, and proceed to the next steps.
Alternatively, use the GDK CLI as follows:
Open the micronaut-cli.yml file, you can see what features are packaged with the application:
features: [app-name, data, data-jdbc, flyway, gdk-aws-cloud-app, gdk-aws-database, gdk-aws-metrics, gdk-bom, gdk-license, graalvm, http-client, java, java-application, jdbc-hikari, junit, logback, management, maven, maven-enforcer-plugin, micrometer, micrometer-annotation, micrometer-cloudwatch, micronaut-configuration-validation-gradle-plugin, micronaut-http-validation, micronaut-processing-compiler-args, mysql, native-image-properties, netty-server, properties, readme, serialization-jackson, shade, static-resources, test-resources, validation]The GDK Launcher creates a multi-module project with two subprojects: aws for Amazon Web Services, and lib for common code and configuration shared across cloud platforms. You develop the application logic in the lib subproject, and keep the Amazon Web Services-specific configurations in the aws subproject.
1.1. Configure Metrics Collection
The project generated by the GDK Launcher has Micrometer as a dependency.
Micrometer provides a simple facade over the instrumentation clients for a number of popular monitoring systems.
To configure Micrometer, the following properties were added to the configuration file, aws/src/main/resources/application.properties, as follows:
micronaut.application.name=aws
micronaut.metrics.enabled=true
micronaut.metrics.binders.files.enabled=true
micronaut.metrics.binders.jdbc.enabled=true
micronaut.metrics.binders.jvm.enabled=true
micronaut.metrics.binders.logback.enabled=true
micronaut.metrics.binders.processor.enabled=true
micronaut.metrics.binders.uptime.enabled=true
micronaut.metrics.binders.web.enabled=true
Several groups of metrics are enabled by default: these include system metrics (such as JVM information and uptime), as well as metrics tracking web requests, datasources activity, and others. Overall metrics can be enabled or disabled, and groups can be individually enabled or disabled in configuration. In this case all metrics are enabled. To disable, change to false, for example, per-environment.
To export metrics to Amazon CloudWatch, enable CloudWatch as an export location for Micrometer. Then, create queries and monitor your metrics on CloudWatch.
Set the namespace property for your metrics to something meaningful, for example, an application name such as aws-metrics-demo. The namespace will be used to group the metrics in CloudWatch.
2. Configure Datasources
The GDK Launcher included Flyway for database migrations. It uses the Micronaut integration with Flyway that automates schema changes, significantly simplifies schema management tasks, such as migrating, rolling back, and reproducing in multiple environments. The GDK Launcher enables Flyway in the aws/src/main/resources/application.properties file and configures it to perform migrations on the default datasources.
flyway.datasources.default.enabled=trueIf you specified Flyway as a project feature in the GDK Launcher the build file includes it as a dependency:
Note: Flyway migrations require full control over schema management. By default, the project does not generate schema automatically in aws/src/main/resources/application.properties. If you manually configure
datasources.default.schema-generate=CREATE_DROPset it toNONEto ensure that only Flyway manages your schema.
Configuring multiple datasources is as simple as enabling Flyway for each one. You can also specify directories that will be used for migrating each datasource. For more information, see Micronaut integration with Flyway.
Flyway migration is automatically triggered before your application starts. Flyway reads migration file(s) in the lib/src/main/resources/db/migration/ directory. The migration file with the database schema, lib/src/main/resources/db/migration/V1__schema.sql, was also created for you by the GDK Launcher.
DROP TABLE IF EXISTS book;

CREATE TABLE book (
    id   BIGINT NOT NULL AUTO_INCREMENT UNIQUE PRIMARY KEY,
   name  VARCHAR(255) NOT NULL UNIQUE,
   isbn  CHAR(13) NOT NULL UNIQUE
);

INSERT INTO book (isbn, name)
VALUES ("9781491950357", "Building Microservices"),
       ("9781680502398", "Release It!"),
       ("9780321601919", "Continuous Delivery"),
       ("9781617294549", "Microservices Patterns");
During application startup, Flyway runs the commands in the SQL file and creates the schema needed for the application.
Using the SQL statements in V1__schema.sql, Flyway creates a table with the name book and populates it with four records.
2.1. Domain Entity
The GDK Launcher created a Book domain class that uses Micronaut Data JDBC in a file named lib/src/main/java/com/example/Book.java, as follows:
package com.example;

import io.micronaut.data.annotation.GeneratedValue;
import io.micronaut.data.annotation.Id;
import io.micronaut.data.annotation.MappedEntity;

import static io.micronaut.data.annotation.GeneratedValue.Type.AUTO;

import io.micronaut.serde.annotation.Serdeable;
import jakarta.validation.constraints.Size;

@Serdeable
@MappedEntity (1)
public class Book {

    @Id
    @GeneratedValue(AUTO)
    private Long id;

    private String name;

    @Size(min=13, max=13)
    private String isbn;

    public Book(String isbn, String name) {
        this.isbn = isbn;
        this.name = name;
    }

    public Long getId() {
        return id;
    }

    public void setId(Long id) {
        this.id = id;
    }

    public String getName() {
        return name;
    }

    public void setName(String name) {
        this.name = name;
    }

    public String getIsbn() {
        return isbn;
    }

    public void setIsbn(String isbn) {
        this.isbn = isbn;
    }
}
1 The annotation @MappedEntity maps the class to the table defined in the schema.
2.2. Repository Interface
A repository interface defines the operations to access the database. Micronaut Data implements the interface at compilation time.
The GDK Launcher created a BookRepository interface in a file named lib/src/main/java/com/example/BookRepository.java:
package com.example;

import io.micronaut.core.annotation.NonNull;
import io.micronaut.data.jdbc.annotation.JdbcRepository;
import io.micronaut.data.repository.CrudRepository;

import jakarta.validation.constraints.NotBlank;
import java.util.Optional;

import static io.micronaut.data.model.query.builder.sql.Dialect.MYSQL;

@JdbcRepository(dialect = MYSQL) (1)
public interface BookRepository extends CrudRepository<Book, Long> { (2)

    @NonNull
    Optional<Book> findByIsbn(@NotBlank String isbn);
}
1 A database dialect is specified with the @JdbcRepository annotation.
2 The Book is the root entity, and the primary key type is Long.
2.3. Controller Class
The GDK Launcher created a controller to access Book instances (and to trigger the JDBC metric data) in a file named lib/src/main/java/com/example/BookController.java with the following contents:
package com.example;

import io.micronaut.http.annotation.Controller;
import io.micronaut.http.annotation.Get;
import io.micronaut.scheduling.TaskExecutors;
import io.micronaut.scheduling.annotation.ExecuteOn;
import io.micrometer.core.annotation.Timed;
import io.micrometer.core.annotation.Counted;

import java.util.Optional;

@Controller("/books") (1)
@ExecuteOn(TaskExecutors.IO)
class BookController {

    private final BookRepository bookRepository;

    BookController(BookRepository bookRepository) {
        this.bookRepository = bookRepository;
    }

    @Get (2)
    @Timed("books.index") (3)
    Iterable<Book> index() {
        return bookRepository.findAll();
    }

    @Get("/{isbn}")
    @Counted("books.find") (4)
    Optional<Book> findBook(String isbn) {
        return bookRepository.findByIsbn(isbn);
    }
}
1 The class is defined as a controller with the @Controller annotation mapped to the path /books.
2 The controller maps a GET request to /books, which returns a list of Book.
3 Use a Micrometer @Timed annotation, with the value “books.index”, to create a timer metric.
4 Use a Micrometer @Counted annotation, with the value “books.find”, to create a counter metric.
3. Create Tests
Note: You require a running Docker container to run the tests.
-
For tests to run correctly, the GDK Launcher created a test configuration file named aws/src/test/resources/application-test.properties with the following contents:
micronaut.metrics.export.cloudwatch.enabled=false
micronaut.metrics.enabled=true
flyway.datasources.default.enabled=true
datasources.default.dialect=MYSQL
datasources.default.driverClassName=com.mysql.cj.jdbc.Driver
datasources.default.db-type=mysql
customMetrics.initialDelay=10h
The configuration enables the metrics and specifies a MySQL datasource. Since it does not specify a URL for the source, Micronaut Test Resources automatically creates a test container for the database. The configuration also enables Flyway to create the
bookstables the same way as in a production environment. -
The GDK Launcher created a test class, named
BookControllerMetricsTest, to verify metrics functionality in a file named aws/src/test/java/com/example/BookControllerMetricsTest.java with the following contents:package com.example; import io.micrometer.core.instrument.Counter; import io.micrometer.core.instrument.MeterRegistry; import io.micrometer.core.instrument.Tags; import io.micrometer.core.instrument.Timer; import io.micronaut.core.type.Argument; import io.micronaut.http.HttpRequest; import io.micronaut.http.client.HttpClient; import io.micronaut.http.client.annotation.Client; import io.micronaut.logging.LoggingSystem; import io.micronaut.test.extensions.junit5.annotation.MicronautTest; import jakarta.inject.Inject; import org.junit.jupiter.api.Test; import org.slf4j.Logger; import org.slf4j.LoggerFactory; import java.util.List; import java.util.Map; import java.util.Set; import java.util.stream.Collectors; import java.util.concurrent.TimeUnit; import static io.micronaut.logging.LogLevel.ALL; import static org.junit.jupiter.api.Assertions.assertEquals; import static org.junit.jupiter.api.Assertions.assertFalse; import static org.junit.jupiter.api.Assertions.assertTrue; @MicronautTest class BookControllerMetricsTest { @Inject MeterRegistry meterRegistry; @Inject LoggingSystem loggingSystem; @Inject @Client("/") HttpClient httpClient; @Test void testExpectedMeters() { Set<String> names = meterRegistry.getMeters().stream() .map(meter -> meter.getId().getName()) .collect(Collectors.toSet()); // check that a subset of expected meters exist assertTrue(names.contains("jvm.memory.max")); assertTrue(names.contains("process.uptime")); assertTrue(names.contains("system.cpu.usage")); assertTrue(names.contains("logback.events")); assertTrue(names.contains("hikaricp.connections.max")); // these will be lazily created assertFalse(names.contains("http.client.requests")); assertFalse(names.contains("http.server.requests")); } @Test void testHttp() { Timer timer = meterRegistry.timer("http.server.requests", Tags.of( "exception", "none", "method", "GET", "status", "200", "uri", "/books")); assertEquals(0, timer.count()); Timer bookIndexTimer = meterRegistry.timer("books.index", Tags.of("exception", "none")); assertEquals(0, bookIndexTimer.count()); httpClient.toBlocking().retrieve( HttpRequest.GET("/books"), Argument.listOf(Book.class)); assertEquals(1, timer.count()); assertEquals(1, bookIndexTimer.count()); assertTrue(0.0 < bookIndexTimer.totalTime(TimeUnit.MILLISECONDS)); assertTrue(0.0 < bookIndexTimer.max(TimeUnit.MILLISECONDS)); Counter bookFindCounter = meterRegistry.counter("books.find", Tags.of("result", "success", "exception", "none")); assertEquals(0, bookFindCounter.count()); httpClient.toBlocking().retrieve( HttpRequest.GET("/books/9781491950357"), Argument.of(Book.class)); assertEquals(1, bookFindCounter.count()); } @Test void testLogback() { Counter counter = meterRegistry.counter("logback.events", Tags.of("level", "info")); double initial = counter.count(); Logger logger = LoggerFactory.getLogger("testing.testing"); loggingSystem.setLogLevel("testing.testing", ALL); logger.trace("trace"); logger.debug("debug"); logger.info("info"); logger.warn("warn"); logger.error("error"); assertEquals(initial + 1, counter.count(), 0.000001); } @Test void testMetricsEndpoint() { Map<String, Object> response = httpClient.toBlocking().retrieve( HttpRequest.GET("/metrics"), Argument.mapOf(String.class, Object.class)); assertTrue(response.containsKey("names")); assertTrue(response.get("names") instanceof List); List<String> names = (List<String>) response.get("names"); // check that a subset of expected meters exist assertTrue(names.contains("jvm.memory.max")); assertTrue(names.contains("process.uptime")); assertTrue(names.contains("system.cpu.usage")); assertTrue(names.contains("logback.events")); assertTrue(names.contains("hikaricp.connections.max")); } @Test void testOneMetricEndpoint() { Map<String, Object> response = httpClient.toBlocking().retrieve( HttpRequest.GET("/metrics/jvm.memory.used"), Argument.mapOf(String.class, Object.class)); String name = (String) response.get("name"); assertEquals("jvm.memory.used", name); List<Map<String, Object>> measurements = (List<Map<String, Object>>) response.get("measurements"); assertEquals(1, measurements.size()); double value = (double) measurements.get(0).get("value"); assertTrue(value > 0); } }The tests verify that certain metrics are present, including the ones that you enabled in the application configuration file, and the ones that you collected thanks to the
@Counterand@Timerannotations.Note that, since the
@MicronautTestannotation is used, Micronaut initializes the application context and the embedded server with the endpoints you created earlier. (For more information, see the Micronaut Test guide.)
4. Create Custom Metrics
-
The GDK Launcher created a service that retrieves information from the database and publishes custom metrics based on it. The custom metrics provide the number of books about microservices. The service is in a file named lib/src/main/java/com/example/MicroserviceBooksNumberService.java with the following contents:
package com.example;

import io.micrometer.core.instrument.Counter;
import io.micrometer.core.instrument.MeterRegistry;
import io.micrometer.core.instrument.Timer;
import io.micronaut.scheduling.annotation.Scheduled;
import jakarta.inject.Singleton;
import org.slf4j.Logger;
import org.slf4j.LoggerFactory;

import java.util.concurrent.atomic.AtomicInteger;
import java.util.stream.StreamSupport;

@Singleton
public class MicroserviceBooksNumberService {

    private final Logger log = LoggerFactory.getLogger(getClass().getName());

    private final BookRepository bookRepository;
    private final Counter checks;
    private final Timer time;
    private final AtomicInteger microserviceBooksNumber = new AtomicInteger(0);

    private static final String SEARCH_KEY = "microservice";

    MicroserviceBooksNumberService(BookRepository bookRepository,
                                   MeterRegistry meterRegistry) {  (1)
        this.bookRepository = bookRepository;
        checks = meterRegistry.counter("microserviceBooksNumber.checks");
        time = meterRegistry.timer("microserviceBooksNumber.time");
        meterRegistry.gauge("microserviceBooksNumber.latest", microserviceBooksNumber);
    }

    @Scheduled(fixedRate = "${customMetrics.updateFrequency:1h}",
               initialDelay = "${customMetrics.initialDelay:0s}")  (2)
    public void updateNumber() {
        time.record(() -> {
            try {
                Iterable<Book> allBooks = bookRepository.findAll();
                long booksNumber = StreamSupport.stream(allBooks.spliterator(), false)
                        .filter(b -> b.getName().toLowerCase().contains(SEARCH_KEY))
                        .count();

                checks.increment();
                microserviceBooksNumber.set((int) booksNumber);
            } catch (Exception e) {
                log.error("Problem setting the number of microservice books", e);
            }
        });
    }
}
1 The code registers custom meters, queries the database, counts books containing
microservicein the name and updates themicroserviceBooksNumber.latestmeter with the value.microserviceBooksNumber.checksstores the number of updates performed, andmicroserviceBooksNumber.timestores the total time spent on the updates for the metric.2 The metric update is scheduled. The
customMetrics.updateFrequencyparameter corresponds to the update rate and has the default value of one hour. ThecustomMetrics.initialDelayparameter corresponds to a delay after application startup before metrics calculation and has a default value of zero seconds. -
The GDK Launcher created
MicroserviceBooksNumberTestto test the custom metrics in a file named aws/src/test/java/com/example/MicroserviceBooksNumberTest.java with the following contents:package com.example; import io.micrometer.core.instrument.Counter; import io.micrometer.core.instrument.Gauge; import io.micrometer.core.instrument.MeterRegistry; import io.micrometer.core.instrument.Timer; import io.micronaut.test.extensions.junit5.annotation.MicronautTest; import jakarta.inject.Inject; import org.junit.jupiter.api.Test; import static java.util.concurrent.TimeUnit.MILLISECONDS; import static org.junit.jupiter.api.Assertions.assertEquals; import static org.junit.jupiter.api.Assertions.assertTrue; @MicronautTest class MicroserviceBooksNumberTest { @Inject MeterRegistry meterRegistry; @Inject MicroserviceBooksNumberService service; @Test void testMicroserviceBooksNumberUpdates() { Counter counter = meterRegistry.counter("microserviceBooksNumber.checks"); Timer timer = meterRegistry.timer("microserviceBooksNumber.time"); Gauge gauge = meterRegistry.get("microserviceBooksNumber.latest").gauge(); assertEquals(0.0, counter.count()); assertEquals(0.0, timer.totalTime(MILLISECONDS)); assertEquals(0.0, gauge.value()); int checks = 3; for (int i = 0; i < checks; i++) { service.updateNumber(); } assertEquals((double) checks, counter.count()); assertTrue(timer.totalTime(MILLISECONDS) > 0); assertEquals(2.0, gauge.value()); } }1 The test calls the service three times and verifies that the metrics are collected correctly. Because the Flyway schema added two books with titles containing the word "microservices", the value of
microserviceBooksNumber.latestis2.0. -
To make sure that the test works as expected and only three updates of the metric are performed, change the test configuration (in the file aws/src/test/resources/application-test.properties) so that it does not perform scheduled updates for the custom metric. To achieve this, change the
customMetrics.initialDelayparameter to a large value, such as10hours. For example:customMetrics.initialDelay=10h
5. Run the Tests
Run the tests:
Then open the file aws/build/reports/tests/test/index.html in a browser to view the results.
The tests could be run locally without any cloud credentials, as metrics are not exported to the cloud, and a database is automatically provided by Micronaut test containers.
6. Configure the Application
The GDK Launcher configured an initial datasource in aws/src/main/resources/application.properties with the following properties:
datasources.default.driver-class-name=com.mysql.cj.jdbc.Driver
datasources.default.db-type=mysql
datasources.default.dialect=MYSQL
You can set values for the missing datasources.default.url, datasources.default.username, and datasources.default.password properties with these environment variables:
This approach requires an existing database, or requires you to manually start a server in a Docker container. Instead, to simplify things, do not set the environment variables: if you do not specify a datasource URL, Micronaut Test Resources automatically starts a MySQL server in a Docker container when running the application locally or running tests.
To test publishing metrics to AWS Cloudwatch from a local machine, you may use an AWS Access key configured in the AWS CLI. If you do not have AWS CLI, follow the AWS documentation to install or update to the latest version of the AWS CLI.
If you do not have an access key, complete the steps in the Programmatic Access section of the AWS Secure Credential Types guide to create a long-term access key for your account. Run aws configure and provide access key ID and secret access key to authenticate as your user.
Instead of using your AWS root account, it is highly recommended to use the administrator account. If you do not have one already, see Setting up Your Cloud Accounts.
After completing these steps, you can start the application and it will have access to AWS Services, including CloudWatch.
7. Run the Application
To run the application, use the following command, which starts the application on port 8080.
Alternatively, to cause the custom metric update to occur more frequently (to see the effects on metrics), start the application with a configuration override to update every five seconds, as follows:
Send a few test requests with curl, as follows:
-
Get all the books:
curl localhost:8080/books[{"id": 1, "name": "Building Microservices", "isbn": "9781491950357"}, {"id": 2, "name": "Release It!", "isbn": "9781680502398"}, {"id": 3, "name": "Continuous Delivery", "isbn": "9780321601919"}] -
Get a book by its ISBN:
curl localhost:8080/books/9781680502398{"id": 2, "name": "Release It!", "isbn": "9781680502398"} -
Get a list of all the available metrics:
curl localhost:8080/metrics{"names": [ "books.find", "books.index", ..., "microserviceBooksNumber.latest", "microserviceBooksNumber.time", ..., "http.server.requests", "process.uptime", ... ]} -
Get the value of a particular metric:
curl localhost:8080/metrics/http.server.requests{"name": "http.server.requests", "measurements": [ {"statistic": "COUNT", "value": 3.0}, {"statistic": "TOTAL_TIME", "value": 0.6045995000000001}, {"statistic": "MAX", "value": 0.0343463} ], ... } -
Get the value of the metric that you created on the
booksendpoint:curl localhost:8080/metrics/books.index{"name": "books.index", "measurements": [ {"statistic": "COUNT", "value": 1.0}, {"statistic": "TOTAL_TIME", "value": 0.3218636}, {"statistic":"MAX","value":0.0} ], ... } -
Get the value of the custom metric calculating the number of books with
microservicein their title:curl localhost:8080/metrics/microserviceBooksNumber.latest{"name": "microserviceBooksNumber.latest", "measurements": [{"statistic": "VALUE", "value" :2.0}] }
8. Monitor Metrics on Amazon CloudWatch
To use CloudWatch, first authenticate to AWS. Use any of these methods.
-
Sign in to the AWS console and navigate to CloudWatch:
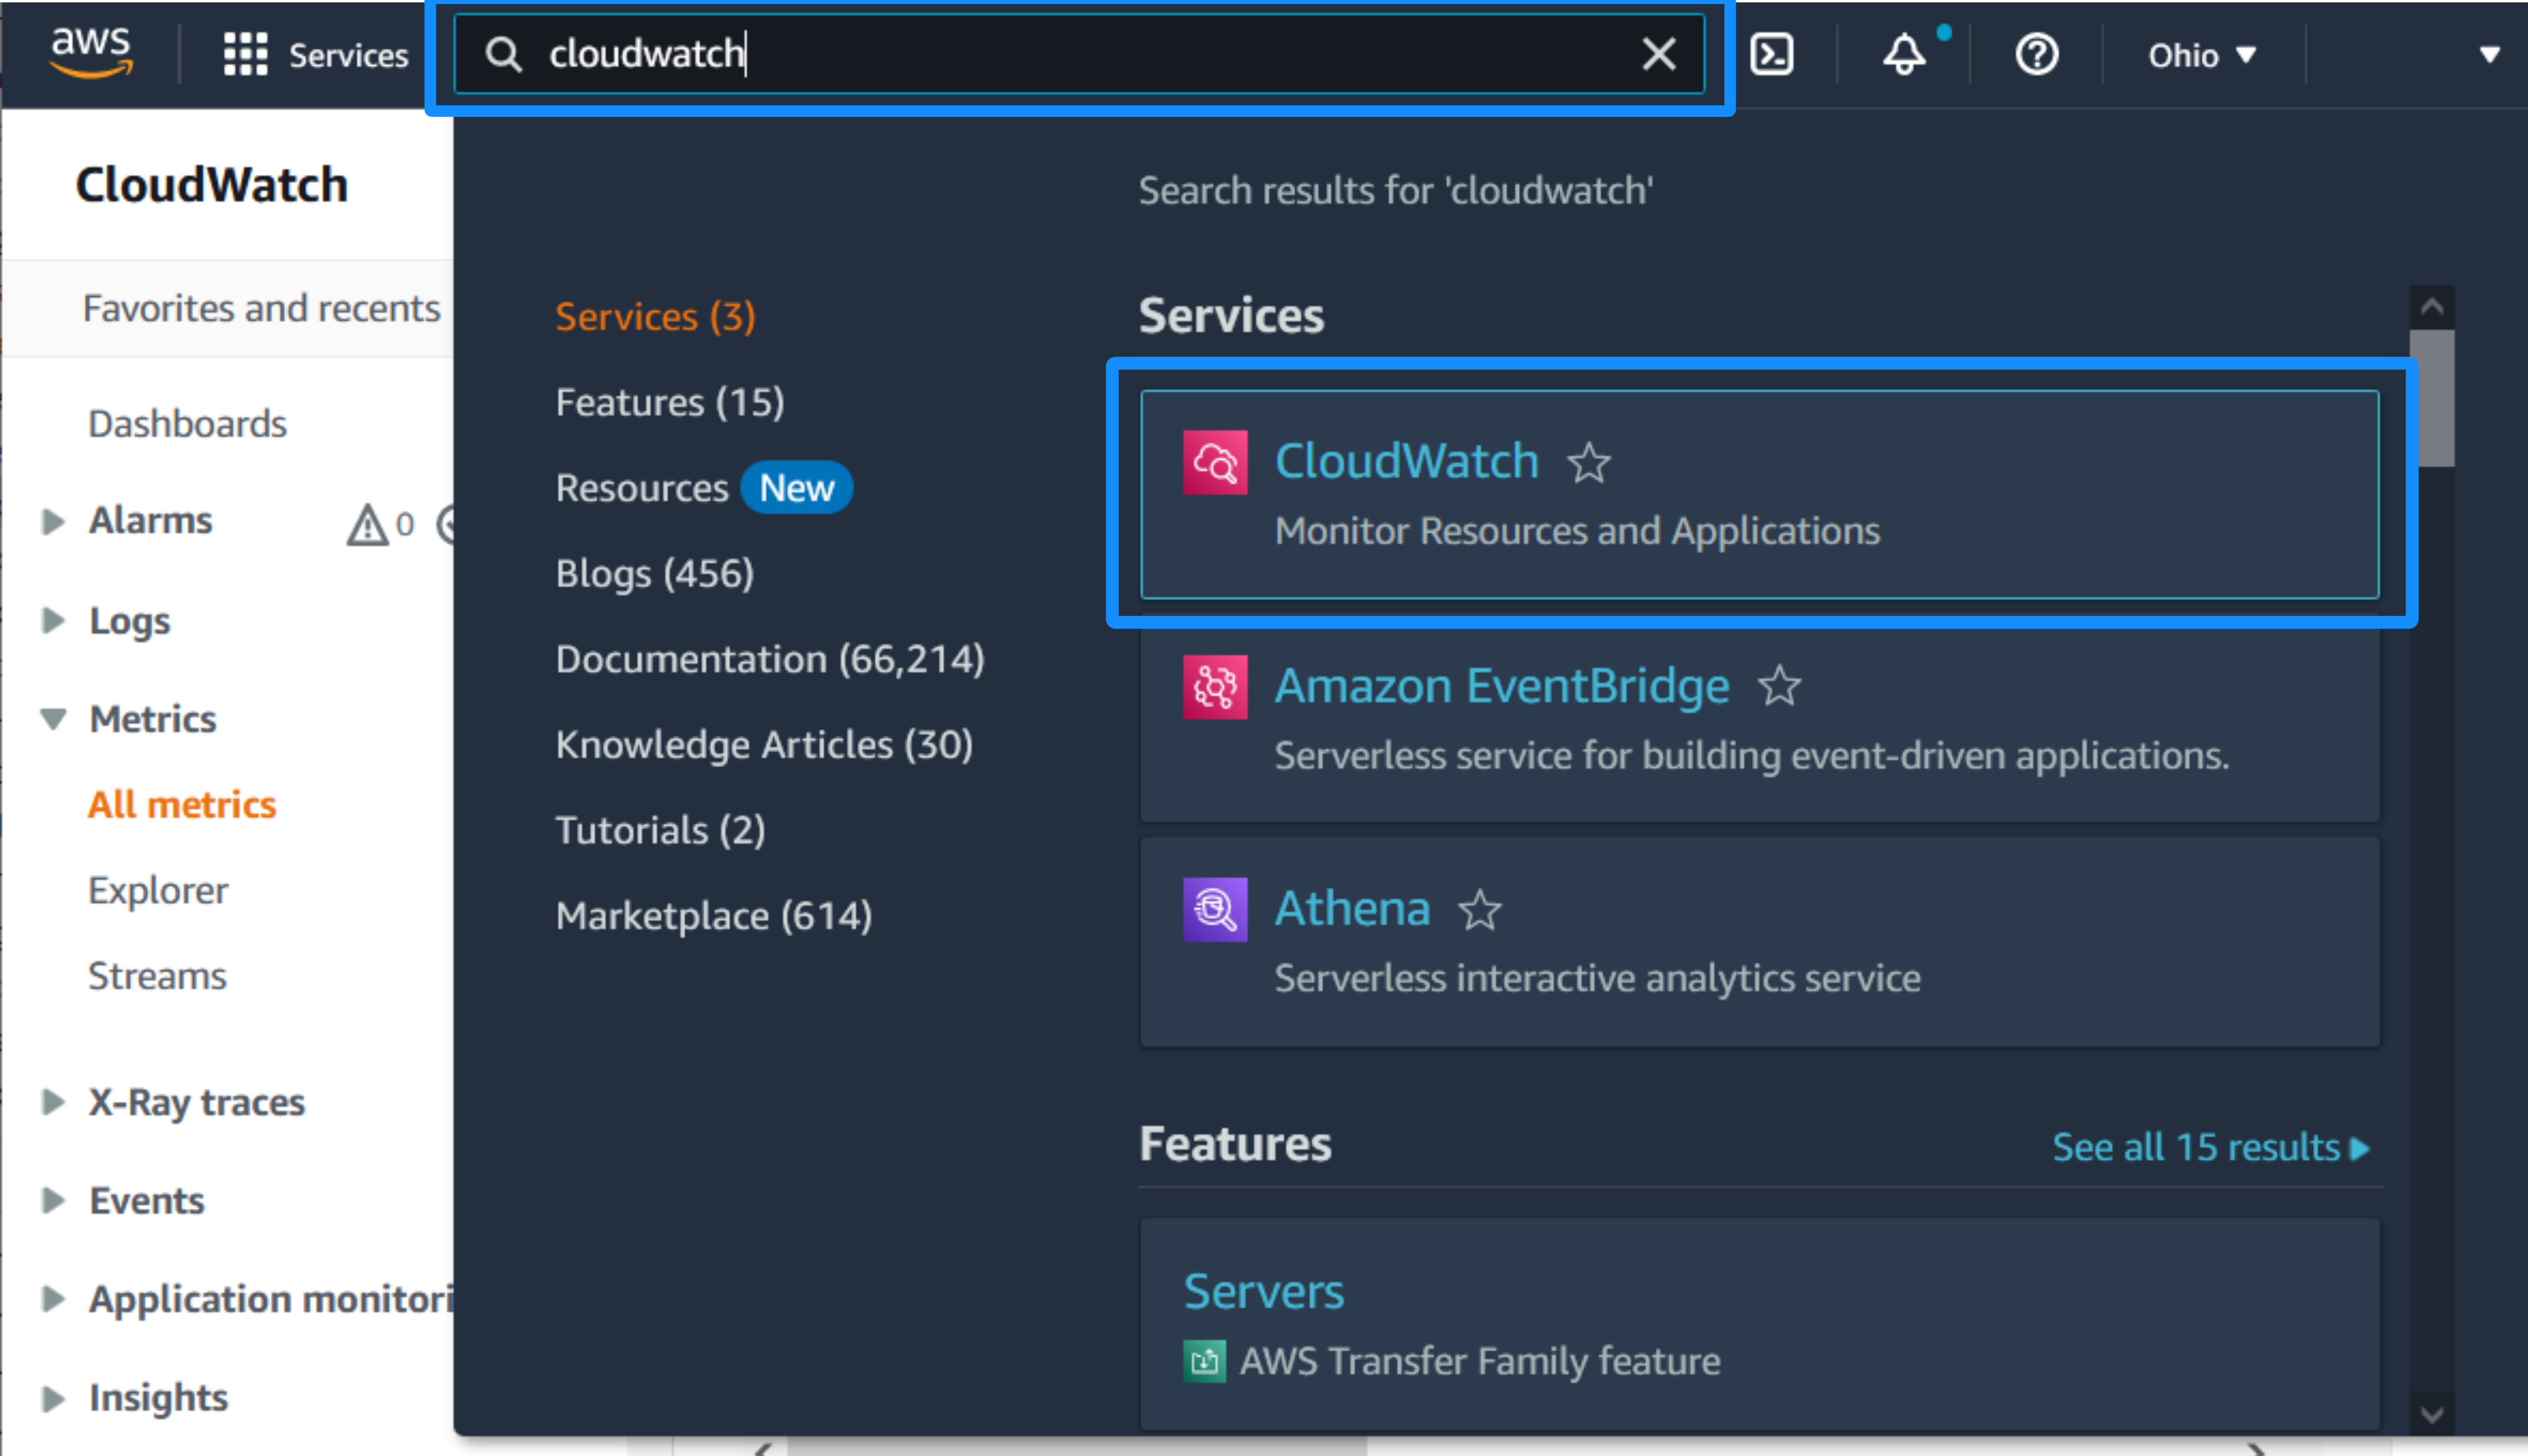
-
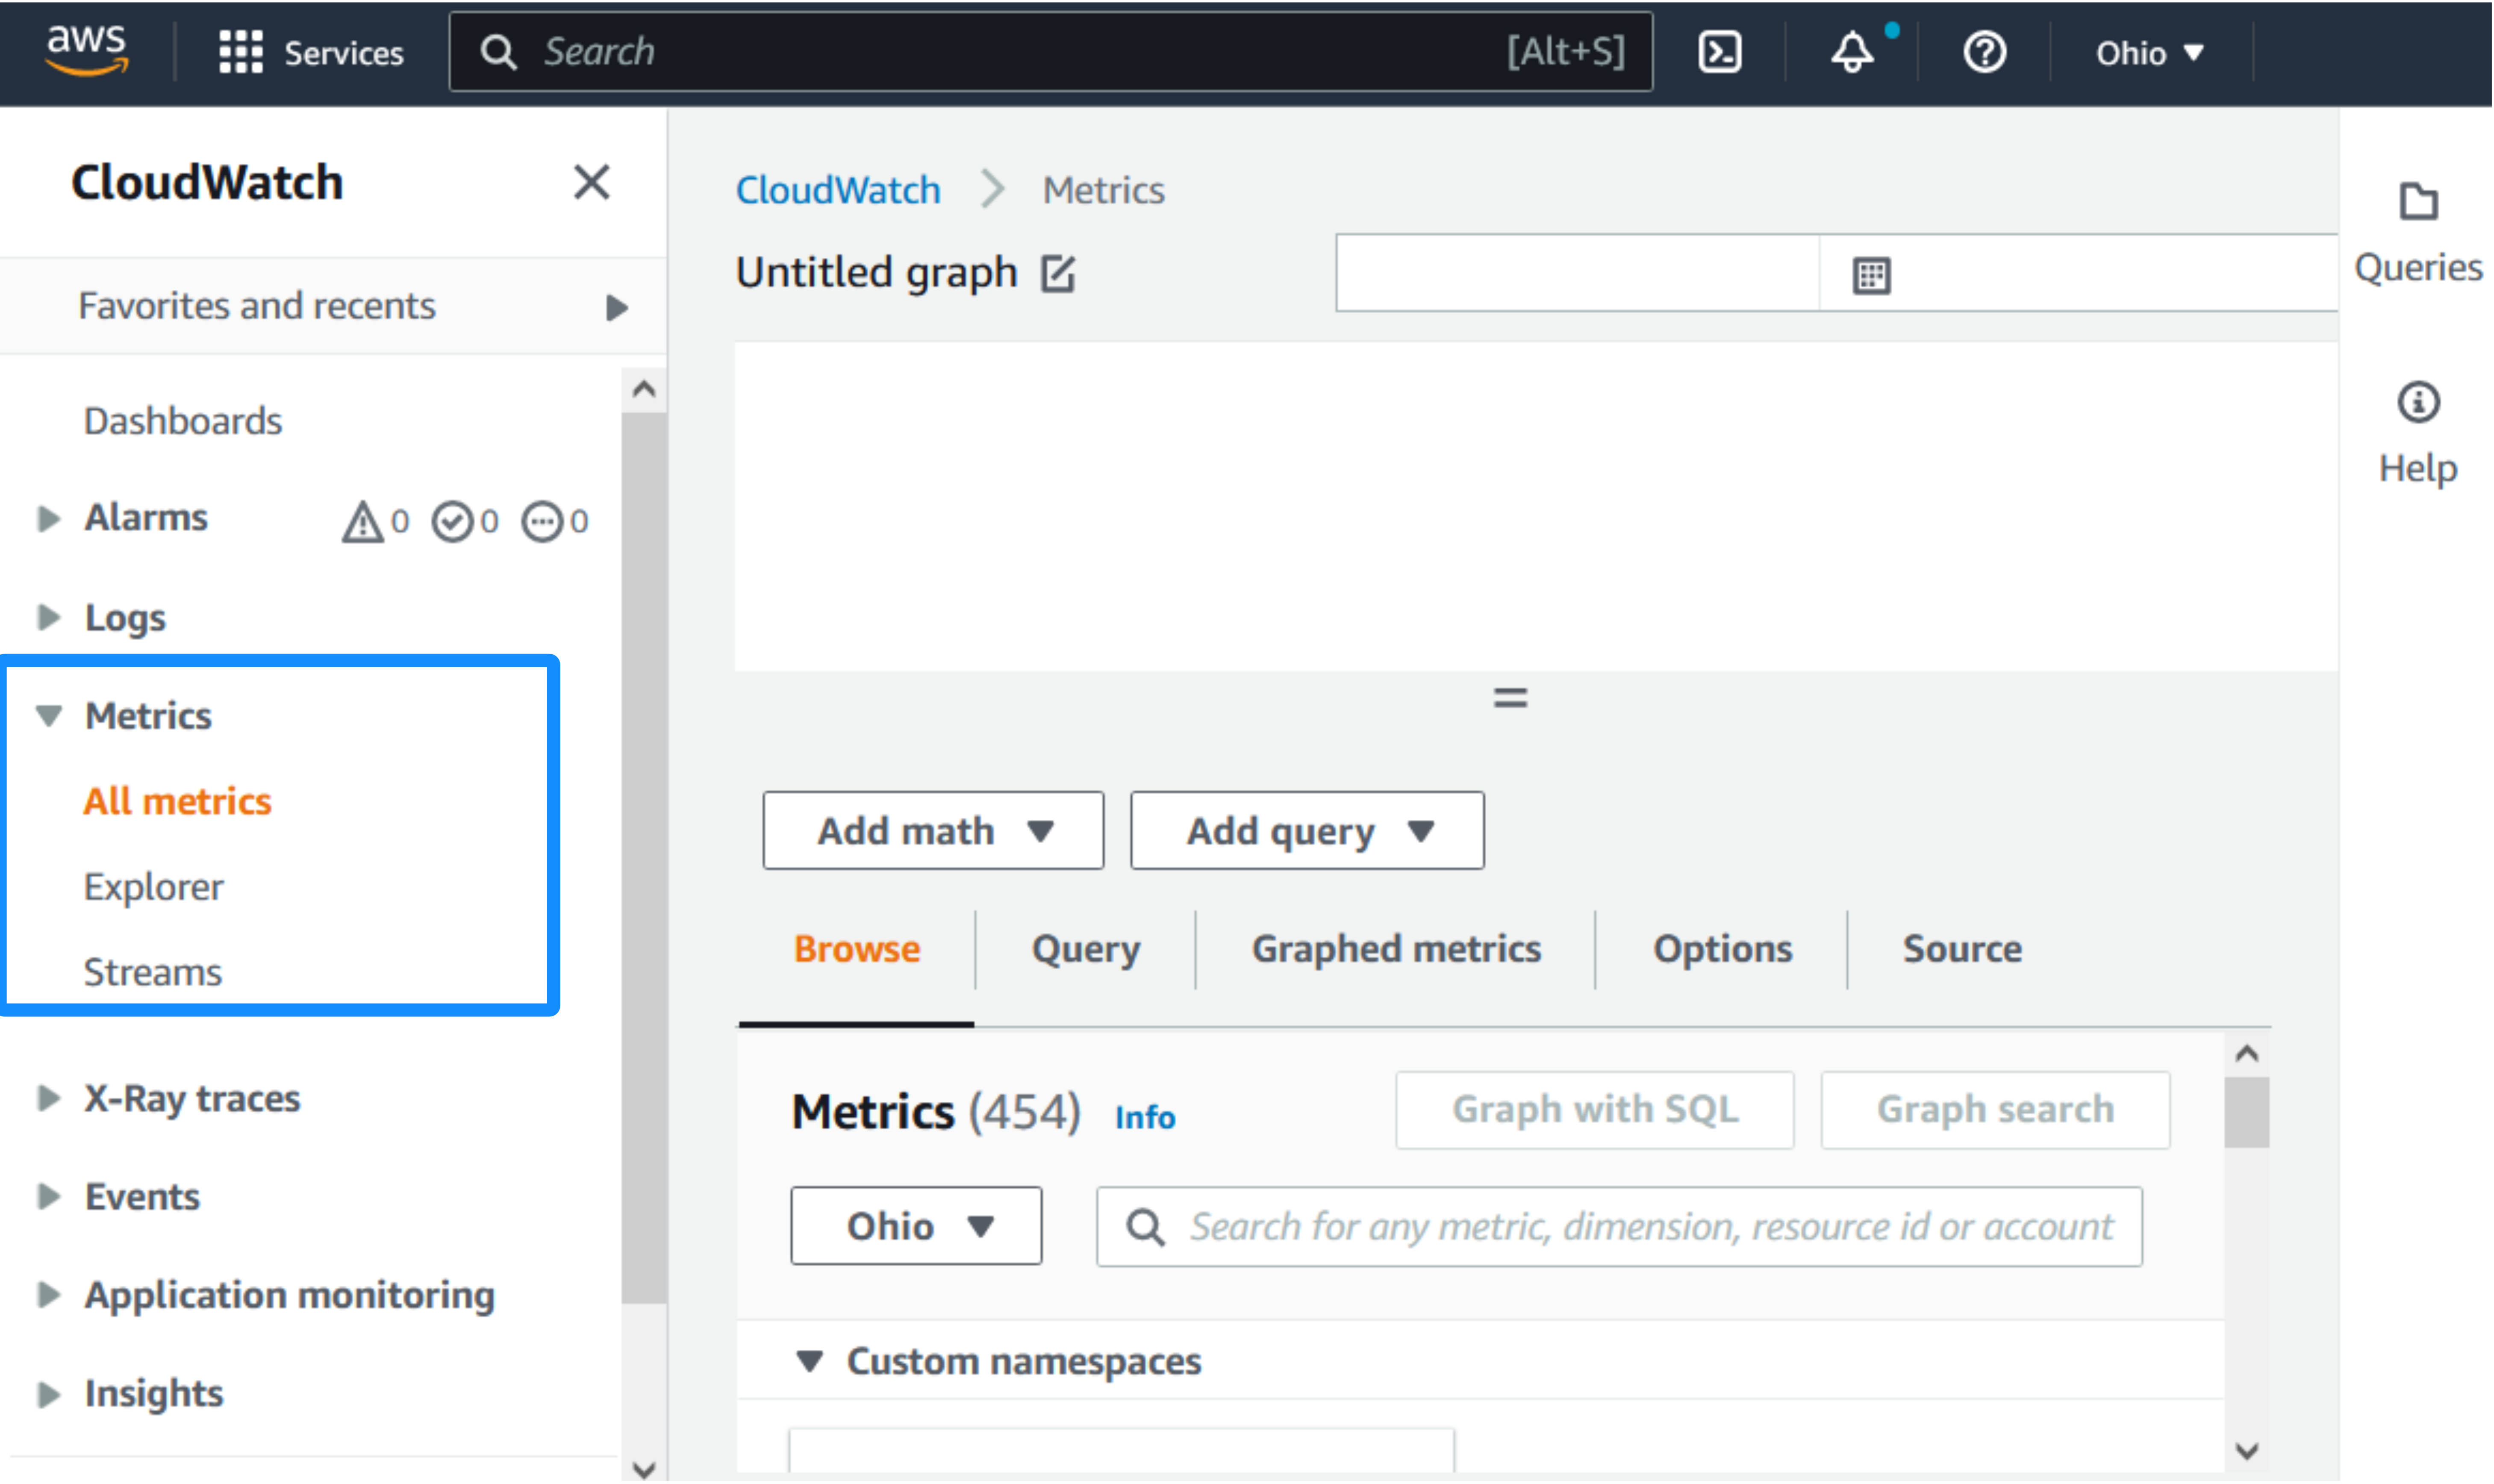
Then go to Metrics > All metrics.
-
In the Metrics Browse panel, select the search field, and enter the metrics you want to observe, for example,
microserviceBooksNumber.latest. Click Enter to search: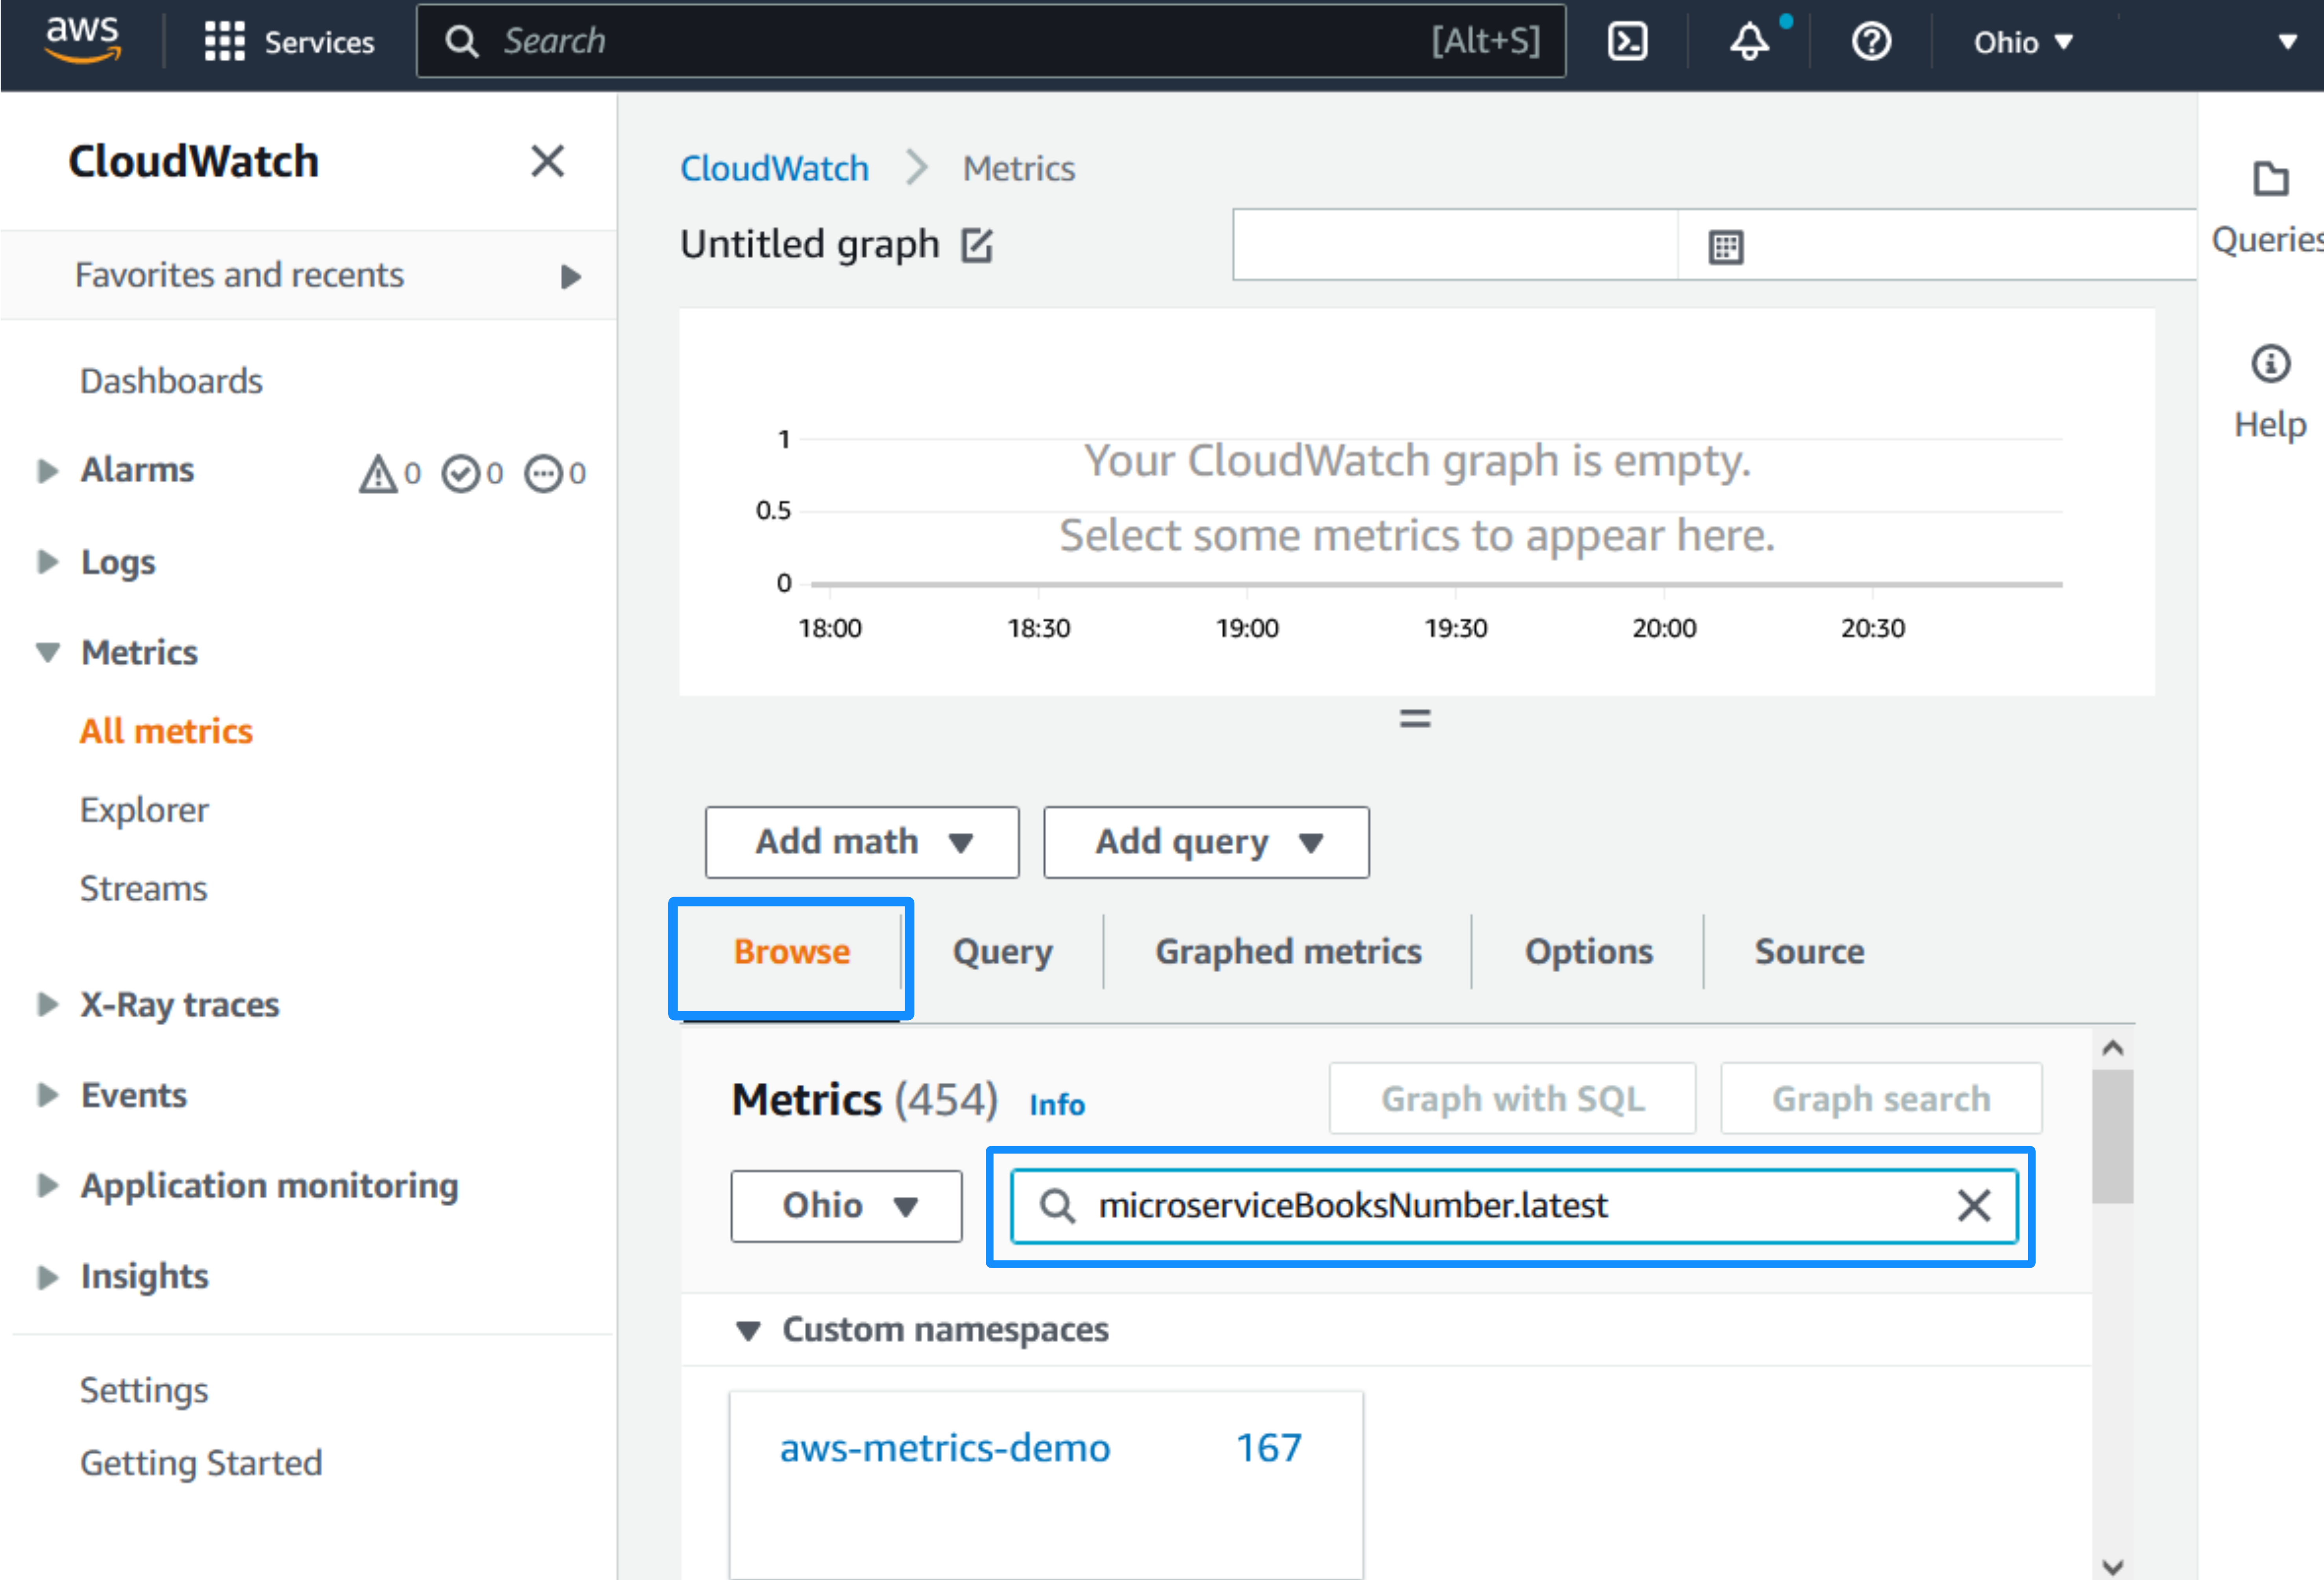
-
Select the namespace and dimensions: aws-metrics-demo > Metrics with no dimensions.
-
Select the
microserviceBooksNumber.latest.valuemetric with a check box. Observe the changes of the value over time on the graph: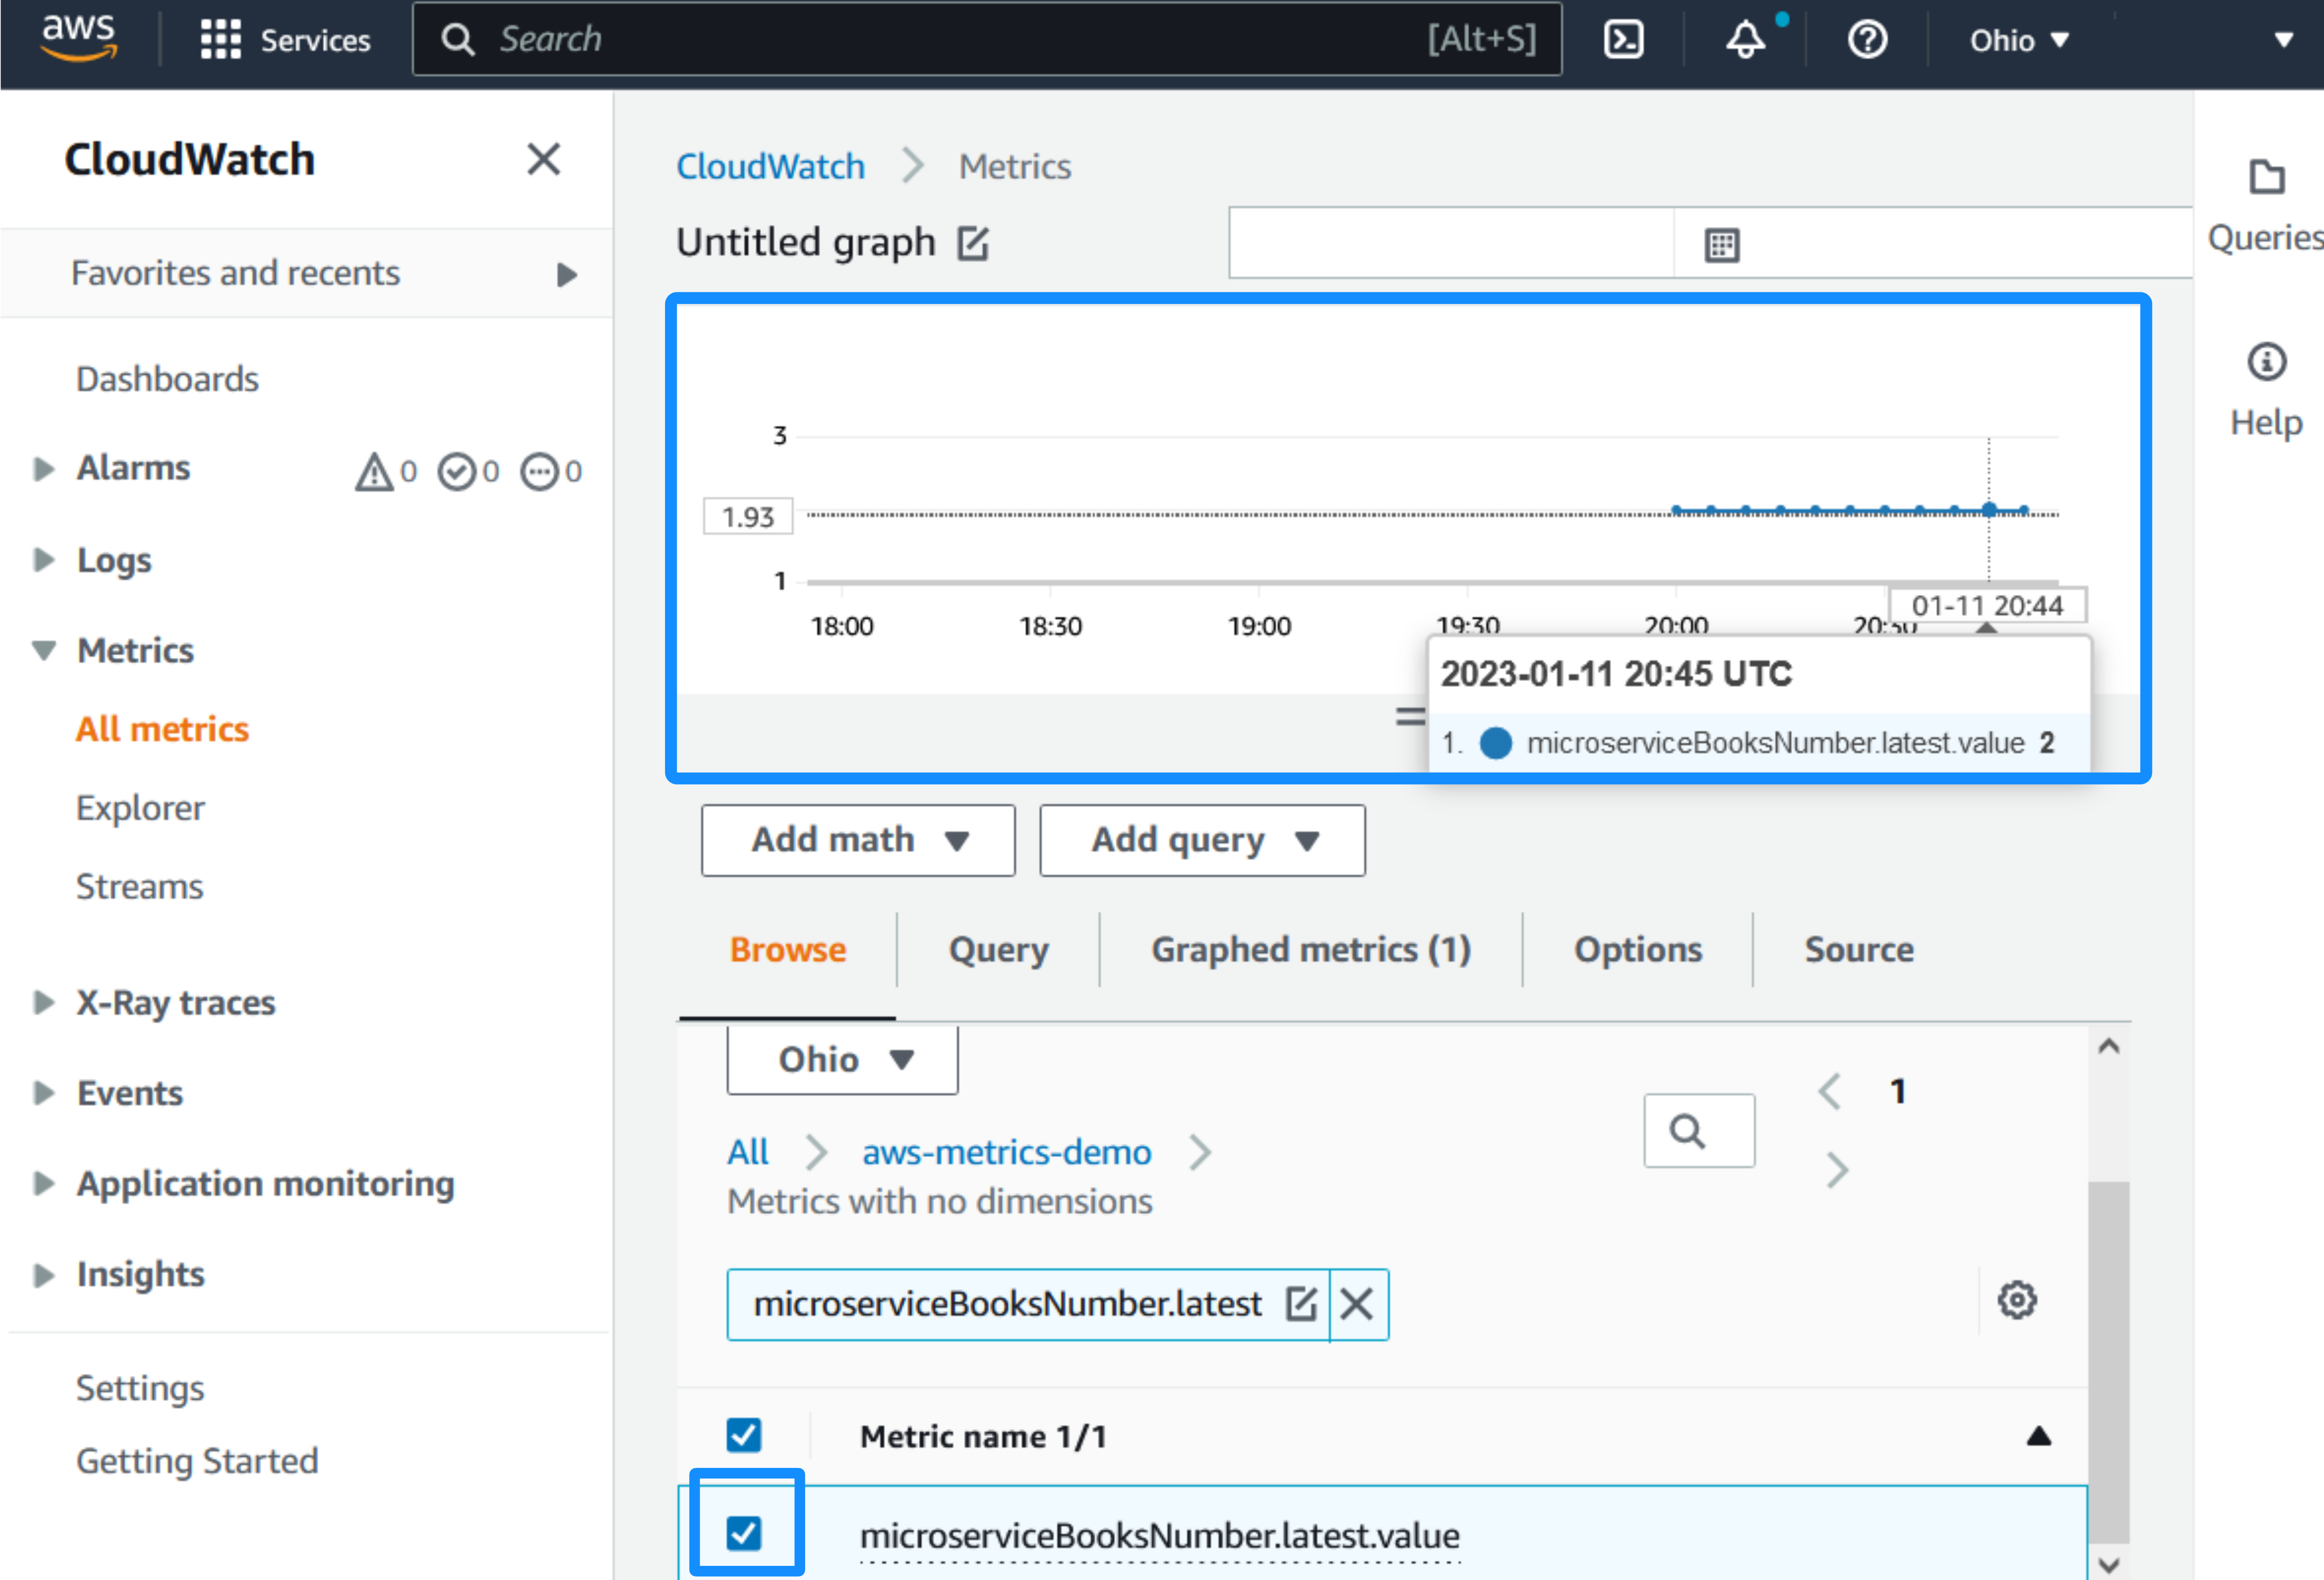
9. Generate a Native Executable Using GraalVM
The GDK supports compiling Java applications ahead-of-time into native executables using GraalVM Native Image. You can use the Gradle plugin for GraalVM Native Image building/Maven plugin for GraalVM Native Image building. Packaged as a native executable, it significantly reduces application startup time and memory footprint.
Prerequisites: Make sure you have installed a GraalVM JDK. The easiest way to get started is with SDKMAN!. For other installation options, visit the Downloads section.
To generate a native executable, use the following command:
You can customize the name of the resulting binary by updating the Maven/Gradle plugin for GraalVM Native Image configuration.
9.1. Run the Native Executable
Set the environment variables:
To start the native executable, run a Docker container with a MySQL database:
docker run -it --rm \
    --name "mysql.8" \
    -p 3306:3306 \
    -e MYSQL_DATABASE=gdk \
    -e MYSQL_USER=guide_user \
    -e MYSQL_PASSWORD=User123User! \
    -e MYSQL_ALLOW_EMPTY_PASSWORD=true \
    mysql:8
Run the native executable with the following command:
Note: With Gradle you can run
./gradlew :aws:nativeRunto start the native executable in development mode, which uses Micronaut Test Resources and therefore doesn’t require you to start a MySQL server.
Run the same curl commands from above to confirm that the application works the same way as before, but with faster startup and response times.
Then return to Amazon CloudWatch console) to review the metrics.
To stop your container run the following command:
docker stop mysql.8Summary
This guide demonstrated how to create a Micronaut application that collects standard and custom metrics, then publishes and monitors them on Amazon CloudWatch Metrics. The application uses Micronaut Micrometer to expose application metric data with Micrometer.