Create and Connect a Micronaut Application to Azure Blob Storage
This guide describes how to use the Graal Development Kit for Micronaut (GDK) to create a Micronaut® application that demonstrates how to store, retrieve, and delete user profile pictures in Azure Blob Storage using Micronaut Object Storage
The Micronaut Object Storage API provides a uniform API to create, read, and delete objects in the major cloud providers:
-
Oracle Cloud Infrastructure Object Storage
-
Amazon S3
-
Google Cloud Storage
-
Azure Blob Storage
Using this API enables the creation of truly multicloud, portable applications.
Prerequisites
-
JDK 25 or higher. See Setting up Your Desktop.
-
An Azure account. See Setting up Your Cloud Accounts.
-
The Azure CLI. Follow the Azure documentation for installing or updating the latest version of the Azure CLI.
-
An Azure user with enough permissions to create and manage Azure storage containers.
-
The GDK CLI. See Setting up Your Desktop. (Optional.)
Follow the steps below to create the application from scratch. However, you can also download the completed example:
The application ZIP file will be downloaded in your default downloads directory. Unzip it and proceed to the next steps.
A note regarding your development environment
Use the editor or IDE of your choice together with the GDK Launcher or GDK CLI to create, build, and test your application locally.
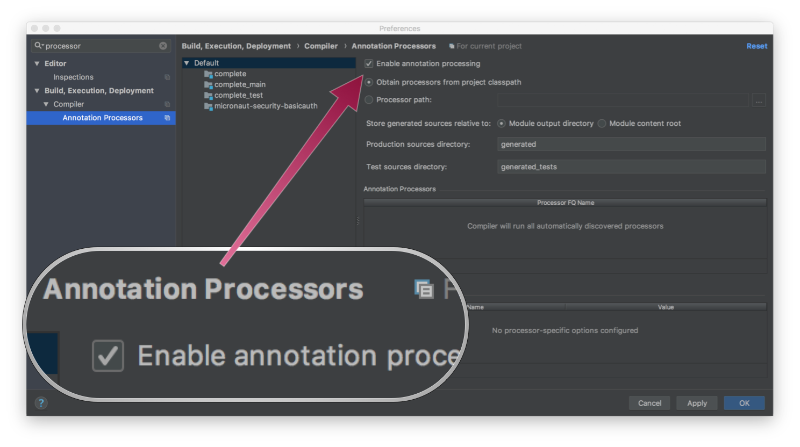
Note: If you use IntelliJ IDEA, enable annotation processing.
Windows platform: The GDK guides are compatible with Gradle only. Maven support is coming soon.
1. Create the Application
Create an application using the GDK Launcher.
-
Open the GDK Launcher in advanced mode.
- Create a new project using the following selections.
- Project Type: Application (Default)
- Project Name: azure-storage-demo
- Base Package: com.example (Default)
- Clouds: Azure
- Build Tool: Gradle (Groovy) or Maven
- Language: Java (Default)
- Test Framework: JUnit (Default)
- Java Version: 25 (Default)
- Micronaut Version: (Default)
- Cloud Services: Object Storage
- Features: GraalVM Native Image (Default)
- Sample Code: Yes (Default)
- Click Generate Project, then click Download Zip. The GDK Launcher creates an application with the package
com.examplein a directory named azure-storage-demo. The application ZIP file will be downloaded to your default downloads directory. Unzip it, open it in your code editor, and proceed to the next steps.
Alternatively, use the GDK CLI as follows:
Open the micronaut-cli.yml file, you can see what features are packaged with the application:
features: [app-name, gdk-azure-cloud-app, gdk-azure-objectstore, gdk-bom, gdk-license, graalvm, http-client, java, java-application, junit, logback, maven, maven-enforcer-plugin, micronaut-configuration-validation-gradle-plugin, micronaut-http-validation, micronaut-processing-compiler-args, native-image-properties, netty-server, object-storage-azure, properties, readme, serialization-jackson, shade, static-resources]The GDK Launcher creates a multi-module project with two subprojects: azure for Microsoft Azure, and lib for common code and configuration shared across cloud platforms. You develop the application logic in the lib subproject, and keep the Microsoft Azure-specific configurations in the azure subproject.
2. ProfilePicturesController
The GDK Launcher created an interface with the endpoints of the "profile pictures" microservice in a file named lib/src/main/java/com/example/ProfilePicturesApi.java:
package com.example;

import io.micronaut.http.HttpRequest;
import io.micronaut.http.HttpResponse;
import io.micronaut.http.annotation.Delete;
import io.micronaut.http.annotation.Get;
import io.micronaut.http.annotation.Post;
import io.micronaut.http.annotation.Status;
import io.micronaut.http.multipart.CompletedFileUpload;
import io.micronaut.http.server.types.files.StreamedFile;

import java.util.Optional;

import static io.micronaut.http.HttpStatus.NO_CONTENT;
import static io.micronaut.http.MediaType.MULTIPART_FORM_DATA;

public interface ProfilePicturesApi {

    @Post(uri = "/{userId}", consumes = MULTIPART_FORM_DATA) (1)
    HttpResponse<?> upload(CompletedFileUpload fileUpload, String userId, HttpRequest<?> request);

    @Get("/{userId}") (2)
    Optional<HttpResponse<StreamedFile>> download(String userId);

    @Status(NO_CONTENT) (3)
    @Delete("/{userId}") (4)
    void delete(String userId);
}
1 The @Post annotation maps the method to an HTTP POST request.
2 The @Get annotation maps the method to an HTTP GET request.
3 You can return void in your controller’s method and specify the HTTP status code via the @Status annotation.
4 The @Delete annotation maps the delete method to an HTTP Delete request on /{userId}.
The GDK Launcher also created the ProfilePicturesController class that implements the ProfilePicturesApi interface in a file named lib/src/main/java/com/example/ProfilePicturesController.java. It contains the class definition and constructor:
package com.example;

import io.micronaut.http.HttpRequest;
import io.micronaut.http.HttpResponse;
import io.micronaut.http.MutableHttpResponse;
import io.micronaut.http.annotation.Controller;
import io.micronaut.http.multipart.CompletedFileUpload;
import io.micronaut.http.server.types.files.StreamedFile;
import io.micronaut.http.server.util.HttpHostResolver;
import io.micronaut.http.uri.UriBuilder;
import io.micronaut.objectstorage.ObjectStorageEntry;
import io.micronaut.objectstorage.ObjectStorageOperations;
import io.micronaut.objectstorage.request.UploadRequest;
import io.micronaut.objectstorage.response.UploadResponse;
import io.micronaut.scheduling.TaskExecutors;
import io.micronaut.scheduling.annotation.ExecuteOn;

import java.net.URI;
import java.util.Optional;

import static io.micronaut.http.HttpHeaders.ETAG;
import static io.micronaut.http.MediaType.IMAGE_JPEG_TYPE;

@Controller(ProfilePicturesController.PREFIX) (1)
@ExecuteOn(TaskExecutors.IO) (2)
class ProfilePicturesController implements ProfilePicturesApi {

    static final String PREFIX = "/pictures";

    private final ObjectStorageOperations<?, ?, ?> objectStorage; (3)
    private final HttpHostResolver httpHostResolver; (4)

    ProfilePicturesController(ObjectStorageOperations<?, ?, ?> objectStorage,
                              HttpHostResolver httpHostResolver) {
        this.objectStorage = objectStorage;
        this.httpHostResolver = httpHostResolver;
    }
1 The class is defined as a controller with the @Controller annotation mapped to the path /pictures.
2 It is critical that any blocking I/O operations (such as fetching the data from the database) are offloaded to a separate thread pool that does not block the event loop.
3 ObjectStorageOperations provides a uniform API to create, read and delete objects in the major cloud providers.
4 HttpHostResolver enables you to resolve the host for an HTTP request.
2.1. Upload Endpoint
The GDK Launcher also generated the /upload endpoint which receives the file from the HTTP client via CompletedFileUpload, and the userId path parameter. It uploads the file to {storage} using ObjectStorageOperations, and then returns its ETag in an HTTP response header to the client:
    @Override
    public HttpResponse<?> upload(CompletedFileUpload fileUpload,
                                  String userId,
                                  HttpRequest<?> request) {
        String key = buildKey(userId); (1)
        UploadRequest objectStorageUpload = UploadRequest.fromCompletedFileUpload(fileUpload, key); (2)
        UploadResponse<?> response = objectStorage.upload(objectStorageUpload); (3)

        return HttpResponse
                .created(location(request, userId)) (4)
                .header(ETAG, response.getETag()); (5)
    }

    private static String buildKey(String userId) {
        return userId + ".jpg";
    }

    private URI location(HttpRequest<?> request, String userId) {
        return UriBuilder.of(httpHostResolver.resolve(request))
                .path(PREFIX)
                .path(userId)
                .build();
    }
1 The key represents the path under which the file will be stored.
2 You can use any of the UploadRequest static methods to build an upload request.
3 The upload operation returns an UploadResponse, which wraps the cloud-specific SDK response.
4 Return the absolute URL of the resource in the location header.
5 The response object contains some common properties for all cloud vendors, such as the ETag, that is sent in a header to the client.
2.2. Download Endpoint
The generated /download endpoint simply retrieves the entry from the expected key, and transforms it into a StreamedFile:
    @Override
    public Optional<HttpResponse<StreamedFile>> download(String userId) {
        String key = buildKey(userId);
        return objectStorage.retrieve(key) (1)
                .map(ProfilePicturesController::buildStreamedFile); (2)
    }

    private static HttpResponse<StreamedFile> buildStreamedFile(ObjectStorageEntry<?> entry) {
        StreamedFile file = new StreamedFile(entry.getInputStream(), IMAGE_JPEG_TYPE).attach(entry.getKey());
        MutableHttpResponse<Object> httpResponse = HttpResponse.ok();
        file.process(httpResponse);
        return httpResponse.body(file);
    }
1 The retrieve operation returns a cloud-independent ObjectStorageEntry.
2 Transform the cloud-specific storage entry into an HttpResponse<StreamedFile>.
The HTTP client could have used the ETag from the upload operation and sent it in a If-None-Match header in the download request to implement caching, which then could have been implemented in the download endpoint. But this approach is beyond the scope of this guide.
2.3. Delete Endpoint
For the /delete endpoint, all you have to do is invoke the delete method with the expected key:
    @Override
    public void delete(String userId) {
        String key = buildKey(userId);
        objectStorage.delete(key);
    }
3. Set up Azure Resources
First define the environment variables:
Replace <email> with the email address associated with your account, and <subscription-id> with your Azure Subscription ID.
3.1. Create a Resource Group
We recommend that you create a new resource group for this guide, but you can use an existing resource group instead.
Run the az group create command to create a resource group named gdkguides in the eastus region:
If you prefer using the region geographically closer to you, run az account list-locations to list all available regions.
3.2. Register Microsoft.Storage as a Resource Provider
Run the az provider register command to register Microsoft.Storage as a Resource Provider:
3.3. Create a Storage Account
Run the az storage account create command to create a storage account:
3.4. Create a Storage Container
Run the az storage container create command to create a storage container named gdkcontainer:
Then, configure the container in azure/src/main/resources/application.properties:
micronaut.object-storage.azure.default.container=gdkcontainer
micronaut.object-storage.azure.default.endpoint=https://gdkstorage.blob.core.windows.net/
3.5. Authorize Access to Blob Storage
Authorize access to your storage container by assigning the Storage Blob Data Contributor role to yourself:
Note that it can take a few minutes for the role grant to propagate.
3.6. Configure the Upload Parameters
To upload a file larger than 1MB, configure the file azure/src/main/resources/application.properties as follows:
# 20MB = 20 * 1024 * 1024b = 20971520b
micronaut.server.multipart.max-file-size=20971520
4. Run the Application
To run the application, use the following command, which starts the application on port 8080.
5. Test the Application
Test the application by uploading, downloading, and deleting a user profile picture.
5.1. Upload a Profile Picture
Assuming you have a profile picture in a local file named profile.jpg, you can upload it to your application using the following command:
curl -i -F "fileUpload=@profile.jpg" http://localhost:8080/pictures/user_name5.2. Download a Profile Picture
Use the following command to download a picture:
curl http://localhost:8080/pictures/user_name -O -JThe file will be saved as user_name.jpg because the download endpoint includes a Content-Disposition: attachment header. Open it to check that it is the same image as profile.jpg.
5.3. Delete a Profile Picture
Use the following command to delete a picture:
curl -X DELETE http://localhost:8080/pictures/user_name6. Generate a Native Executable Using GraalVM
The GDK supports compiling Java applications ahead-of-time into native executables using GraalVM Native Image. You can use the Gradle plugin for GraalVM Native Image building/Maven plugin for GraalVM Native Image building. Packaged as a native executable, it significantly reduces application startup time and memory footprint.
Prerequisites: Make sure you have installed a GraalVM JDK. The easiest way to get started is with SDKMAN!. For other installation options, visit the Downloads section.
-
To generate a native executable, use the following command:
-
You can then run the native executable with the following command:
You can customize the name of the resulting binary by updating the Maven/Gradle plugin for GraalVM Native Image configuration.
7. Run and Test the Native Executable
Run the native executable, and then perform the same tests as in step 5.
8. Clean up Cloud Resources
Once you are done with this guide, you can delete the Azure resources created to avoid incurring unnecessary charges.
Delete the resource group and all of its resources with:
or run these commands to delete resources individually:
Summary
This guide demonstrated how to create a Java application to store, retrieve, and delete user profile pictures in Azure Blob Storage.