Secure an Application with Amazon Cognito
In this guide, you will create an application and secure it with an Authorization Server provided by Amazon Cognito. Amazon Cognito provides authentication, authorization, and user management for your web and mobile applications.
Prerequisites
-
JDK 17 or higher. See Setting up Your Desktop.
-
An Amazon Web Services (AWS) account. See Setting up Your Cloud Accounts.
-
The AWS CLI.
-
The GDK CLI. See Setting up Your Desktop. (Optional.)
Follow the steps below to create the application from scratch. However, you can also download the completed example:

The application ZIP file will be downloaded in your default downloads directory. Unzip it and proceed to the next steps.
A note regarding your development environment
Consider using Visual Studio Code, which provides native support for developing applications with the Graal Development Kit for Micronaut Extension Pack.
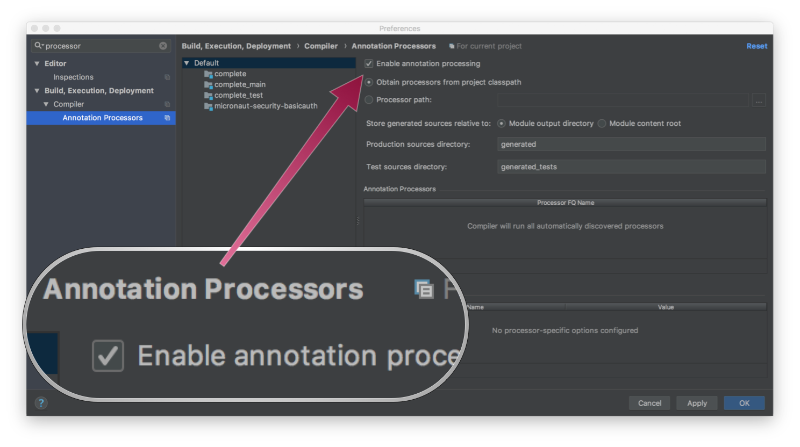
Note: If you use IntelliJ IDEA, enable annotation processing.
Windows platform: The GDK guides are compatible with Gradle only. Maven support is coming soon.
1. Create the Application
Create an application using the GDK Launcher.
-
Open the GDK Launcher in advanced mode.
- Create a new project using the following selections.
- Project Type: Application (Default)
- Project Name: aws-security-demo
- Base Package: com.example (Default)
- Clouds: AWS
- Build Tool: Gradle (Groovy) or Maven
- Language: Java (Default)
- Test Framework: JUnit (Default)
- Java Version: 17 (Default)
- Micronaut Version: (Default)
- Cloud Services: Security
- Features: GraalVM Native Image (Default)
- Sample Code: Yes (Default)
- Click Generate Project, then click Download Zip. The GDK Launcher creates an application with the package
com.examplein a directory named aws-security-demo. The application ZIP file will be downloaded to your default downloads directory. Unzip it, open it in your code editor, and proceed to the next steps.
Alternatively, use the GDK CLI as follows:
Open the micronaut-cli.yml file, you can see what features are packaged with the application:
features: [app-name, gdk-aws-cloud-app, gdk-aws-security, gdk-bom, gdk-license, graalvm, http-client, java, java-application, junit, logback, maven, maven-enforcer-plugin, micronaut-http-validation, native-image-properties, netty-server, properties, readme, security-annotations, security-jwt, security-oauth2, serialization-jackson, shade, static-resources, views-jte]The GDK Launcher creates a multi-module project with two subprojects: aws for Amazon Web Services, and lib for common code and configuration shared across cloud platforms. You develop the application logic in the lib subproject, and keep the Amazon Web Services-specific configurations in the aws subproject.
1.1. AuthController
The GDK Launcher created a class named AuthController to handle requests to /. It displays the email of an authenticated person, if any. The controller endpoint is annotated with a @View annotation that uses a JTE template. The file named aws/src/main/java/com/example/AuthController.java has the following contents:
package com.example;

import io.micronaut.core.annotation.Nullable;
import io.micronaut.http.annotation.Controller;
import io.micronaut.http.annotation.Get;
import io.micronaut.security.annotation.Secured;
import io.micronaut.security.authentication.Authentication;
import io.micronaut.views.View;

import java.util.Collections;
import java.util.HashMap;
import java.util.Map;

import static io.micronaut.security.rules.SecurityRule.IS_ANONYMOUS;
import static io.micronaut.security.rules.SecurityRule.IS_AUTHENTICATED;

@Controller (1)
class AuthController {

    @Secured(IS_ANONYMOUS) (2)
    @View("auth") (3)
    @Get (4)
    Map<String, Object> index(@Nullable Authentication authentication) { (5)
        Map<String, Object> model = new HashMap<>();
        if (authentication != null) {
            model.put("username", authentication.getAttributes().get("email"));
        } else {
            model.put("username", "Anonymous");
        }
        return model;
    }

    @Secured(IS_AUTHENTICATED) (6)
    @Get("/secure") (7)
    Map<String, Object> secured() {
        return Collections.singletonMap("secured", true); (8)
    }
}
1 The class is defined as a controller with the @Controller annotation mapped to the path /.
2 Annotate with @Secured to configure secured access. The SecurityRule.IS_ANONYMOUS expression allows access without authentication.
3 Use the @View annotation to specify which template to use to render the response.
4 The @Get annotation maps the index method to an HTTP GET request on /.
5 Micronaut Security will inject the Authentication instance as a method parameter; by annotating with @Nullable, you can determine whether the user is authenticated or not, and populate the model map accordingly.
6 Annotate with @Secured to configure secured access. The SecurityRule.IS_AUTHENTICATED expression allows access only to authenticated users.
7 The @Get annotation maps the secured method to an HTTP GET request on /secure.
8 This method simply returns a model map that will be rendered as JSON (because there is no @View annotation).
1.2. JTE Template
The GDK Launcher created a JTE template in a file named aws/src/main/jte/auth.jte to render the UI for the controller. It has the following contents:
@param String username
@param java.util.Map<?, ?> security

<!DOCTYPE html>
<html lang="en">
<head>
    <title>GDK - Cognito example</title>
</head>
<body>
<h1>GDK - Cognito example</h1>

<h2>username: <span>${username}</span></h2>

<nav>
    <ul>
    @if(security == null)
        <li><a href="/oauth/login/cognito">Enter</a></li>
    @else
        <li><a href="/logout">Logout</a></li>
    @endif
    </ul>
</nav>
</body>
</html>
2. Access Amazon Web Services
2.1. Create an Administrator IAM User
Use an IAM administrative user instead of using your AWS root account.
Instead of using your AWS root account, use an administrator account. If you do not have one already, see Setting up Your Cloud Accounts.
2.2. Create an OAuth 2.0 Pool and Client
Note: You can view the created user pool in the AWS Console by opening the Amazon Cognito Service and navigating to User Pools. Open the "Micronaut Guides" user pool and click the App Integration tab to inspect that an app domain and an app client were created. The client will have the Authorization code grant OAuth Flow and email and openid OAuth Scopes.
2.3. Configure OAuth 2.0 in the Application
The initial security configuration was generated in the file named aws/src/main/resources/application.properties:
micronaut.application.name=aws
(1)
micronaut.security.authentication=idtoken
(2)
micronaut.security.endpoints.logout.get-allowed=true
(3) (4)
micronaut.security.oauth2.clients.cognito.client-id=${OAUTH_CLIENT_ID\:xxx}
(3) (5)
micronaut.security.oauth2.clients.cognito.client-secret=${OAUTH_CLIENT_SECRET\:yyy}
(6)
micronaut.security.oauth2.clients.cognito.openid.issuer=https\://cognito-idp.${COGNITO_REGION\:zzz}.amazonaws.com/${COGNITO_POOL_ID\:www}
micronaut.security.token.jwt.signatures.secret.generator.secret=${JWT_GENERATOR_SIGNATURE_SECRET\:pleaseChangeThisSecretForANewOne}
1 Set micronaut.security.authentication as idtoken. The idtoken provided by Cognito when the OAuth 2.0 Authorization code flow ends will be saved in a cookie. The id token is a signed JSON Web Token (JWT). For every request, the Micronaut framework extracts the JWT from the Cookie and validates the JWT signature with the remote JSON Web Key Set (JWKS) exposed by Cognito. JWKS is exposed by the jws-uri entry of Cognito .well-known/openid-configuration.
2 Accept GET request to the /logout endpoint.
3 The provider identifier must match the last part of the URL you entered as a redirect URL: /oauth/callback/cognito.
4 Client ID. See previous screenshot.
5 Client Secret. See previous screenshot.
6 The issuer URL. It allows the Micronaut framework to discover the configuration of the OpenID Connect server. Note: use the pool id and region mentioned previously.
The application configuration uses certain placeholders filled by environment variables. If you did not use AWS CLI or started a new terminal session, set up the OAUTH_CLIENT_ID, OAUTH_CLIENT_SECRET, COGNITO_REGION and COGNITO_POOL_ID environment variables.
Although undocumented in the Amazon Cognito User Pools Auth API Reference, Cognito provides an openid-configuration endpoint which the Micronaut framework internally uses to configure your application. The endpoint is available at https://cognito-idp.${COGNITO_REGION}.amazonaws.com/${COGNITO_POOL_ID}/.well-known/openid-configuration.
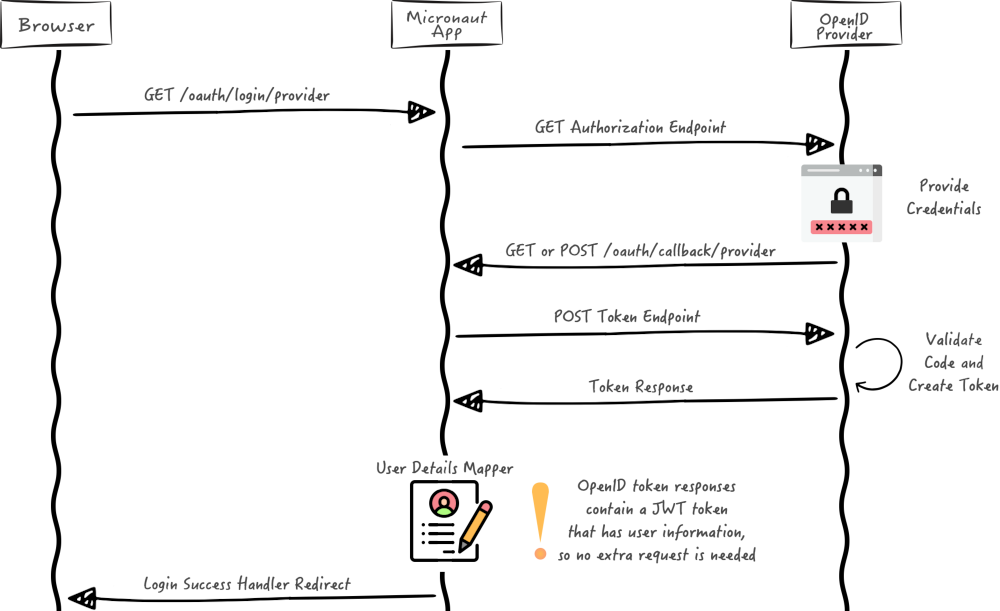
You will use an Authorization Code grant type flow which it is described in the following diagram:
3. Run the Application
To run the application, use the following command, which starts the application on port 8080.
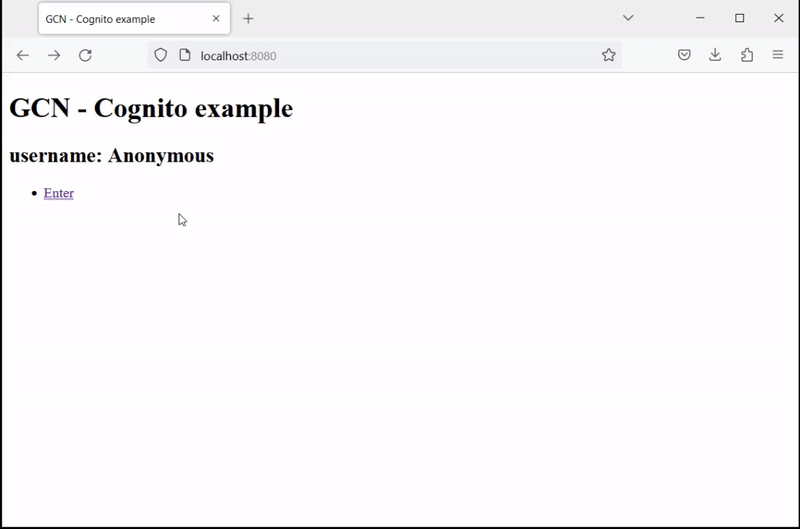
Open http://localhost:8080/ in a browser and click Enter. Then enter your sign-in information or click Sign Up to create a new account with your email:
4. Generate a Native Executable Using GraalVM
The GDK supports compiling Java applications ahead-of-time into native executables using GraalVM Native Image. You can use the Gradle plugin for GraalVM Native Image building/Maven plugin for GraalVM Native Image building. Packaged as a native executable, it significantly reduces application startup time and memory footprint.
Prerequisites: Make sure you have installed a GraalVM JDK. The easiest way to get started is with SDKMAN!. For other installation options, visit the Downloads section.
-
To generate a native executable, use the following command:
-
You can then run the native executable with the following command:
You can customize the name of the resulting binary by updating the Maven/Gradle plugin for GraalVM Native Image configuration.
Run the native executable, then navigate to http://localhost:8080[localhost:8080] and authenticate with Cognito.
5. Cleanup Cloud Resources
Once you are done with this guide, you can stop and delete the AWS resources created to avoid incurring unnecessary charges.
Summary
This guide demonstrated how to use the GDK to create an OAuth 2.0 application and secure it with an Authorization Server provided by Amazon Cognito. Then you packaged that application into a native executable with GraalVM Native Image for faster startup and lower memory footprint.