Create and Deploy a Micronaut Gateway Function as an Azure HTTP Function
This guide describes how to use the Graal Development Kit for Micronaut (GDK) to create a Micronaut® Gateway Function and deploy it using Azure Functions. The application is compiled into a native executable using GraalVM Native Image and then built into a container image.
A Micronaut Gateway Function acts as a serverless cloud (HTTP) API gateway function.
Azure Functions is a serverless solution that allows you to build robust apps while using less code, and with less infrastructure and lower costs.
The guide consists of the following steps:
-
Use the GDK Launcher to create a Micronaut Gateway Function
-
Create the code to implement the gateway function
-
Deploy the gateway function as a container image to a Container Registry in Azure
-
Create and deploy an Azure Function based on the container image of the gateway function
Prerequisites
-
JDK 17 or higher. See Setting up Your Desktop.
-
An Azure account. See Setting up Your Cloud Accounts.
-
The Azure CLI. Follow the Azure documentation for installing or updating the latest version of the Azure CLI.
-
An Azure user with sufficient permissions to create and manage Azure Functions and Azure Container Registry (ACR).
-
The Azure Functions Core Tools. Follow the Azure documentation to install the Azure Functions Core Tools.
-
A Docker-API compatible container runtime such as Rancher Desktop or Docker installed and running.
-
The GDK CLI. See Setting up Your Desktop. (Optional.)
Follow the steps below to create the application from scratch. However, you can also download the completed example:

The application ZIP file will be downloaded in your default downloads directory. Unzip it and proceed to the next steps.
A note regarding your development environment
Consider using Visual Studio Code, which provides native support for developing applications with the Graal Development Kit for Micronaut Extension Pack.
Note: If you use IntelliJ IDEA, enable annotation processing.
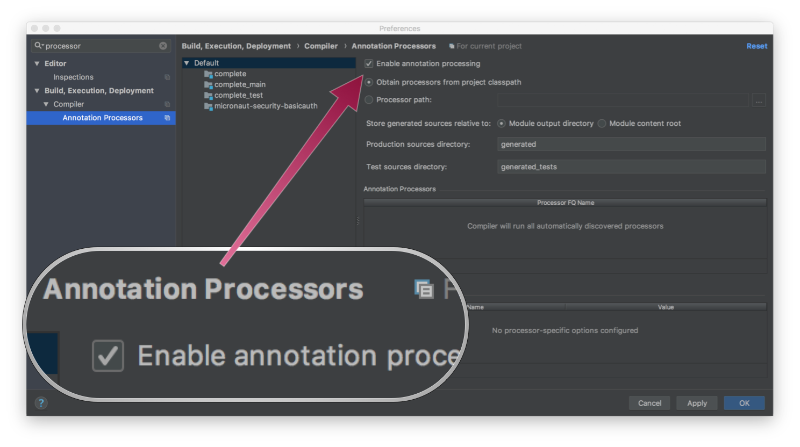
Windows platform: The GDK guides are compatible with Gradle only. Maven support is coming soon.
1. Create the Gateway Function
This section describes how to create a Micronaut gateway function for a simple online store. The store provides information about available items and enables the user to order items. An HTTP controller is responsible for the API implementation and a service stores the availability of items.
Create an application using the GDK Launcher.
-
Open the GDK Launcher in advanced mode.
- Create a new project using the following selections.
- Project Type: Gateway Function
- Project Name: azure-serverless-demo
- Base Package: com.example (Default)
- Clouds: Azure
- Build Tool: Gradle (Groovy) or Maven
- Language: Java (Default)
- Test Framework: JUnit (Default)
- Java Version: 17 (Default)
- Micronaut Version: (Default)
- Cloud Services:
- Features: GraalVM Native Image, Micronaut Validation
- Sample Code: No
- Click Generate Project, then click Download Zip. The GDK Launcher creates an application with the package
com.examplein a directory named azure-serverless-demo. The application ZIP file will be downloaded to your default downloads directory. Unzip it, open it in your code editor, and proceed to the next steps.
Alternatively, use the GDK CLI as follows:
Open the micronaut-cli.yml file, you can see what features are packaged with the application:
features: [app-name, azure-function, azure-function-http, gdk-azure-cloud-gateway-function, gdk-bom, gdk-license, graalvm, http-client, java, java-application, junit, logback, maven, maven-enforcer-plugin, micronaut-http-validation, micronaut-processing-compiler-args, native-image-properties, properties, readme, serialization-jackson, static-resources, validation]The GDK Launcher creates a multi-module project with two subprojects: azure for Microsoft Azure, and lib for common code and configuration shared across cloud platforms. You develop the application logic in the lib subproject, and keep the Microsoft Azure-specific configurations in the azure subproject.
1.1. StoreItem
Create a StoreItem model to represent an item in the store in the file lib/src/main/java/com/example/StoreItem.java with the following contents:
package com.example;

import io.micronaut.core.annotation.Introspected;
import io.micronaut.core.annotation.NonNull;

import io.micronaut.serde.annotation.Serdeable;
import jakarta.validation.constraints.Min;
import jakarta.validation.constraints.NotBlank;

@Serdeable
@Introspected (1)
public class StoreItem {

    @NotBlank
    @NonNull
    private final String name;

    private final String description;

    @Min(0)
    private int numberInStorage;

    public StoreItem(String name, String description, int numberInStorage) { (2)
        this.name = name;
        this.description = description;
        this.numberInStorage = numberInStorage;
    }

    public String getName() {
        return name;
    }

    public String getDescription() {
        return description;
    }

    public Integer getNumberInStorage() {
        return numberInStorage;
    }

    public void setNumberInStorage(Integer numberInStorage) {
        this.numberInStorage = numberInStorage;
    }
}
1 The @Introspected annotation enables Micronaut to serialize and deserialize the model from different formats including JSON. This provides the ability to use the type inside HTTP requests or responses.
2 The model has fields to store the item’s name, description, and number available.
1.2. StoreController
Create an HTTP controller in the file lib/src/main/java/com/example/StoreController.java, as follows:
package com.example;

import io.micronaut.http.HttpResponse;
import io.micronaut.http.annotation.Controller;
import io.micronaut.http.annotation.Get;
import io.micronaut.http.annotation.PathVariable;
import io.micronaut.http.annotation.Post;
import io.micronaut.http.exceptions.HttpStatusException;

import jakarta.validation.constraints.Min;
import jakarta.validation.constraints.NotBlank;
import jakarta.validation.constraints.NotNull;
import java.util.Collection;
import java.util.stream.Collectors;

import static io.micronaut.http.HttpStatus.BAD_REQUEST;
import static io.micronaut.http.HttpStatus.NOT_FOUND;

@Controller("/store") (1)
class StoreController {

    private final StorageService storageService;

    StoreController(StorageService storageService) {
        this.storageService = storageService;
    } (2)

    @Get("/all") (3)
    Collection<StoreItem> listAllItems() {
        return storageService.getItems();
    }

    @Get("/available") (4)
    Collection<StoreItem> listAvailableItems() {
        return storageService.getItems().stream()
                .filter(i -> i.getNumberInStorage() > 0)
                .collect(Collectors.toList());
    }

    @Post(uri = "/order/{name}/{amount}", consumes = "*/*") (5)
    HttpResponse<StoreItem> orderItem(@NotBlank @PathVariable String name, @Min(1) int amount) {
        if (storageService.findItem(name).isEmpty()) {
            throw new HttpStatusException(NOT_FOUND, "Item '" + name + "' not found");
        }
        try {
            storageService.orderItem(name, amount);
        } catch (StorageService.StorageException e) {
            throw new HttpStatusException(BAD_REQUEST, "Could not order item '" + name + "'. " + e.getMessage());
        }
        return HttpResponse.ok(storageService.findItem(name).orElse(null));
    }
}
1 The class is defined as a controller with the @Controller annotation mapped to the path /store.
2 Use Micronaut argument injection to inject a StorageService bean by defining it as the constructor argument. You will create the StorageService in next section.
3 The @Get annotation maps the listAllItems method to an HTTP GET request on /store/all.
4 The @Get annotation maps the listAvailableItems method to an HTTP GET request on /store/available.
5 The @Post annotation maps the orderItem method to an HTTP POST request on /store/order/{name}/{amount}. Use the consumes argument to specify which content-types are allowed in the request. Throwing HttpStatusException will set the corresponding HTTP status in the response.
1.3. StorageService
-
Create an interface for a service that represents the store’s inventory in lib/src/main/java/com/example/StorageService.java:
package com.example;

import io.micronaut.core.annotation.NonNull;

import jakarta.validation.constraints.Min;
import jakarta.validation.constraints.NotBlank;
import java.util.Collection;
import java.util.Optional;

public interface StorageService { (1)
    Collection<StoreItem> getItems();
    Optional<StoreItem> findItem(@NonNull @NotBlank String name);
    void orderItem(@NonNull @NotBlank String name, @Min(1) int amount);

    class StorageException extends RuntimeException { (2)
        StorageException(String message) {
            super(message);
        }
    }
}
1 The storage service provides information about all the items, finds an items by its name, and can place an order for an item.
2 The class includes a custom exception that thrown in case of invalid requests to
-
Create an implementation of the service interface in lib/src/main/java/com/example/DefaultStorageService.java:
package com.example;

import io.micronaut.context.annotation.Requires;
import io.micronaut.core.annotation.NonNull;
import jakarta.inject.Singleton;

import java.util.ArrayList;
import java.util.Collection;
import java.util.List;
import java.util.Optional;

@Singleton (1)
@Requires(missingBeans = StorageService.class) (2)
class DefaultStorageService implements StorageService {

    protected List<StoreItem> items = List.of( (3)
        new StoreItem("chair", "A black chair with 4 legs", 10),
        new StoreItem("table", "A quality dining table", 6),
        new StoreItem("sofa", "A grey sofa", 2),
        new StoreItem("bookshelf", "A futuristic-looking bookshelf", 0)
    );

    @Override
    public Collection<StoreItem> getItems() {
        return items;
    }

    @Override
    public Optional<StoreItem> findItem(@NonNull String name) {
        return items.stream().filter(item -> item.getName().equals(name)).findFirst();
    }

    @Override
    public void orderItem(@NonNull String name, int amount) {
        findItem(name).ifPresentOrElse(item -> {
            if (item.getNumberInStorage() >= amount) {
                item.setNumberInStorage(item.getNumberInStorage() - amount);
            } else {
                throw new StorageException("Insufficient amount in storage");
            }
        }, () -> { throw new StorageException("Item not found in storage"); });
    }
}
1 Use
jakarta.inject.Singletonto designate a class as a singleton.2 The
@Requires(missingBeans = StorageService.class)annotation specifies that this implementation should only be used if no other implementations could be found.3 The implementation stores the items in a
Listand populates some sample items in the list.
If you wish to implement a more advanced StorageService to be used instead of this one, annotate your implementation with @Singleton as shown above. Use the @Requires(env = "azure") annotation to make it specific to Microsoft Azure. Visit the Database Module for details about how to store and manipulate data in a database.
1.4. Tests to Verify Gateway Function Logic
Create a test class for the controller in azure/src/test/java/com/example/StoreControllerTest.java, as follows:
package com.example;

import io.micronaut.context.annotation.Property;
import io.micronaut.context.annotation.Requires;
import io.micronaut.http.HttpResponse;
import io.micronaut.http.annotation.Get;
import io.micronaut.http.annotation.Post;
import io.micronaut.http.client.annotation.Client;
import io.micronaut.http.client.exceptions.HttpClientResponseException;
import io.micronaut.test.extensions.junit5.annotation.MicronautTest;
import jakarta.inject.Inject;
import jakarta.inject.Singleton;
import org.junit.jupiter.api.Test;

import java.util.ArrayList;
import java.util.List;

import static io.micronaut.http.HttpStatus.BAD_REQUEST;
import static io.micronaut.http.HttpStatus.NOT_FOUND;
import static io.micronaut.http.HttpStatus.OK;
import static org.junit.jupiter.api.Assertions.assertEquals;
import static org.junit.jupiter.api.Assertions.assertNotNull;
import static org.junit.jupiter.api.Assertions.assertThrows;

@MicronautTest
@Property(name = "use-test-storage-service", value = "true") (1)
class StoreControllerTest {

    @Inject
    StoreClient client;

    @Test
    void testAvailableItems() {
        List<StoreItem> availableItems = client.getAvailable();

        assertEquals(2, availableItems.size());
        assertEquals("pot", availableItems.get(1).getName());
        assertEquals(10, availableItems.get(1).getNumberInStorage());
        assertNotNull(availableItems.get(1).getDescription());
    }

    @Test
    void testNotFoundException() {
        HttpResponse<?> response = client.order("lamp", 1);

        assertEquals(NOT_FOUND, response.getStatus());
    }

    @Test
    void testNotSufficientException() {
        HttpClientResponseException e = assertThrows(HttpClientResponseException.class, () -> {
            client.order("pot", 100);
        });

        assertEquals(BAD_REQUEST, e.getStatus());
    }

    @Test
    void testOrderRequest() {
        StoreItem plate = client.getAll().stream()
            .filter(i -> i.getName().equals("plate"))
            .findFirst().orElse(null);
        assertNotNull(plate);
        assertEquals(100, plate.getNumberInStorage());

        HttpResponse<StoreItem> response = client.order("plate", 10);
        assertEquals(OK, response.getStatus());
        assertNotNull(response.body());
        assertEquals("plate", response.body().getName());
        assertEquals(90, response.body().getNumberInStorage());
    }

    @Singleton
    @Requires(property = "use-test-storage-service", value = "true") (2)
    static class TestStorageService extends DefaultStorageService {
        TestStorageService() {
            items = List.of(
                new StoreItem("plate", "A large plate", 100),
                new StoreItem("pot", "A cooking pot", 10),
                new StoreItem("pan", "A large pan", 0)
            );
        }
    }

    @Client("/store") (3)
    interface StoreClient {
        @Get("/all") (4)
        List<StoreItem> getAll();

        @Get("/available") (4)
        List<StoreItem> getAvailable();

        @Post("/order/{name}/{amount}") (4)
        HttpResponse<StoreItem> order(String name, Integer amount);
    }
}
1 Annotate the class with @MicronautTest so the Micronaut framework will initialize the application context. This enables you to inject beans using the Jakarta @Inject annotation and to send requests to the StoreController defined in the application. Configure this test to use an identified environment using the @MicronautTest(environments="test-storage-service") annotation.
2 Create a mock implementation of StorageService so that the test is independent of the current state of the storage. The @Requires(env="test-storage-service") annotation specifies that the bean should only be available in the identified environment. (In this case it matches the one identified in the @MicronautTest annotation.)
3 Create a Micronaut Declarative Client with the same /store path to send requests to the controller.
4 Create three tests using the defined client and assuming that TestStorageService is used.
2. Run the Tests
Run the tests:
Then open the file azure/build/reports/tests/test/index.html in a browser to view the results.
Although you created this gateway function to run on Azure Functions runtime, the tests should run successfully on your local machine.
Furthermore, Micronaut has a test implementation that simulates the Azure Functions environment. Since sequential requests to a function may be processed by different instances, Micronaut creates a separate environment for each request in a test.
3. Run the Application
To run the application, use the following command, which starts the application on port 7071.
Test the application by accessing its REST endpoints.
-
Use
curlto retrieve all the items:curl http://localhost:7071/store/all[ { "name": "chair", "description": "A black chair with 4 legs", "numberInStorage": 10 }, { "name": "table", "description": "A quality dining table", "numberInStorage": 6 }, { "name": "sofa", "description": "A grey sofa", "numberInStorage": 2 }, { "name": "bookshelf", "description": "A futuristic-looking bookshelf", "numberInStorage": 0 } ] -
Get an error when attempting to order too many items:
curl -X POST http://localhost:7071/store/order/table/10{"message": "Bad Request", "_embedded": { "errors": [{ "message": "Could not order item 'table'. Insufficient amount in storage" }] }, ... } -
Order an item and print the response status code:
curl -X POST -w "\nStatus code: %{http_code}" http://localhost:7071/store/order/table/6{ "name":"table", "description":"A quality dining table", "numberInStorage":0 } Status code: 200 -
Get the available items:
curl http://localhost:7071/store/available[ { "name": "chair", "description": "A black chair with 4 legs", "numberInStorage": 10 }, { "name": "sofa", "description": "A grey sofa", "numberInStorage": 2 } ]
4. Set up Azure Resources
First define the environment variables:
1 Set location Ex. eastus
2 Set resource group name Ex. gdkguides
3 Set storage name Ex. gdkstorage
4 Set function name Ex. gdkfunction
4.1. Create a Resource Group
We recommend that you create a new resource group for this guide, but you can use an existing resource group instead.
Run the az group create command to create a resource group named gdkguides in the eastus region:
4.2. Register Microsoft.ContainerRegistry as a Resource Provider
Run the az provider register command to register Microsoft.ContainerRegistry as a Resource Provider:
This will take a while to execute. Check the status:
Once the "registrationState": "Registering" changes to "registrationState": "Registered", the registration is complete.
4.3. Register Microsoft.Storage as a Resource Provider
Run the az provider register command to register Microsoft.Storage as a Resource Provider:
This will take a while to execute. Check the status:
Once the "registrationState": "Registering" changes to "registrationState": "Registered", the registration is complete.
4.4. Register Microsoft.Web as a Resource Provider
Run the az provider register command to register Microsoft.Web as a Resource Provider:
This will take a while to execute. Check the status:
Once the "registrationState": "Registering" changes to "registrationState": "Registered", the registration is complete.
4.5. Create a Storage Account
Run the az storage account create command to create a storage account:
4.6. Create an Azure Function
Run the az functionapp create command to create an Azure function:
The underlying App Service plan might take a few minutes to get created. Run az functionapp plan show to check if it’s created:
If it returns an error or empty result, wait a minute and try again. Once it shows the plan information, you can proceed.
5. Deploy the Application to Azure Functions
Follow these steps to publish the function on Azure Functions
If you visit https://[FUNCTION_NAME].azurewebsites.net you will get an HTML page informing you that the function is up and running.
6. Test the Azure Function
Now the application is deployed to Azure, you can test it by sending requests.
-
Use
curlto retrieve all the items:curl https://$FUNCTION_NAME.azurewebsites.net/store/all[ { "name": "chair", "description": "A black chair with 4 legs", "numberInStorage": 10 }, { "name": "table", "description": "A quality dining table", "numberInStorage": 6 }, { "name": "sofa", "description": "A grey sofa", "numberInStorage": 2 }, { "name": "bookshelf", "description": "A futuristic-looking bookshelf", "numberInStorage": 0 } ] -
Get an error when attempting to order too many items:
curl -X POST https://$FUNCTION_NAME.azurewebsites.net/store/order/table/10{"message": "Bad Request", "_embedded": { "errors": [{ "message": "Could not order item 'table'. Insufficient amount in storage" }] }, ... } -
Order an item and print the response status code:
curl -X POST -w "\nStatus code: %{http_code}" https://$FUNCTION_NAME.azurewebsites.net/store/order/table/6{ "name":"table", "description":"A quality dining table", "numberInStorage":0 } Status code: 200 -
Get the available items:
curl https://$FUNCTION_NAME.azurewebsites.net/store/available[ { "name": "chair", "description": "A black chair with 4 legs", "numberInStorage": 10 }, { "name": "sofa", "description": "A grey sofa", "numberInStorage": 2 } ]
7. Create and Publish a Native Executable to Azure Functions
Note: Azure Functions (and Azure Container Apps/Registry) currently support only Linux-based x86-64 (linux/amd64) container images. You cannot deploy an ARM-based container image.
Set the following environment variables:
1 Set docker image name Ex. gdkAzureFunction
2 Set repo name Ex. gdkrepo
3 Set native function name Ex. gdkfunction-native
4 Set app service name Ex. gdkAppServicePlan
7.1. Configure the Application
7.2. Create a App Service Plan
Run the az functionapp plan create command to create an App Service Plan:
7.3. Create an Azure Container Registry
Run the az acr create command to create an Azure Container Registry:
7.4. Authenticate to Your Azure Container Registry
Run the az acr login command to authenticate to your Azure Container Registry:
az acr login --name $REPO_NAMEAlternately, login using docker login.
Run az acr login with the --expose-token flag to generate an access token, and save it in the TOKEN environment variable:
7.5. Create and Publish Container Image
To create and publish a container image containing a native executable to Azure Container Registry run the following command:
Push the image to the container registry:
docker push $REPO_NAME.azurecr.io/gdk-function:latest7.6. Create an Azure Function
Run az acr credential show to get the login credentials for the container registry
export ACR_CREDENTIALS=$(az acr credential show --name $REPO_NAME)

export ACR_USERNAME=$(echo "$ACR_CREDENTIALS" | jq -r '.username')
export ACR_PASSWORD=$(echo "$ACR_CREDENTIALS" | jq -r '.passwords[0].value')
Run the az functionapp create command to create an Azure function:
az functionapp create \
   --name $FUNCTION_NAME_NATIVE \
   --resource-group $RESOURCE_GROUP_NAME \
   --storage-account $STORAGE_NAME \
   --os-type linux \
   --plan $APP_SERVICE_PLAN \
   --image $REPO_NAME.azurecr.io/gdk-function:latest \
   --registry-server $REPO_NAME.azurecr.io \
   --registry-username $ACR_USERNAME \
   --registry-password $ACR_PASSWORD \
   --functions-version 4 \
   --disable-app-insights
8. Test the Azure Function
Now test the function running from the native image container by sending it some requests.
-
Use
curlto retrieve all the items:curl https://$FUNCTION_NAME_NATIVE.azurewebsites.net/store/all[ { "name": "chair", "description": "A black chair with 4 legs", "numberInStorage": 10 }, { "name": "table", "description": "A quality dining table", "numberInStorage": 6 }, { "name": "sofa", "description": "A grey sofa", "numberInStorage": 2 }, { "name": "bookshelf", "description": "A futuristic-looking bookshelf", "numberInStorage": 0 } ] -
Get an error when attempting to order too many items:
curl -X POST https://$FUNCTION_NAME_NATIVE.azurewebsites.net/store/order/table/10{"message": "Bad Request", "_embedded": { "errors": [{ "message": "Could not order item 'table'. Insufficient amount in storage" }] }, ... } -
Order an item and print the response status code:
curl -X POST -w "\nStatus code: %{http_code}" https://$FUNCTION_NAME_NATIVE.azurewebsites.net/store/order/table/6{ "name":"table", "description":"A quality dining table", "numberInStorage":0 } Status code: 200 -
Get the available items:
curl https://$FUNCTION_NAME_NATIVE.azurewebsites.net/store/available[ { "name": "chair", "description": "A black chair with 4 legs", "numberInStorage": 10 }, { "name": "sofa", "description": "A grey sofa", "numberInStorage": 2 } ]
9. Clean up Cloud Resources
Once you are done with this guide, you can delete the Azure resources created to avoid incurring unnecessary charges.
Delete the resource group and all of its resources with:
Alternatively, run these commands to delete resources individually:
Summary
This guide demonstrated how to create a Micronaut Gateway Function, run it on Azure Functions. The guide also demonstrated how to create a native executable from the Gateway Function and deploy it in place of the original Java-based version.