Using the Graal Cloud Native and OCI DevOps Tools Extensions in VS Code
The Graal Cloud Native and OCI DevOps Tools extensions make it easy to work with Graal Cloud Native projects and the OCI DevOps service from within Visual Studio (VS) Code. These extensions are available on the VS Code Marketplace. You can install both extensions through the Graal Cloud Native Extension Pack by following this guide. Learn below what features they provide.
Prerequisites #
- GraalVM Extension Pack for Java (VS Code installs this extension for you.)
- Kubernetes Microsoft extension (VS Code installs this extension for you.)
- Microsoft Extension Pack for Java Microsoft extension.
Graal Cloud Native Project Generation Wizard #
The Graal Cloud Native extension provides the Graal Cloud Native (GCN) project creation wizard. The wizard enables you to create different types of applications including serverless applications and gateway functions.
-
Open the Command Palette and search for “Graal Cloud Native”. Run the Graal Cloud Native: Create New Project quick action.
- Follow the command prompts to create a new Maven or Gradle project. Configure your project from the following options:
- Micronaut version
- Application type
- Java runtime
- Project name
- Base package
- Programming language
- Cloud Services
- Build tool
- Test framework
- Cloud platform
- Select the destination directory on your local disk.
- Select whether to open the project in a new window or add it to the current workspace.
- The project is created and opened in the VS Code window.
You can also use the Graal Cloud Native CLI to create a project. For more information, see Using the Graal Cloud Native CLI.
OCI DevOps Tools in VS Code #
The OCI DevOps Tools extension enables easy integration with the OCI DevOps service. The DevOps service can host your source code in Oracle Cloud Infrastructure and build, then deploy your projects in hosted CI/CD pipelines.
The extension creates a project in the OCI DevOps service, sets up a source code repository, as well as build and deployment pipelines, enabling you to easily transition between local and cloud-based development and deployment.
If you are working with a Graal Cloud Native (or Spring Boot) project, the extension sets up build pipelines to build containers for your Java-based application and native executable. The extension also creates deployment pipelines that will deploy these containers to an OKE cluster.
If you have a standard Maven or Gradle project, you can use this extension to build your JAR files in the cloud, on the OCI DevOps service, but deployment pipelines are not created. Find more information about what resources are created here.
To get started you will need:
- JDK 17 or higher
- An Oracle Cloud Infrastructure account. Create an account at signup.oraclecloud.com
- A configured .oci/config file to access OCI services
- An API Key
- The OCI CLI
- An OKE cluster. OKE is Oracle’s managed Kubernetes service.
With a Graal Cloud Native or a Spring Boot project, you can now create an OCI DevOps project.
Creating a DevOps Project #
-
Open the OCI DEVOPS panel in VS Code Explorer and click Create OCI DevOps Project.

-
You will be guided through the process of creating an OCI DevOps project:
- If you are using multiple OCI profiles, you first need to select the OCI profile that you wish to use.
- Select a target compartment in OCI. Your DevOps project will be created there.
- Confirm the DevOps project name. This must be unique to the tenancy.
- Depending on your setup, you might be asked to:
- Confirm the SSH keys for Git operations and add the OCI DevOps Git server to your SSH config and known_hosts files.
- Select an existing OKE cluster on OCI, or create a new one using the OKE Quick Create action.
-
When the new OKE cluster is created, configure local access to your OKE Kubernetes cluster using the
VNC-Native Public Endpoint. This is achieved with the OCI CLI and you may have already completed this in the prerequisite steps.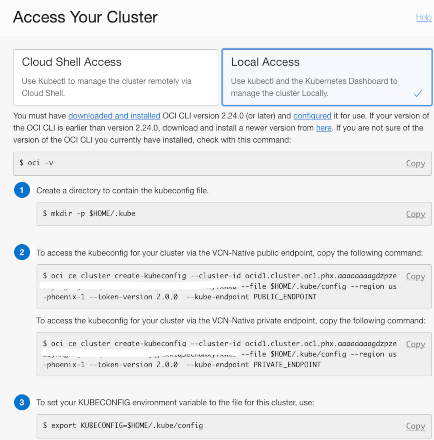
Alternatively, see the Setting Up Local Access to Clusters OCI guide for more information.
Once you create a DevOps project, the following build targets become available from within VS Code:
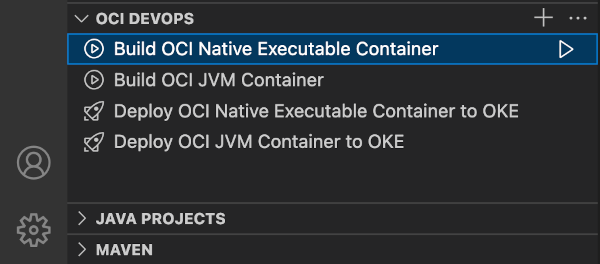
You can invoke these build targets, which will run in the cloud, in the OCI DevOps service, and not locally, by clicking the triangle run icon.
Default Pipelines Setup #
- Build OCI Native Executable Container: Packages the application as a native executable in a container image.
- Build OCI JVM Container: Packages the application as a JVM-based container image.
Once built, the container images can be pulled by clicking the cloud icon, which runs the command to pull the containers locally.
The build specification files for each pipeline are stored in the .devops/ directory. If you update the build specification file, commit and push the change to the DevOps-hosted repository: the build pipelines will be updated to reflect this change. Note that the build pipelines run on custom-sized build runners to ensure there is sufficient memory to build all native executables using GraalVM Native Image. These can be customized within the Oracle Cloud Console.
OCI Kubernetes Deployment with OKE #
When the build pipeline succeeds, the container image can be deployed to OKE using the Deploy OCI Native Executable Container to OKE
deployment pipeline. When complete, test the application in a browser by selecting the action Open in Browser for the Deploy pipeline. This will set up port forwarding using your local kubectl.
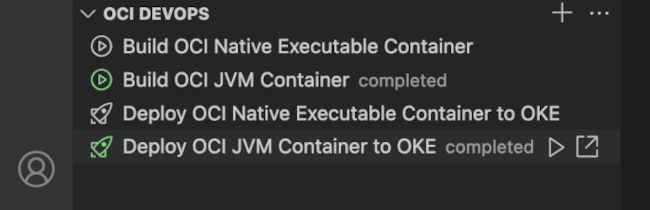
It will perform kubectl port forwarding from OKE to the localhost.
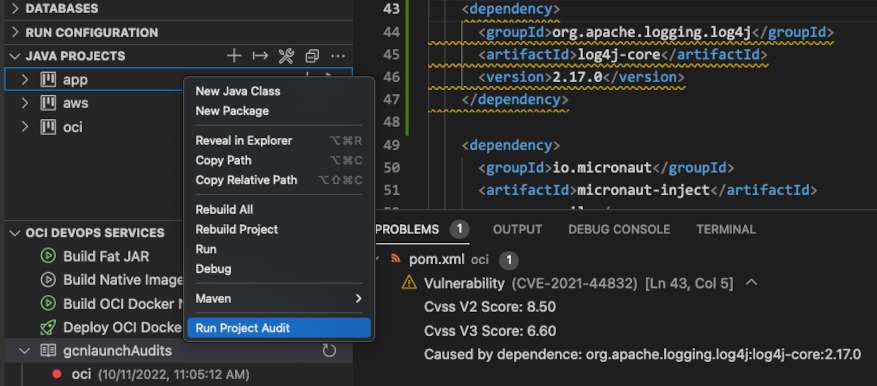
Project Dependencies Vulnerability Audits #
The extension also audits your project for vulnerabilities in third-party project libraries. The supported project types are Maven and Gradle. Project Audits require an OCI account and use an OCI Application Dependency Management (ADM) Knowledge Base which retrieves data from the nvd.nist.gov database.
Select the Run Project Audit action in the Java Projects panel to check for vulnerabilities in an opened project. If a project contains a vulnerable dependency, it is shown in the PROBLEMS view.
When your project is moved into the DevOps service, it is scanned for vulnerabilities by ADM. The results of this audit can be displayed within the OCI DevOps panel by clicking the plus icon and selecting Add Knowledge Base from the services.
Adding More OCI DevOps Services #
The OCI DEVOPS services feature is not limited to the four jobs listed in the previous step. There are many more: You can add an existing build pipeline, a build artifact, a container registry, and so on.

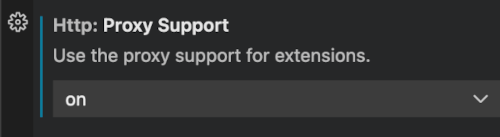
Proxy Setup #
When working behind firewall over a proxy then VS Code Proxy has to be set ON. In VS Code Settings, set Http: Proxy Support to ON. Subsequently, when working without proxy, set this OFF. For more information, check Proxy Setup.
Many tools used to work on Java projects, such as Maven, Gradle, kubectl, and docker (if used), may require proxy configuration.