Create and Connect a Spring Application to Oracle Cloud Infrastructure Object Storage
This guide describes how to create a Spring Boot 3 application (using the Graal Development Kit for Micronaut (GDK)) that demonstrates how to store, retrieve, and delete user profile pictures in Oracle Cloud Infrastructure Object Storage using the Micronaut® Object Storage API.
The Micronaut Object Storage API provides a uniform API to create, read and delete objects in the major cloud providers:
- Amazon S3
- Google Cloud Storage
- Oracle Cloud Infrastructure Object Storage
Using this API enables the creation of truly multicloud, portable applications.
Prerequisites #
- JDK 17 or higher. See Setting up Your Desktop.
- An Oracle Cloud Infrastructure account. See Setting up Your Cloud Accounts.
- The Oracle Cloud Infrastructure CLI installed with local access configured.
- An Oracle Cloud Infrastructure compartment with appropriate permission granted to your Oracle Cloud Infrastructure user account to manage the Object Storage family in the compartment.
Follow the steps below to create the application from scratch. However, you can also download the completed example:

A note regarding your development environment
Consider using Visual Studio Code, which provides native support for developing applications with the Graal Development Kit extension.
Note: If you use IntelliJ IDEA, enable annotation processing.
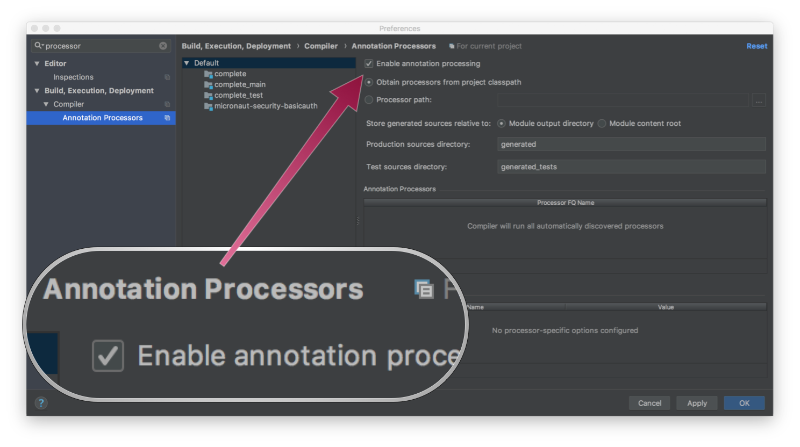
Windows platform: The GDK guides are compatible with Gradle only. Maven support is coming soon.
1. Create the Spring Boot Application #
Generate a Spring Boot application using Spring Initializr with Spring Web.
1.1. Add Dependencies #
Add the following dependencies to your build file as described in Using the Micronaut Spring Boot Starter to use Micronaut Features within a Spring Boot application.
build.gradle
Add the Oracle Public Repository to the repositories block:
maven { url "https://maven.oracle.com/public" }Add the following dependencies:
implementation enforcedPlatform("cloud.graal.gcn:gcn-bom:4.2.1.2")
implementation platform("io.micronaut.platform:micronaut-platform:4.2.1-oracle-00001")
annotationProcessor platform('io.micronaut.platform:micronaut-platform:4.2.1-oracle-00001')
annotationProcessor("io.micronaut:micronaut-inject-java")
implementation("io.micronaut.spring:micronaut-spring-boot-starter")
pom.xml
Add the Micronaut version to the properties element:
<micronaut.version>4.2.1-oracle-00001</micronaut.version>
<micronaut.platform.version>4.2.1-oracle-00001</micronaut.platform.version>
Add the following repositories element:
<repositories>
   <repository>
      <id>gcn</id>
      <url>https://maven.oracle.com/public</url>
   </repository>
   <repository>
      <id>central</id>
      <url>https://repo.maven.apache.org/maven2</url>
   </repository>
</repositories>
Add the following dependencyManagement element:
<dependencyManagement>
    <dependencies>
      <dependency>
        <groupId>org.springframework</groupId>
        <artifactId>spring-framework-bom</artifactId>
        <version>${spring-framework.version}</version>
        <type>pom</type>
        <scope>import</scope>
      </dependency>
      <dependency>
        <groupId>cloud.graal.gcn</groupId>
        <artifactId>gcn-bom</artifactId>
        <version>4.2.1.2</version>
        <type>pom</type>
        <scope>import</scope>
      </dependency>
      <dependency>
        <groupId>io.micronaut.platform</groupId>
        <artifactId>micronaut-platform</artifactId>
        <version>${micronaut.platform.version}</version>
        <type>pom</type>
        <scope>import</scope>
      </dependency>
    </dependencies>
</dependencyManagement>
Add the following plugin to the build/plugins element:
<plugin>
  <groupId>org.apache.maven.plugins</groupId>
  <artifactId>maven-compiler-plugin</artifactId>
  <configuration>
    <annotationProcessorPaths combine.children="append">
      <path>
        <groupId>io.micronaut</groupId>
        <artifactId>micronaut-inject-java</artifactId>
        <version>${micronaut.version}</version>
      </path>
    </annotationProcessorPaths>
    <compilerArgs>
      <arg>-Amicronaut.processing.group=com.example</arg>
      <arg>-Amicronaut.processing.module=gdkguide</arg>
    </compilerArgs>
  </configuration>
</plugin>
Add these dependencies to your dependencies element:
<dependency>
  <groupId>io.micronaut.spring</groupId>
  <artifactId>micronaut-spring-boot-starter</artifactId>
</dependency>
Additionally, add the following dependency to use Micronaut Oracle Cloud Infrastructure Object Storage:
build.gradle
implementation("io.micronaut.objectstorage:micronaut-object-storage-oracle-cloud")
implementation("io.micronaut.oraclecloud:micronaut-oraclecloud-httpclient-netty")
pom.xml
<dependency>
    <groupId>io.micronaut.objectstorage</groupId>
    <artifactId>micronaut-object-storage-oracle-cloud</artifactId>
</dependency>
<dependency>
    <groupId>io.micronaut.oraclecloud</groupId>
    <artifactId>micronaut-oraclecloud-httpclient-netty</artifactId>
</dependency>
1.2. Enable Micronaut #
Add the @EnableMicronaut annotation for Spring Boot to start the Micronaut context. Edit the file named src/main/java/com/example/Application.java as follows:
package com.example;

import io.micronaut.spring.boot.starter.EnableMicronaut;
import org.springframework.boot.SpringApplication;
import org.springframework.boot.autoconfigure.SpringBootApplication;

@SpringBootApplication
@EnableMicronaut
public class Application {
    public static void main(String[] args) {
        SpringApplication.run(Application.class, args);
    }
}
1.3. Create a Service #
Define a service that interacts with Object Storage in a file named src/main/java/com/example/PictureService.java, as follows:
package com.example;

import io.micronaut.objectstorage.ObjectStorageEntry;
import io.micronaut.objectstorage.ObjectStorageException;
import io.micronaut.objectstorage.ObjectStorageOperations;
import io.micronaut.objectstorage.request.UploadRequest;
import org.slf4j.Logger;
import org.slf4j.LoggerFactory;
import org.springframework.stereotype.Service;

import java.io.IOException;
import java.io.InputStream;
import java.util.Optional;

@Service
public class PictureService {

    private static final Logger LOG = LoggerFactory.getLogger(PictureService.class);
    private ObjectStorageOperations<?, ?, ?> pictureBucket;

    public PictureService(ObjectStorageOperations<?,?,?> pictureBucket) { // <1>
        this.pictureBucket = pictureBucket;
    }

    public boolean upload(String name, InputStream inputStream) {
        try {
            pictureBucket.upload(UploadRequest.fromBytes(inputStream.readAllBytes(), name)); // <2> <3>
            return true;
        } catch (IOException | ObjectStorageException ex) {
            LOG.error("Failed to upload picture: " + name, ex);
            return false;
        }
    }

    public Optional<InputStream> download(String name) {
        try {
            return pictureBucket.retrieve(name).map(ObjectStorageEntry::getInputStream); // <4>
        } catch (ObjectStorageException ex) {
            LOG.error("Failed to download picture: " + name, ex);
            return Optional.empty();
        }
    }

    public void delete(String name) {
        pictureBucket.delete(name); // <5>
    }
}
1 Parent interface that enables you to use the API in a generic way for all cloud providers.
2 You can use any of the UploadRequest static methods to build an upload request.
3 The upload operation returns an UploadResponse, which wraps the cloud-specific SDK response object.
4 The retrieve operation returns an ObjectStorageEntry, from which you can get an InputStream. There is also a getNativeEntry() method that gives you access to the cloud vendor-specific response object.
5 The delete operation returns the cloud vendor-specific delete response object in case you need it.
1.4. Create a Controller #
Create a Controller in a file named src/main/java/com/example/PictureController.java:
package com.example;

import org.springframework.http.HttpStatus;
import org.springframework.http.ResponseEntity;
import org.springframework.stereotype.Controller;
import org.springframework.web.bind.annotation.DeleteMapping;
import org.springframework.web.bind.annotation.GetMapping;
import org.springframework.web.bind.annotation.PostMapping;
import org.springframework.web.bind.annotation.RequestParam;
import org.springframework.web.bind.annotation.ResponseBody;
import org.springframework.web.multipart.MultipartFile;

import java.io.IOException;
import java.io.InputStream;
import java.util.List;
import java.util.Optional;

@Controller
public class PictureController {

    private final static List<String> ALLOWED_UPLOAD_EXTENSIONS = List.of("png", "jpg", "jpeg");
    private static final String PICTURE = "picture.png"; // <1>
    private static final String MISSING_PICTURE = "default.png"; // <2>

    private PictureService pictureService;

    public PictureController(PictureService pictureService) {
        this.pictureService = pictureService;
    }

    @GetMapping
    public String index() {
        return "index.html";
    }

    @GetMapping("/download")
    @ResponseBody
    public byte[] download() throws IOException {
        try(InputStream is = pictureService.download(PICTURE).orElse(getResourceAsStream(MISSING_PICTURE))) {
            return is.readAllBytes();
        }
    }

    @PostMapping ("/upload")
    public ResponseEntity<String> upload(@RequestParam("file") MultipartFile file) throws IOException {

        if(file != null) {
            Optional<String> extension = Optional.ofNullable(file.getOriginalFilename())
                    .filter(f -> f.contains("."))
                    .map(f -> f.substring(file.getOriginalFilename().lastIndexOf(".") + 1));

            if(extension.isPresent() && ALLOWED_UPLOAD_EXTENSIONS.contains(extension.get())) {
                if(pictureService.upload(PICTURE, file.getInputStream())) {
                    return new ResponseEntity<>(file.getOriginalFilename() + " was successfully uploaded", HttpStatus.OK);
                }
            }
        }

        return new ResponseEntity<>("Could not upload picture", HttpStatus.BAD_REQUEST);
    }

    @DeleteMapping("/delete")
    @ResponseBody
    public void delete() {
        pictureService.delete(PICTURE);
    }

    private InputStream getResourceAsStream(String resourceName) {
        return getClass().getClassLoader().getResourceAsStream(resourceName);
    }
}
1 Name of the ‘object’ being stored, used for all operations (upload, download and delete).
2 Name of the default picture in src/main/resources. (Not essential for the application to run.)
1.5. Create an HTML Page #
Create a simple HTML page to display the image in a browser. Create a new file named src/main/resources/static/index.html with the following contents:
<!DOCTYPE html>
<html lang="en">
  <head>
    <meta charset="UTF-8">
    <title>Object Storage Example</title>
  </head>
  <body>
    <h1>Spring Boot Example using Object Storage</h1>
    <div>
      <img src="/download">
    </div>
  </body>
</html>
1.6. Write Tests to Verify Application Logic #
Create a test class for the controller in src/test/java/com/example/PictureControllerTest.java, as follows:
package com.example;

import org.junit.jupiter.api.Test;
import org.springframework.beans.factory.annotation.Autowired;
import org.springframework.boot.test.autoconfigure.web.servlet.WebMvcTest;
import org.springframework.boot.test.mock.mockito.MockBean;
import org.springframework.mock.web.MockMultipartFile;
import org.springframework.test.web.servlet.MockMvc;

import java.io.InputStream;
import java.util.Optional;

import static org.mockito.ArgumentMatchers.any;
import static org.mockito.ArgumentMatchers.eq;
import static org.mockito.BDDMockito.given;
import static org.springframework.test.web.servlet.request.MockMvcRequestBuilders.get;
import static org.springframework.test.web.servlet.request.MockMvcRequestBuilders.multipart;
import static org.springframework.test.web.servlet.result.MockMvcResultMatchers.header;
import static org.springframework.test.web.servlet.result.MockMvcResultMatchers.status;

@WebMvcTest(PictureController.class)
class PictureControllerTest {

    @Autowired
    private MockMvc mockMvc;

    @MockBean
    private PictureService service;

    @Test
    void testUpload() throws Exception {

        byte[] bytes = getResource().readAllBytes();

        MockMultipartFile multipartFile = new MockMultipartFile("file", "test.png", null, bytes);

        given(service.upload(eq("picture.png"), any(InputStream.class))).willReturn(true);

        mockMvc.perform(multipart("/upload")
                .file(multipartFile)).andExpect(status().isOk());
    }

    @Test
    void testDownload() throws Exception {

        Optional<InputStream> resource = Optional.of(getResource());
        given(service.download("picture.png")).willReturn(resource);

        mockMvc.perform(get("/download"))
                .andExpect(status().isOk())
                .andExpect(header().longValue("Content-Length", getResource().readAllBytes().length));
    }

    private InputStream getResource() {
        return getClass().getClassLoader().getResourceAsStream("my_picture.png"); // <1>
    }
}
1 If you are not using the downloaded example, add an image file named my_picture.png to the src/main/resources/ directory.
2. Set up Oracle Cloud Infrastructure Resources #
You need to find the OCID of the compartment and then create a bucket.
2.1. Compartment OCID #
Find the OCID of the compartment where you will be deploying. Run this command to list all the compartments in your root compartment:
oci iam compartment list
Find the compartment by the name or description in the JSON output. It should look like this:
{
    "compartment-id": "ocid1.tenancy.oc1..aaaaaaaaud4g4e5ovjaw...",
    "defined-tags": {},
    "description": "GDK Guides",
    "freeform-tags": {},
    "id": "ocid1.compartment.oc1..aaaaaaaarkh3s2wcxbbm...",
    "inactive-status": null,
    "is-accessible": null,
    "lifecycle-state": "ACTIVE",
    "name": "gdk-guides",
    "time-created": "2021-05-02T23:54:28.392000+00:00"
}
In this case, there is a compartment named “gdk-guides”.
Use the OCID from the id property; the compartment-id property is the parent compartment.
For convenience, save the compartment OCID as an environment variable. For Linux or macOS, run the following command:
export C=ocid1.compartment.oc1..aaaaaaaarkh3s2wcxbbm...
or for Windows, if using cmd run this command
set C=ocid1.compartment.oc1..aaaaaaaarkh3s2wcxbbm...
and if using PowerShell run
$C = "ocid1.compartment.oc1..aaaaaaaarkh3s2wcxbbm..."
The examples below use Linux/macOS syntax for environment variables, for example -c $C. If you use Windows cmd, change those to -c %C% (but no change needed if you use PowerShell).
2.2. Create a Bucket #
Use the Oracle Cloud Infrastructure CLI to create the bucket:
export OBJECT_STORAGE_BUCKET=gdk-guide-object-storage
oci os bucket create --compartment-id $C --name $OBJECT_STORAGE_BUCKET
You can also use the CLI to get the Object Storage namespace:
export OBJECT_STORAGE_NAMESPACE=$(oci os ns get --query "data" --raw-output)
Then, configure the bucket name and namespace in src/main/resources/application.properties:
micronaut.object-storage.oracle-cloud.default.bucket=${OBJECT_STORAGE_BUCKET}
micronaut.object-storage.oracle-cloud.default.namespace=${OBJECT_STORAGE_NAMESPACE}
2.3. Configure the Upload Parameters #
If you want to upload a file larger than 1MB, you need to configure this in the src/main/resources/application.properties file as follows:
# 20 * 1024 * 1024 = 20MB
micronaut.server.multipart.max-file-size: 20971520
3. Run the Tests (Optional) #
If you are not using the downloaded example, add an image file named my_picture.png to the src/main/resources/ directory.
Use the following command to run the test.
./gradlew testThen open the file build/reports/tests/test/index.html in a browser to view the results.
./mvnw test4. Run the Application #
To run the application, use the following command, which starts the application on port 8080.
5. Test the Application #
Test the application by uploading, downloading, and deleting a user profile picture.
5.1. Upload a Picture #
If using the complete solution, navigate into the src/main/resources/ directory before running the following command. Otherwise, update the my_picture.png file with an image you want to upload.
curl -i -F "file=@my_picture.png" http://localhost:8080/upload
Use the oci CLI to verify that the file has been uploaded to an Oracle Cloud Infrastructure bucket, as follows
oci os object list --bucket-name gdk-guide-object-storage
5.2. View the Website #
Open a browser to http://localhost:8080 and you should see:
5.3. Download the Picture #
Use the following command to download a picture:
curl http://localhost:8080/download --raw -o image.png
5.4. Delete the Picture #
Use the following command to delete a picture:
curl -X "DELETE" http://localhost:8080/delete
Then, check that the file has actually been deleted using the following command:
oci os object list --bucket-name gdk-guide-object-storage
6. Clean up #
When you have completed the guide, remove the bucket from Oracle Cloud Infrastructure to avoid stale resources. Use the following command to delete the bucket:
oci os bucket delete --bucket-name gdk-guide-object-storage
Summary #
This guide demonstrated how to create a Spring Boot application to store, retrieve, and delete user profile pictures in Oracle Cloud Infrastructure Object Storage.