- 1. Create the Gateway Function
- 2. Run the Tests
- 3. Set Up Oracle Cloud Infrastructure
- 4. Create and Publish a Container Image of the Gateway Function to Container Registry
- 5. Create the Oracle Function from the Container Image
- 6. Create an API Deployment
- 7. Test the Oracle Function
- 8. Publish a Native Executable to Oracle Cloud Infrastructure
- 9. Update the Oracle Cloud Infrastructure Function
- 10. Clean Up Cloud Resources
Create and Deploy a Micronaut Gateway Function to Oracle Cloud Infrastructure
This guide describes how to use the Graal Development Kit for Micronaut (GDK) to create a Micronaut® Gateway Function, deploy it as a container image using Oracle Cloud Infrastructure Functions, and access it via Oracle Cloud Infrastructure API Gateway.
A Micronaut Gateway Function acts as a serverless cloud (HTTP) API gateway function.
Oracle Cloud Infrastructure Functions is a fully managed, multitenant, highly scalable, on-demand, Functions-as-a-Service platform.
The guide consists of the following steps:
-
Use the GDK Launcher to create a Micronaut Gateway Function
-
Create the code to implement the gateway function
-
Deploy the gateway function as a container image to a Container Repository in Oracle Cloud Infrastructure Registry
-
Create and deploy an Oracle Function based on the container image of the gateway function
-
Create and deploy an Oracle Cloud Infrastructure API Gateway to access the Oracle Function
Prerequisites
-
JDK 25 or higher. See Setting up Your Desktop.
-
An Oracle Cloud Infrastructure account. See Setting up Your Cloud Accounts.
-
A Docker-API compatible container runtime such as Rancher Desktop or Docker installed and running.
-
The GDK CLI. See Setting up Your Desktop. (Optional.)
Follow the steps below to create the application from scratch. However, you can also download the completed example:
The application ZIP file will be downloaded in your default downloads directory. Unzip it and proceed to the next steps.
A note regarding your development environment
Use the editor or IDE of your choice together with the GDK Launcher or GDK CLI to create, build, and test your application locally.
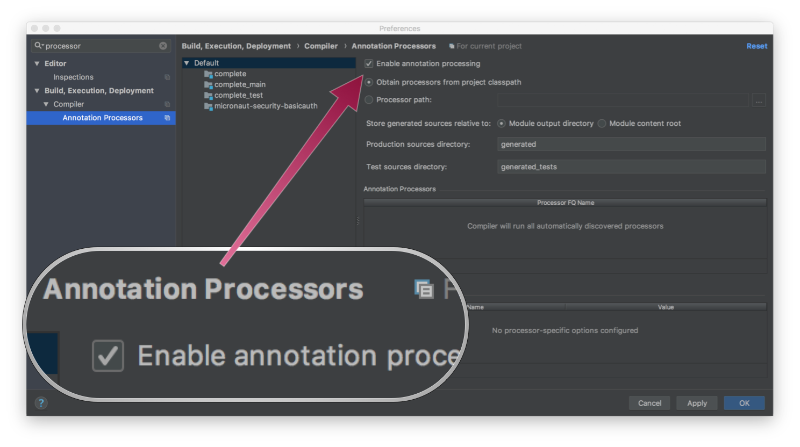
Note: If you use IntelliJ IDEA, enable annotation processing.
Windows platform: The GDK guides are compatible with Gradle only. Maven support is coming soon.
This section describes how to create a Micronaut gateway function for a simple online store. The store provides information about available items and enables the user to order items. An HTTP controller is responsible for the API implementation and a service stores the availability of items.
1. Create the Gateway Function
This section describes how to create a Micronaut gateway function for a simple online store. The store provides information about available items and enables the user to order items. An HTTP controller is responsible for the API implementation and a service stores the availability of items.
Create an application using the GDK Launcher.
-
Open the GDK Launcher in advanced mode.
- Create a new project using the following selections.
- Project Type: Gateway Function
- Project Name: oci-serverless-demo
- Base Package: com.example (Default)
- Clouds: OCI
- Build Tool: Gradle (Groovy) or Maven
- Language: Java (Default)
- Test Framework: JUnit (Default)
- Java Version: 25 (Default)
- Micronaut Version: (Default)
- Cloud Services:
- Features: GraalVM Native Image, Micronaut Validation
- Sample Code: No
- Click Generate Project, then click Download Zip. The GDK Launcher creates an application with the package
com.examplein a directory named oci-serverless-demo. The application ZIP file will be downloaded to your default downloads directory. Unzip it, open it in your code editor, and proceed to the next steps.
Alternatively, use the GDK CLI as follows:
Open the micronaut-cli.yml file, you can see what features are packaged with the application:
features: [app-name, gdk-bom, gdk-license, gdk-oci-cloud-gateway-function, graalvm, http-client, java, java-application, junit, maven, maven-enforcer-plugin, micronaut-configuration-validation-gradle-plugin, micronaut-http-validation, micronaut-processing-compiler-args, native-image-properties, oracle-function, oracle-function-http, properties, readme, serialization-jackson, shade, slf4j-simple, static-resources, validation]The GDK Launcher creates a multi-module project with two subprojects: oci for Oracle Cloud, and lib for common code and configuration shared across cloud platforms. You develop the application logic in the lib subproject, and keep the Oracle Cloud-specific configurations in the oci subproject.
1.1. StoreItem
Create a StoreItem model to represent an item in the store in the file lib/src/main/java/com/example/StoreItem.java with the following contents:
package com.example;

import io.micronaut.core.annotation.Introspected;
import io.micronaut.core.annotation.NonNull;

import io.micronaut.serde.annotation.Serdeable;
import jakarta.validation.constraints.Min;
import jakarta.validation.constraints.NotBlank;

@Serdeable
@Introspected (1)
public class StoreItem {

    @NotBlank
    @NonNull
    private final String name;

    private final String description;

    @Min(0)
    private int numberInStorage;

    public StoreItem(String name, String description, int numberInStorage) { (2)
        this.name = name;
        this.description = description;
        this.numberInStorage = numberInStorage;
    }

    public String getName() {
        return name;
    }

    public String getDescription() {
        return description;
    }

    public Integer getNumberInStorage() {
        return numberInStorage;
    }

    public void setNumberInStorage(Integer numberInStorage) {
        this.numberInStorage = numberInStorage;
    }
}
1 The @Introspected annotation enables Micronaut to serialize and deserialize the model from different formats including JSON. This provides the ability to use the type inside HTTP requests or responses.
2 The model has fields to store the item’s name, description, and number available.
1.2. StoreController
Create an HTTP controller in the file lib/src/main/java/com/example/StoreController.java, as follows:
package com.example;

import io.micronaut.http.HttpResponse;
import io.micronaut.http.annotation.Controller;
import io.micronaut.http.annotation.Get;
import io.micronaut.http.annotation.PathVariable;
import io.micronaut.http.annotation.Post;
import io.micronaut.http.exceptions.HttpStatusException;

import jakarta.validation.constraints.Min;
import jakarta.validation.constraints.NotBlank;
import jakarta.validation.constraints.NotNull;
import java.util.Collection;
import java.util.stream.Collectors;

import static io.micronaut.http.HttpStatus.BAD_REQUEST;
import static io.micronaut.http.HttpStatus.NOT_FOUND;

@Controller("/store") (1)
class StoreController {

    private final StorageService storageService;

    StoreController(StorageService storageService) {
        this.storageService = storageService;
    } (2)

    @Get("/all") (3)
    Collection<StoreItem> listAllItems() {
        return storageService.getItems();
    }

    @Get("/available") (4)
    Collection<StoreItem> listAvailableItems() {
        return storageService.getItems().stream()
                .filter(i -> i.getNumberInStorage() > 0)
                .collect(Collectors.toList());
    }

    @Post(uri = "/order/{name}/{amount}", consumes = "*/*") (5)
    HttpResponse<StoreItem> orderItem(@NotBlank @PathVariable String name, @Min(1) int amount) {
        if (storageService.findItem(name).isEmpty()) {
            throw new HttpStatusException(NOT_FOUND, "Item '" + name + "' not found");
        }
        try {
            storageService.orderItem(name, amount);
        } catch (StorageService.StorageException e) {
            throw new HttpStatusException(BAD_REQUEST, "Could not order item '" + name + "'. " + e.getMessage());
        }
        return HttpResponse.ok(storageService.findItem(name).orElse(null));
    }
}
1 The class is defined as a controller with the @Controller annotation mapped to the path /store.
2 Use Micronaut argument injection to inject a StorageService bean by defining it as the constructor argument. You will create the StorageService in next section.
3 The @Get annotation maps the listAllItems method to an HTTP GET request on /store/all.
4 The @Get annotation maps the listAvailableItems method to an HTTP GET request on /store/available.
5 The @Post annotation maps the orderItem method to an HTTP POST request on /store/order/{name}/{amount}. Use the consumes argument to specify which content-types are allowed in the request. Throwing HttpStatusException will set the corresponding HTTP status in the response.
1.3. StorageService
-
Create an interface for a service that represents the store’s inventory in lib/src/main/java/com/example/StorageService.java:
package com.example;

import io.micronaut.core.annotation.NonNull;

import jakarta.validation.constraints.Min;
import jakarta.validation.constraints.NotBlank;
import java.util.Collection;
import java.util.Optional;

public interface StorageService { (1)
    Collection<StoreItem> getItems();
    Optional<StoreItem> findItem(@NonNull @NotBlank String name);
    void orderItem(@NonNull @NotBlank String name, @Min(1) int amount);

    class StorageException extends RuntimeException { (2)
        StorageException(String message) {
            super(message);
        }
    }
}
1 The storage service provides information about all the items, finds an items by its name, and can place an order for an item.
2 The class includes a custom exception that thrown in case of invalid requests to
-
Create an implementation of the service interface in lib/src/main/java/com/example/DefaultStorageService.java:
package com.example;

import io.micronaut.context.annotation.Requires;
import io.micronaut.core.annotation.NonNull;
import jakarta.inject.Singleton;

import java.util.ArrayList;
import java.util.Collection;
import java.util.List;
import java.util.Optional;

@Singleton (1)
@Requires(missingBeans = StorageService.class) (2)
class DefaultStorageService implements StorageService {

    protected List<StoreItem> items = List.of( (3)
        new StoreItem("chair", "A black chair with 4 legs", 10),
        new StoreItem("table", "A quality dining table", 6),
        new StoreItem("sofa", "A grey sofa", 2),
        new StoreItem("bookshelf", "A futuristic-looking bookshelf", 0)
    );

    @Override
    public Collection<StoreItem> getItems() {
        return items;
    }

    @Override
    public Optional<StoreItem> findItem(@NonNull String name) {
        return items.stream().filter(item -> item.getName().equals(name)).findFirst();
    }

    @Override
    public void orderItem(@NonNull String name, int amount) {
        findItem(name).ifPresentOrElse(item -> {
            if (item.getNumberInStorage() >= amount) {
                item.setNumberInStorage(item.getNumberInStorage() - amount);
            } else {
                throw new StorageException("Insufficient amount in storage");
            }
        }, () -> { throw new StorageException("Item not found in storage"); });
    }
}
1 Use
jakarta.inject.Singletonto designate a class as a singleton.2 The
@Requires(missingBeans = StorageService.class)annotation specifies that this implementation should only be used if no other implementations could be found.3 The implementation stores the items in a
Listand populates some sample items in the list.
If you wish to implement a more advanced StorageService to be used instead of this one, annotate your implementation with @Singleton as shown above. Use the @Requires(env = "oraclecloud") annotation to make it specific to Oracle Cloud. Visit the Database Module for details about how to store and manipulate data in a database.
1.4. Tests to Verify Gateway Function Logic
Create a test class for the controller in oci/src/test/java/com/example/StoreControllerTest.java, as follows:
package com.example;

import io.micronaut.context.annotation.Requires;
import io.micronaut.http.HttpResponse;
import io.micronaut.http.annotation.Get;
import io.micronaut.http.annotation.Post;
import io.micronaut.http.client.annotation.Client;
import io.micronaut.http.client.exceptions.HttpClientResponseException;
import io.micronaut.test.extensions.junit5.annotation.MicronautTest;
import jakarta.inject.Inject;
import jakarta.inject.Singleton;
import org.junit.jupiter.api.Test;

import java.util.ArrayList;
import java.util.List;

import static io.micronaut.http.HttpStatus.BAD_REQUEST;
import static io.micronaut.http.HttpStatus.NOT_FOUND;
import static io.micronaut.http.HttpStatus.OK;
import static org.junit.jupiter.api.Assertions.assertEquals;
import static org.junit.jupiter.api.Assertions.assertNotNull;
import static org.junit.jupiter.api.Assertions.assertThrows;

@MicronautTest(environments = "test-storage-service") (1)
class StoreControllerTest {

    @Inject
    StoreClient client;

    @Test
    void testAvailableItems() {
        List<StoreItem> availableItems = client.getAvailable();

        assertEquals(2, availableItems.size());
        assertEquals("pot", availableItems.get(1).getName());
        assertEquals(10, availableItems.get(1).getNumberInStorage());
        assertNotNull(availableItems.get(1).getDescription());
    }

    @Test
    void testNotFoundException() {
        HttpResponse<?> response = client.order("lamp", 1);

        assertEquals(NOT_FOUND, response.getStatus());
    }

    @Test
    void testNotSufficientException() {
        HttpClientResponseException e = assertThrows(HttpClientResponseException.class, () -> {
            client.order("pot", 100);
        });

        assertEquals(BAD_REQUEST, e.getStatus());
    }

    @Test
    void testOrderRequest() {
        StoreItem plate = client.getAll().stream()
            .filter(i -> i.getName().equals("plate"))
            .findFirst().orElse(null);
        assertNotNull(plate);
        assertEquals(100, plate.getNumberInStorage());

        HttpResponse<StoreItem> response = client.order("plate", 10);
        assertEquals(OK, response.getStatus());
        assertNotNull(response.body());
        assertEquals("plate", response.body().getName());
        assertEquals(90, response.body().getNumberInStorage());
    }

    @Singleton
    @Requires(env = "test-storage-service") (2)
    static class TestStorageService extends DefaultStorageService {
        TestStorageService() {
            items = List.of(
                new StoreItem("plate", "A large plate", 100),
                new StoreItem("pot", "A cooking pot", 10),
                new StoreItem("pan", "A large pan", 0)
            );
        }
    }

    @Client("/store") (3)
    interface StoreClient {
        @Get("/all") (4)
        List<StoreItem> getAll();

        @Get("/available") (4)
        List<StoreItem> getAvailable();

        @Post("/order/{name}/{amount}") (4)
        HttpResponse<StoreItem> order(String name, Integer amount);
    }
}
1 Annotate the class with @MicronautTest so the Micronaut framework will initialize the application context. This enables you to inject beans using the Jakarta @Inject annotation and to send requests to the StoreController defined in the application. Configure this test to use an identified environment using the @MicronautTest(environments="test-storage-service") annotation.
2 Create a mock implementation of StorageService so that the test is independent of the current state of the storage. The @Requires(env="test-storage-service") annotation specifies that the bean should only be available in the identified environment. (In this case it matches the one identified in the @MicronautTest annotation.)
3 Create a Micronaut Declarative Client with the same /store path to send requests to the controller.
4 Create three tests using the defined client and assuming that TestStorageService is used.
2. Run the Tests
Run the tests:
Then open the file oci/build/reports/tests/test/index.html in a browser to view the results.
Although you created this gateway function to run on OCI Functions runtime, the tests should run successfully on your local machine.
Furthermore, Micronaut has a test implementation that simulates the OCI Functions environment. Since sequential requests to a function may be processed by different instances, Micronaut creates a separate environment for each request in a test.
3. Set Up Oracle Cloud Infrastructure
This guide requires the following Oracle Cloud Infrastructure resources:
-
A Container Repository in Oracle Cloud Infrastructure Registry (named "gdk-function-demo")
-
An Oracle Application (named "gdk-function-application") to deploy your Oracle Function
-
An API Gateway (named "gdk-function-gateway") to provide access to your Oracle Function
-
A Virtual Cloud Network (named "GDK-function-VCN")
-
A public subnet open to the internet
-
A private subnet to the API Gateway
-
An Identity and Access Management (IAM) Policy (named "gdk-function-policy") to give the API Gateway permission to call your Oracle Function.
Instead of creating the stack manually, use the following steps to provision the resources using Oracle Cloud Infrastructure Resource Manager:
-
Download the Terraform configuration GDK Function
 to your default downloads directory.
(For a general introduction to Terraform and the "infrastructure-as-code" model, see https://www.terraform.io.)
to your default downloads directory.
(For a general introduction to Terraform and the "infrastructure-as-code" model, see https://www.terraform.io.) -
Follow the instructions in Creating a Stack from a Zip File.
Note: For Linux/macOS AArch64 users, enter "GENERIC_ARM" in the "deployment_architecture" field of the Configure variables panel.
-
In the Review panel, click Run apply.
-
-
Click Create. (It can take up to ten minutes to provision the stack. The Logs resource provides details of progress.)
Note: These resources must not already exist in your Oracle Cloud Infrastructure tenancy, otherwise the Resource Manager will fail to provision the stack—in the Log you will see a message similar to
Error: 409-NAMESPACE_CONFLICT, Repository already exists.Delete the conflicting resources before re-attempting to provision the stack. -
When the job completes, click Outputs in the list of the job’s resources and make note of the following values:
-
gdk-function-demo_namespace(the namespace for the container repository) -
gdk-function-gateway_hostname(the hostname of the API Gateway) -
region(your region identifier)
-
3.1. Authenticate with Oracle Cloud Infrastructure Registry
Oracle Cloud Infrastructure Registry (Container Registry) is an Oracle-managed registry to store, share, and manage container images (such as Docker images).
Before you can publish a container image to Container Registry, you must first authenticate with it. For this, create an authentication token.
-
An authentication token is bound to a user, so first select a user. In the Oracle Cloud Console, open the navigation menu, click Identity & Security. Under Identity click Users. Click the name of the user.
-
From the User Details page, select Auth tokens in the Resources section. Click Generate Token:
-
Enter a description for the token and click Generate Token.
-
Click Copy to copy the generated token.
-
-
Authenticate with
dockerto Container Registry with your region identifier:docker login <region>.ocir.io-
Replace
<region>with the output from the Terraform job. -
When asked for a username, provide
<gdk-function-demo_namespace>/<username>, for exampleaaaaaaaaaaaa/example@example.com. -
When asked for a password, provide the Auth token.
The command should complete by printing "Login Succeeded". (It may take some time before your authentication token activates.)
-
4. Create and Publish a Container Image of the Gateway Function to Container Registry
4.1. Publish the Native Executable to Container Registry
To create and publish a container image containing a native executable to Container Registry, provide the path to a container repository in the build file.
5. Create the Oracle Function from the Container Image
-
In the Oracle Cloud Console, open the navigation menu, click Developer Services. Under Functions, click Applications.
-
The table should contain an application named "gdk-function-application" (it was created for you by Oracle Resource Manager). Click its name.
-
On the Application Details page, if necessary, click the Functions resource. Click Create function and select Create from existing image from the drop-down list. (If required, change compartment to select your published container image.) Use the following properties:
-
Name: gdk-serverless-fn
-
Repository: gdk-function-demo
-
Image: …/gdk-function-demo:1.0-SNAPSHOT
-
Memory: 512
-
-
Click Create.
6. Create an API Deployment
An API Deployment is the means by which you deploy an API on an API Gateway. Before the API Gateway can handle requests to the API, you must create an API deployment. (For more information, see API Deployments.)
-
In the Oracle Cloud Console, open the navigation menu, click Developer Services. Under API Management, click Gateways.
-
The table should contain a gateway named "gdk-function-gateway" (it was created for you by Oracle Resource Manager). Click its name.
-
On the API Gateway Details page, click Deployments under Resources. Click Create deployment. Create a new deployment with the following properties, then click Create:
-
Basic information
-
Name: gdk-serverless-deployment
-
Path prefix: /store
-
-
Authentication: No authentication
-
Routes
-
Route1: Path: /{path*}
-
Route1: Methods: ANY
-
Route1: Backend Type: Oracle functions
-
Route1: Application: gdk-function-application
-
Route1: Function name: gdk-serverless-fn
-
-
7. Test the Oracle Function
When the deployment is active, test the function by sending it some requests.
-
Copy the hostname of the gateway from the Gateway information tab. Define an environment variable for the hostname:
export GATEWAY_HOSTNAME=aaaaaaaaaaaaaaaaaaaaa.apigateway.us-phoenix-1.oci.customer-oci.comNote: For Windows PowerShell, use
$ENV:GATEWAY_HOSTNAME = "aaaaaaaaaaaaaaaaaaaaa.apigateway.us-phoenix-1.oci.customer-oci.com"to set it, and$ENV:GATEWAY_HOSTNAMEto access it. Or you can skip this step and paste the hostname to each of the following commands manually. -
Use
curlto retrieve all the items:curl https://$GATEWAY_HOSTNAME/store/all[ { "name": "chair", "description": "A black chair with 4 legs", "numberInStorage": 10 }, { "name": "table", "description": "A quality dining table", "numberInStorage": 6 }, { "name": "sofa", "description": "A grey sofa", "numberInStorage": 2 }, { "name": "bookshelf", "description": "A futuristic-looking bookshelf", "numberInStorage": 0 } ] -
Get an error when attempting to order too many items:
curl -X POST https://$GATEWAY_HOSTNAME/store/order/table/10{"message": "Bad Request", "_embedded": { "errors": [{ "message": "Could not order item 'table'. Insufficient amount in storage" }] }, ... } -
Order an item and print the response status code:
curl -X POST -w "\nStatus code: %{http_code}" https://$GATEWAY_HOSTNAME/store/order/table/6{ "name":"table", "description":"A quality dining table", "numberInStorage":0 } Status code: 200 -
Get the available items:
curl https://$GATEWAY_HOSTNAME/store/available[ { "name": "chair", "description": "A black chair with 4 legs", "numberInStorage": 10 }, { "name": "sofa", "description": "A grey sofa", "numberInStorage": 2 } ]
8. Publish a Native Executable to Oracle Cloud Infrastructure
To create and publish a container image containing a native executable to Container Registry, provide the path to a container repository in the build file.
9. Update the Oracle Cloud Infrastructure Function
To update your Oracle Function to use the new container image, follow these steps:
-
In the Oracle Cloud Console, open the navigation menu, click Developer Services. Under Functions, click Applications.
-
The table contains your application named "gdk-function-application". Click its name.
-
On the page that describes your application, if necessary click the Functions resource. In the table of Functions, click the name of your Oracle Function "gdk-serverless-fn".
-
On the page that describes your Oracle Function, click Edit.
-
Replace the current image with your new image named "…gdk-function-demo:latest".
-
Click Save changes.
Once the function reloads, use the same API Gateway to access it and test it as described in section 7.
10. Clean Up Cloud Resources
After you have finished this guide, clean up the resources you created:
-
In the Oracle Cloud Console, open the navigation menu, click Developer Services. Under API Management click Gateways.
1.1 The table contains a gateway named "gdk-function-gateway". Click its name.
1.2. On the API Gateway Details page, click Deployments under Resources. The table contains your deployment named "gdk-serverless-deployment". Click its name.
1.3. On the Deployment Details page, click Delete to delete the deployment.
-
In the Oracle Cloud Console, open the navigation menu, click Developer Services. Under Functions, click Applications.
2.1. The table contains your application named "gdk-function-application". Click its name.
2.2. On the page that describes your application, if necessary click the Functions resource. In the table of Functions, click the name of your Oracle Function "gdk-serverless-fn".
2.3. On the page that describes your Oracle Function, click Delete.
-
Destroy the remaining resources associated with the stack by following the steps in Creating a Destroy Job.
-
Follow the instructions in Deleting a Stack to delete the stack.
Summary
This guide demonstrated how to create a Micronaut Gateway Function, run it on Oracle Functions, and set up an API Gateway to provide access to the function. The guide also demonstrated how to create a native executable from the Gateway Function and deploy it in place of the original Java-based version.