Create and Connect a Micronaut Application to Google Cloud Storage
This guide describes how to create a Micronaut application that demonstrates how to store, retrieve, and delete user profile pictures in Google Cloud Storage using the Micronaut Object Storage API.
The Micronaut Object Storage API provides a uniform API to create, read and delete objects in the major cloud providers:
- Amazon S3
- Google Cloud Storage
- Oracle Cloud Infrastructure (OCI) Object Storage
Using this API enables the creation of truly multicloud, portable applications.
Prerequisites #
- JDK 17 or higher. See Setting up Your Desktop.
- A Google Cloud Platform (GCP) account. See Setting up Your Cloud Accounts.
- The Google Cloud CLI. (The CLI is part of the Google Cloud SDK; for more information, see Cloud SDK.)
- The GCN CLI. See Setting up Your Desktop. (Optional.)
Follow the steps below to create the application from scratch. However, you can also download the completed example in Java:
A note regarding your development environment
Consider using Visual Studio Code that provides native support for developing applications with the Graal Cloud Native Tools extension.
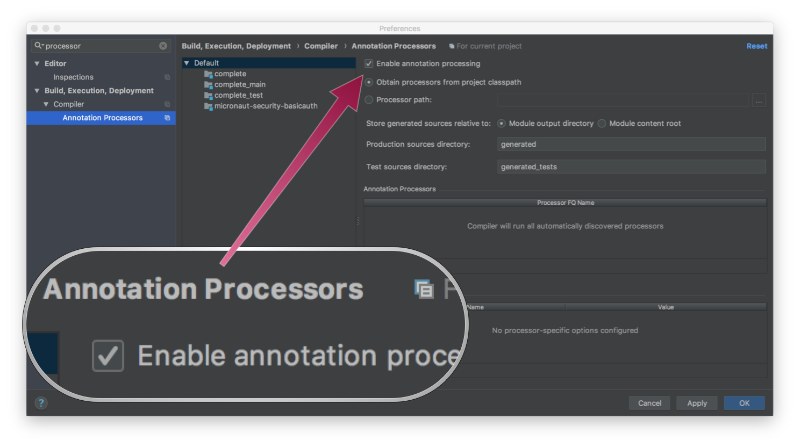
Note: If you use IntelliJ IDEA, enable annotation processing.
Windows platform: The GCN guides are compatible with Gradle only. Maven support is coming soon.
1. Create the Application #
Create an application using the GCN Launcher.
-
Open the GCN Launcher in advanced mode.
- Create a new project using the following selections.
(Alternatively, use these shortcuts for Maven or Gradle.)
- Project Type: Application (Default)
- Project Name: gcp-storage-demo
- Base Package: com.example (Default)
- Clouds: GCP
- Language: Java (Default)
- Build Tool: Gradle (Groovy) or Maven
- Test Framework: JUnit (Default)
- Java Version: 17 (Default)
- Micronaut Version: (Default)
- Cloud Services: Object Storage
- Features: GraalVM Native Image (Default)
- Sample Code: Yes (Default)
- Click Generate Project, then click Download Zip. The GCN Launcher creates an application with the default package
com.examplein a directory named gcp-storage-demo. The application ZIP file will be downloaded in your default downloads directory. Unzip it, open in your code editor, and proceed to the next steps.
Alternatively, use the GCN CLI as follows:
gcn create-app com.example.gcp-storage-demo \
    --clouds=gcp \
    --services=objectstore \
    --features=graalvm \
    --build=gradle \
    --jdk=17 \
    --lang=java
gcn create-app com.example.gcp-storage-demo \
--clouds=gcp \
--services=objectstore \
--features=graalvm \
--build=maven \
--jdk=17 \
--lang=javaFor more information, see Using the GCN CLI.
2. ProfilePicturesController #
The GCN Launcher created an interface with the endpoints of the “profile pictures” microservice in a file named lib/src/main/java/com/example/ProfilePicturesApi.java:
package com.example;

import io.micronaut.http.HttpRequest;
import io.micronaut.http.HttpResponse;
import io.micronaut.http.annotation.Delete;
import io.micronaut.http.annotation.Get;
import io.micronaut.http.annotation.Post;
import io.micronaut.http.annotation.Status;
import io.micronaut.http.multipart.CompletedFileUpload;
import io.micronaut.http.server.types.files.StreamedFile;

import java.util.Optional;

import static io.micronaut.http.HttpStatus.NO_CONTENT;
import static io.micronaut.http.MediaType.MULTIPART_FORM_DATA;

public interface ProfilePicturesApi {

    @Post(uri = "/{userId}", consumes = MULTIPART_FORM_DATA) // <1>
    HttpResponse<?> upload(CompletedFileUpload fileUpload, String userId, HttpRequest<?> request);

    @Get("/{userId}") // <2>
    Optional<HttpResponse<StreamedFile>> download(String userId);

    @Status(NO_CONTENT) // <3>
    @Delete("/{userId}") // <4>
    void delete(String userId);
}
1 The @Post annotation maps the method to an HTTP POST request.
2 The @Get annotation maps the method to an HTTP GET request.
3 You can return void in your controller’s method and specify the HTTP status code via the @Status annotation.
4 The @Delete annotation maps the delete method to an HTTP Delete request on /{userId}.
The GCN Launcher also created the ProfilePicturesController class that implements the ProfilePicturesApi interface in a file named lib/src/main/java/com/example/ProfilePicturesController.java. It contains the class definition and constructor:
package com.example;

import io.micronaut.http.HttpRequest;
import io.micronaut.http.HttpResponse;
import io.micronaut.http.MutableHttpResponse;
import io.micronaut.http.annotation.Controller;
import io.micronaut.http.multipart.CompletedFileUpload;
import io.micronaut.http.server.types.files.StreamedFile;
import io.micronaut.http.server.util.HttpHostResolver;
import io.micronaut.http.uri.UriBuilder;
import io.micronaut.objectstorage.ObjectStorageEntry;
import io.micronaut.objectstorage.ObjectStorageOperations;
import io.micronaut.objectstorage.request.UploadRequest;
import io.micronaut.objectstorage.response.UploadResponse;
import io.micronaut.scheduling.TaskExecutors;
import io.micronaut.scheduling.annotation.ExecuteOn;

import java.net.URI;
import java.util.Optional;

import static io.micronaut.http.HttpHeaders.ETAG;
import static io.micronaut.http.MediaType.IMAGE_JPEG_TYPE;

@Controller(ProfilePicturesController.PREFIX) // <1>
@ExecuteOn(TaskExecutors.IO) // <2>
class ProfilePicturesController implements ProfilePicturesApi {

    static final String PREFIX = "/pictures";

    private final ObjectStorageOperations<?, ?, ?> objectStorage; // <3>
    private final HttpHostResolver httpHostResolver; // <4>

    ProfilePicturesController(ObjectStorageOperations<?, ?, ?> objectStorage,
                              HttpHostResolver httpHostResolver) {
        this.objectStorage = objectStorage;
        this.httpHostResolver = httpHostResolver;
    }
}
1 The class is defined as a controller with the @Controller annotation mapped to the path /pictures.
2 It is critical that any blocking I/O operations (such as fetching the data from the database) are offloaded to a separate thread pool that does not block the event loop.
3 ObjectStorageOperations provides a uniform API to create, read and delete objects in the major cloud providers.
4 HttpHostResolver enables you to resolve the host for an HTTP request.
2.1. Upload Endpoint #
The GCN Launcher also generated the /upload endpoint which receives the file from the HTTP client via CompletedFileUpload, and the userId path parameter. It uploads the file to Google Cloud Storage using ObjectStorageOperations, and then returns its ETag in an HTTP response header to the client:
@Override
public HttpResponse<?> upload(CompletedFileUpload fileUpload,
                              String userId,
                              HttpRequest<?> request) {
    String key = buildKey(userId); // <1>
    UploadRequest objectStorageUpload = UploadRequest.fromCompletedFileUpload(fileUpload, key); // <2>
    UploadResponse<?> response = objectStorage.upload(objectStorageUpload); // <3>

    return HttpResponse
            .created(location(request, userId)) // <4>
            .header(ETAG, response.getETag()); // <5>
}

private static String buildKey(String userId) {
    return userId + ".jpg";
}

private URI location(HttpRequest<?> request, String userId) {
    return UriBuilder.of(httpHostResolver.resolve(request))
            .path(PREFIX)
            .path(userId)
            .build();
}
1 The key represents the path under which the file will be stored.
2 You can use any of the UploadRequest static methods to build an upload request.
3 The upload operation returns an UploadResponse, which wraps the cloud-specific SDK response.
4 Return the absolute URL of the resource in the location header.
5 The response object contains some common properties for all cloud vendors, such as the ETag, that is sent in a header to the client.
2.2. Download Endpoint #
The generated /download endpoint simply retrieves the entry from the expected key, and transforms it into a StreamedFile:
@Override
public Optional<HttpResponse<StreamedFile>> download(String userId) {
    String key = buildKey(userId);
    return objectStorage.retrieve(key) // <1>
            .map(ProfilePicturesController::buildStreamedFile); // <2>
}

private static HttpResponse<StreamedFile> buildStreamedFile(ObjectStorageEntry<?> entry) {
    StreamedFile file = new StreamedFile(entry.getInputStream(), IMAGE_JPEG_TYPE).attach(entry.getKey());
    MutableHttpResponse<Object> httpResponse = HttpResponse.ok();
    file.process(httpResponse);
    return httpResponse.body(file);
}
1 The retrieve operation returns a cloud-independent ObjectStorageEntry.
2 Transform the cloud-specific storage entry into an HttpResponse<StreamedFile>.
The HTTP client could have used the ETag from the upload operation and sent it in a If-None-Match header in the download request to implement caching, which then would have been to be implemented in the download endpoint. But this is beyond the scope of this guide.
2.3. Delete Endpoint #
For the /delete endpoint, all you have to do is invoke the delete method with the expected key:
@Override
public void delete(String userId) {
    String key = buildKey(userId);
    objectStorage.delete(key);
}
3. Set up Google Cloud Resources #
Start by creating a new GCP project, then create a bucket.
3.1. Create a GCP Project #
Create a new GCP project named “gcn-guides” (follow the instructions contained in Creating and managing projects).
Log in to your Google Cloud Platform:
gcloud auth login
Change your project:
gcloud config set project gcn-guides
Note: use
gcloud projects create [PROJECT_ID]to set up a new project orgcloud projects listto find the id of an existing one.
3.2. Create a Bucket #
Use the Google Cloud CLI to create a bucket with the name “gcn-guide-object-storage”:
gcloud storage buckets create gs://gcn-guide-object-storage
Note: Bucket names must be unique across all GCP accounts, so you might need to change the bucket name and retry the command with a different name.
Then, configure the bucket in gcp/src/main/resources/application.properties:
micronaut.object-storage.gcp.default.bucket=gcn-guide-object-storage
micronaut.object-storage.gcp.default.enabled=true
3.3 Configure the Upload Parameters #
To upload a file larger than 1MB, configure the file gcp/src/main/resources/application.properties as follows:
# 20MB = 20 * 1024 * 1024b = 20971520b
micronaut.server.multipart.max-file-size=20971520
4. Run the Application #
To run the application, use the following command, which starts the application on port 8080.
Note: You might see this error message when running your application: “Message: The Application Default Credentials are not available. They are available if running in Google Compute Engine. Otherwise, the environment variable GOOGLE_APPLICATION_CREDENTIALS must be defined pointing to a file defining the credentials. See Google Cloud ADC FAQ for more information.”
If you are developing locally you can run the following command:
gcloud auth application-default loginHowever, it is strongly recommended that you set up a service account. Follow the instructions in the link above and Micronaut GCP setup instructions to create and configure a service account.
5. Test the Application #
Test the application by uploading, downloading, and deleting a user profile picture.
5.1. Upload a Profile Picture #
Assuming you have a profile picture in a local file named profile.jpg, you can upload it to your application using the following command:
curl -i -F "fileUpload=@profile.jpg" http://localhost:8080/pictures/user_name
HTTP/1.1 201 Created
location: http://localhost:8080/pictures/user_name
ETag: "617cb82e296e153c29b34cccf7af0908"
date: Wed, 14 Sep 2022 12:50:30 GMT
connection: keep-alive
transfer-encoding: chunked
Note the location and ETag headers.
Use the gcloud CLI to verify that the file has been uploaded to an Google Cloud bucket:
gcloud storage ls --recursive gs://gcn-guide-object-storage
5.2. Download a Profile Picture #
Use the following command to download a picture:
curl http://localhost:8080/pictures/user_name -O -J
The file will be saved as user_name.jpg because the download endpoint includes a Content-Disposition: attachment header. Open it to check that it is the same image as profile.jpg.
5.3. Delete a Profile Picture #
Use the following command to delete a picture:
curl -X DELETE http://localhost:8080/pictures/user_name
Then, check that the file has actually been deleted using the following command:
gcloud storage ls --recursive gs://gcn-guide-object-storage
6. Generate a Native Executable Using GraalVM #
GCN supports compiling a Java application ahead-of-time into a native executable using GraalVM Native Image. You can use the Gradle plugin for GraalVM Native Image building/Maven plugin for GraalVM Native Image building. Packaged as a native executable, it significantly reduces application startup time and memory footprint.
To generate a native executable, run the following command:
./gradlew :gcp:nativeCompileThe native executable is created in the gcp/build/native/nativeCompile/ directory and can be run with the following command:
gcp/build/native/nativeCompile/gcp./mvnw install -pl lib -am
./mvnw package -pl gcp -Dpackaging=native-imageThe native executable is created in the gcp/target/ directory and can be run with the following command:
gcp/target/gcp7. Run and Test the Native Executable #
Run the native executable, and then perform the same tests as in step 5.
8. Clean up #
When you have completed the guide, you can clean up the resources you created on Google Cloud Platform so you will not be billed for them in the future.
8.1. Delete the Project #
The easiest way to eliminate billing is to delete the project you created.
Deleting a project has the following consequences:
-
If you used an existing project, you will also delete any other work you have done in the project.
-
You cannot reuse the project ID of a deleted project. If you created a custom project ID that you plan to use in the future, you should delete the resources inside the project instead. This ensures that URLs that use the project ID, such as an appspot.com URL, remain available.
-
If you are exploring multiple guides, reusing projects instead of deleting them prevents you from exceeding project quota limits.
8.1.1. Via the CLI
To delete the project using the Google Cloud CLI, run the following command:
gcloud projects delete gcn-guides
8.1.2. Via the Cloud Platform Console
-
In the Cloud Platform Console, go to the Projects page.
-
In the project list, select the project you want to delete and click Delete project. Select the check box next to the project name and click Delete project.
-
In the dialog box, enter the project ID, and then click Shut down to delete the project.
Summary #
This guide demonstrated how to create a Java application to store, retrieve, and delete user profile pictures in Google Cloud Storage.