Create and Trace a Micronaut Application Using Google Cloud Trace
This guide describes how to use GCN to create and trace an application using Google Cloud Trace.
Tracing enables you to track service requests in a single or distributed application. Trace data shows the path, time spent in each section (called a span), and other information collected along during the trace. Tracing gives you observability into what is causing bottlenecks and failures.
Prerequisites #
- JDK 17 or higher. See Setting up Your Desktop.
- A Google Cloud Platform (GCP) account. See Setting up your Cloud Accounts.
- The Google Cloud CLI. (The CLI is part of the Google Cloud SDK; for more information, see Cloud SDK.)
- The GCN CLI. See Setting up Your Desktop. (Optional.)
Note: This guide uses paid services; you may need to enable billing in Google Cloud to complete some steps in this guide.
Follow the steps below to create the application from scratch. However, you can also download the completed example in Java:

A note regarding your development environment
Consider using Visual Studio Code that provides native support for developing applications with the Graal Cloud Native Tools.
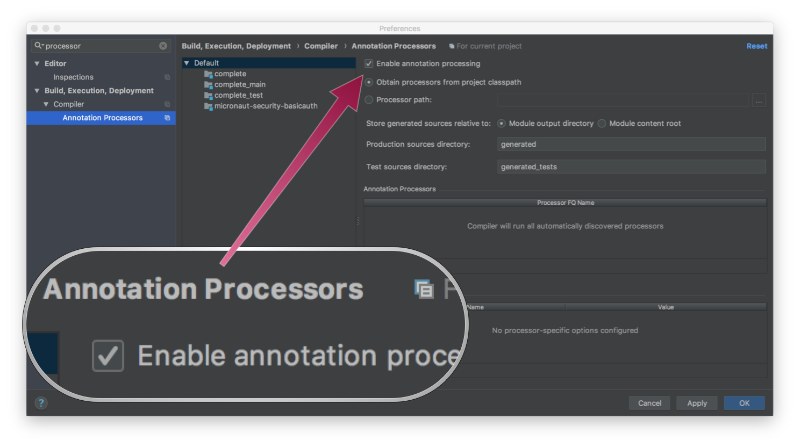
Note: If you use IntelliJ IDEA, enable annotation processing.
Windows platform: The GCN guides are compatible with Gradle only. Maven support is coming soon.
1. Create the Application #
Create an application using the GCN Launcher.
-
Open the GCN Launcher in advanced mode.
- Create a new project using the following selections.
- Project Type: Application (default)
- Project Name: gcp-tracing-demo
- Base Package: com.example (Default)
- Clouds: GCP
- Language: Java (default)
- Build Tool: Gradle (Groovy) or Maven
- Test Framework: JUnit (default)
- Java Version: 17 (default)
- Micronaut Version: (default)
- Cloud Services: Tracing
- Features: GraalVM Native Image (Default)
- Sample Code: No
- Click Generate Project, then click Download Zip. The GCN Launcher creates an application with the default package
com.examplein a directory named gcp-tracing-demo. The application ZIP file will be downloaded in your default downloads directory. Unzip it, open in your code editor, and proceed to the next steps.
Alternatively, use the GCN CLI as follows:
gcn create-app com.example.gcp-tracing-demo \
    --clouds=gcp \
    --services=tracing \
    --features=graalvm \
    --example-code=false \
    --build=gradle \
    --jdk=17 \
    --lang=java
gcn create-app com.example.gcp-tracing-demo \
--clouds=gcp \
--services=tracing \
--features=graalvm \
--example-code=false \
--build=maven \
--jdk=17 \
--lang=javaFor more information, see Using the GCN CLI.
1.1. Tracing Annotations #
The Micronaut framework uses the io.micronaut.tracing.annotation package and OpenTelemetry to generate and export tracing data.
The io.micronaut.tracing.annotation package provides the following three annotations:
-
@NewSpan: Used on methods to create a new span; defaults to the method name, but you can assign a unique name instead. -
@ContinueSpan: Used on methods to continue an existing span; primarily used in conjunction with@SpanTag(below). -
@SpanTag: Used on method parameters to assign a value to a span; defaults to the parameter name, but you can assign a unique name instead. To use the@SpanTagon a method parameter, the method must be annotated with either@NewSpanor@ContinueSpan.
Your build configuration file contains the io.micronaut.tracing dependency which means all HTTP server methods (those annotated with @Get, @Post, and so on) create spans automatically.
1.2. InventoryService #
Note: The
InventoryServiceclass demonstrates how to create and use spans fromio.micronaut.tracing.annotationand OpenTelemetry.
The GCN Launcher created the InventoryService class in a file named lib/src/main/java/com/example/InventoryService.java, as follows:
package com.example;

import io.micronaut.tracing.annotation.NewSpan;
import io.micronaut.tracing.annotation.SpanTag;
import io.opentelemetry.api.trace.Span;
import io.opentelemetry.api.trace.Tracer;
import jakarta.inject.Singleton;

import java.util.Collection;
import java.util.HashMap;
import java.util.Map;
import java.util.concurrent.ConcurrentHashMap;

@Singleton
public class InventoryService {

    private static final String storeName = "my_store";

    private final Tracer tracer;
    private final WarehouseClient warehouse;
    private final Map<String, Integer> inventory = new ConcurrentHashMap<>();

    InventoryService(Tracer tracer, WarehouseClient warehouse) { // <1>
        this.tracer = tracer;
        this.warehouse = warehouse;

        inventory.put("laptop", 4);
        inventory.put("desktop", 2);
        inventory.put("monitor", 11);
    }

    public Collection<String> getProductNames() {
        return inventory.keySet();
    }

    @NewSpan("stock-counts") // <2>
    public Map<String, Integer> getStockCounts(@SpanTag("inventory.item") String item) { // <3>
        Map<String, Integer> counts = new HashMap<>();
        if (inventory.containsKey(item)) {
            int count = inventory.get(item);
            counts.put("store", count);

            if (count < 10) {
                counts.put("warehouse", inWarehouse(storeName, item));
            }
        }

        return counts;
    }

    private int inWarehouse(String store, String item) {
        Span.current().setAttribute("inventory.store-name", store); // <4>

        return warehouse.getItemCount(store, getUPC(item));
    }

    public void order(String item, int count) {
        orderFromWarehouse(item, count);
        if (inventory.containsKey(item)) {
            count += inventory.get(item);
        }
        inventory.put(item, count);
    }

    private void orderFromWarehouse(String item, int count) {
        Span span = tracer.spanBuilder("warehouse-order") // <5>
                .setAttribute("item", item)
                .setAttribute("count", count)
                .startSpan();

        warehouse.order(Map.of(
                "store", storeName,
                "product", item,
                "amount", count,
                "upc", getUPC(item)));

        span.end(); // <6>
    }

    private int getUPC(String item) {
        return Math.abs(item.hashCode());
    }
}
1 Inject an OpenTelemetry Tracing bean into the class.
2 Create a new io.micronaut.tracing.annotation span called “stock-counts”.
3 Add a io.micronaut.tracing.annotation tag called “inventory.item” that will contain the value contained in the parameter item.
4 Get the current OpenTelemetry span and set the value of its attribute named “inventory.store-name” to the store parameter.
5 Create an OpenTelemetry span named “warehouse-order”, set its attributes and start the span.
6 End the span started in 5.
1.3. Store Controller #
The GCN Launcher created the StoreController class in a file named lib/src/main/java/com/example/StoreController.java, as follows:
package com.example;

import io.micronaut.http.annotation.Controller;
import io.micronaut.http.annotation.Get;
import io.micronaut.http.annotation.Post;
import io.micronaut.http.annotation.Status;
import io.micronaut.scheduling.TaskExecutors;
import io.micronaut.scheduling.annotation.ExecuteOn;
import io.micronaut.tracing.annotation.ContinueSpan;
import io.micronaut.tracing.annotation.NewSpan;
import io.micronaut.tracing.annotation.SpanTag;

import java.util.HashMap;
import java.util.List;
import java.util.Map;
import java.util.stream.Collectors;

import static io.micronaut.http.HttpStatus.CREATED;

@ExecuteOn(TaskExecutors.IO)
@Controller("/store")
class StoreController {

    private final InventoryService inventory;

    StoreController(InventoryService inventory) {
        this.inventory = inventory;
    }

    @Post("/order")
    @Status(CREATED)
    @NewSpan("store.order") // <1>
    void order(@SpanTag("order.item") String item, @SpanTag int count) { // <2>
        inventory.order(item, count);
    }

    @Get("/inventory") // <3>
    List<Map<String, Object>> getInventory() {
        return inventory.getProductNames().stream()
                .map(this::getInventory)
                .collect(Collectors.toList());
    }

    @Get("/inventory/{item}")
    @ContinueSpan // <4>
    Map<String, Object> getInventory(@SpanTag("item") String item) { // <5>
        Map<String, Object> counts = new HashMap<>(inventory.getStockCounts(item));
        if (counts.isEmpty()) {
            counts.put("note", "Not available at store");
        }

        counts.put("item", item);

        return counts;
    }
}
1 Create a new span called “store.order”.
2 Add tags for the method parameters. Name the first parameter “order.item”, and use the default name for the second parameter.
3 A span is created automatically if your build configuration file contains the io.micronaut.tracing dependency.
4 Required for @SpanTag (see 5).
5 Add a tag for the method parameter.
1.4. Warehouse Client #
The GCN Launcher created the WarehouseClient class in a file named lib/src/main/java/com/example/WarehouseClient.java, as follows:
package com.example;

import io.micronaut.http.annotation.Get;
import io.micronaut.http.annotation.Post;
import io.micronaut.http.annotation.QueryValue;
import io.micronaut.http.client.annotation.Client;
import io.micronaut.tracing.annotation.ContinueSpan;
import io.micronaut.tracing.annotation.NewSpan;
import io.micronaut.tracing.annotation.SpanTag;

import java.util.Map;

@Client("/warehouse") // <1>
public interface WarehouseClient {

    @Post("/order")
    @NewSpan
    void order(@SpanTag("warehouse.order") Map<String, ?> json);

    @Get("/count")
    @ContinueSpan
    int getItemCount(@QueryValue String store,
                     @SpanTag @QueryValue int upc);
}
1 Some external service without tracing.
1.5. Warehouse Controller #
The GCN Launcher created a WarehouseController class to represent an external service that will be called by WarehouseClient in a file named lib/src/main/java/com/example/WarehouseController.java, as follows:
package com.example;

import io.micronaut.http.HttpResponse;
import io.micronaut.http.annotation.Controller;
import io.micronaut.http.annotation.Get;
import io.micronaut.http.annotation.Post;
import io.micronaut.scheduling.TaskExecutors;
import io.micronaut.scheduling.annotation.ExecuteOn;

import java.util.Random;

@ExecuteOn(TaskExecutors.IO) //<1>
@Controller("/warehouse") // <2>
class WarehouseController {

    @Get("/count") // <3>
    HttpResponse<?> getItemCount() {
        return HttpResponse.ok(new Random().nextInt(11));
    }

    @Post("/order") // <4>
    HttpResponse<?> order() {
        try {
            //To simulate an external process taking time
            Thread.sleep(500);
        } catch (InterruptedException ignored) {
        }

        return HttpResponse.accepted();
    }
}
1 It is critical that any blocking I/O operations (such as fetching the data from the database) are offloaded to a separate thread pool that does not block the event loop.
2 The class is defined as a controller with the @Controller annotation mapped to the path /warehouse.
3 The @Get annotation maps the getItemCount method to an HTTP GET request on /warehouse/count.
4 The @Get annotation maps the order method to an HTTP GET request on /warehouse/order.
1.6. Configure Tracer #
When you created your application, GCN automatically added the necessary OpenTelemetry configuration to your gcp/src/main/resources/application.propertiesl file, as shown below:
otel.traces.exporter=google_cloud_trace
2. Create a New GCP Project #
Create a new GCP project named “gcn-guides” (follow the instructions contained in Creating and managing projects).
- Log in to the Google Cloud Platform:
gcloud auth login - Change your project:
gcloud config set project gcn-guides
3. Run the Application #
The application can be deployed to Google Cloud Run, Cloud Function, Cloud Compute, or App Engine. Traces can be sent to Google Cloud Trace outside the Google Cloud. This enables you to run the application locally and view the traces in Google Cloud Trace.
To run the application, use the following command, which starts the application on port 8080.
You might get this error message when running your application: “Message: The Application Default Credentials are not available. They are available if running in Google Compute Engine. Otherwise, the environment variable GOOGLE_APPLICATION_CREDENTIALS must be defined pointing to a file defining the credentials. See https://developers.google.com/accounts/docs/application-default-credentials for more information.”
If you are developing locally you can run the following command:
gcloud auth application-default login
However, Google strongly recommends that you set up a service account. Follow the instructions in the link above and Micronaut GCP setup instructions to create and configure a service account.
4. Test the Application #
Test the application by accessing REST endpoints. Then review the trace output.
Open the GCP Tracing Console.
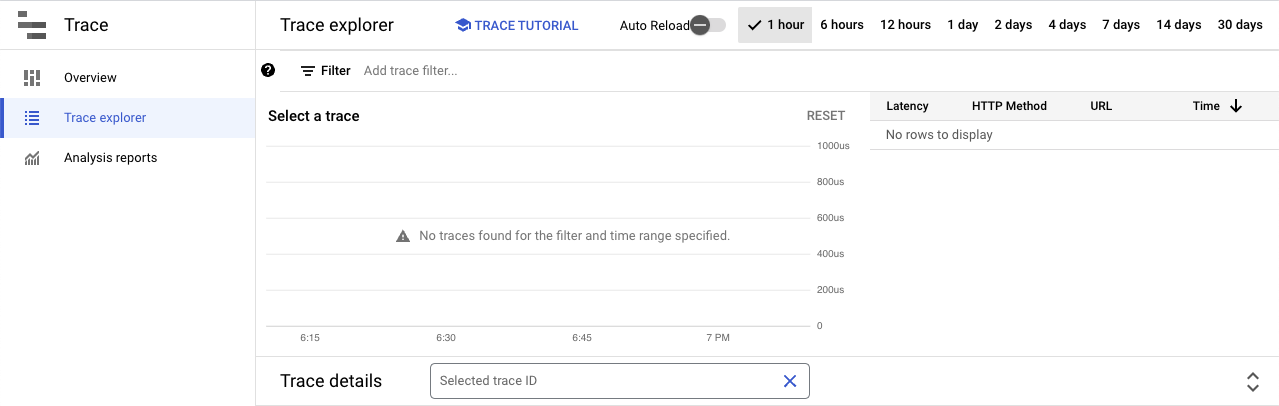
It may take a few seconds for the traces to be displayed.
4.1. Get Item Counts #
Send an HTTP GET request to the /store/inventory/{item} endpoint to get the count of an item, for example:
curl http://localhost:8080/store/inventory/laptop

Each span is represented by a blue bar.
4.2. Order Items #
Send an HTTP POST request to the /store/order endpoint to order an item, as follows:
curl -X "POST" "http://localhost:8080/store/order" \
    -H 'Content-Type: application/json; charset=utf-8' \
    -d $'{"item":"laptop", "count":5}'
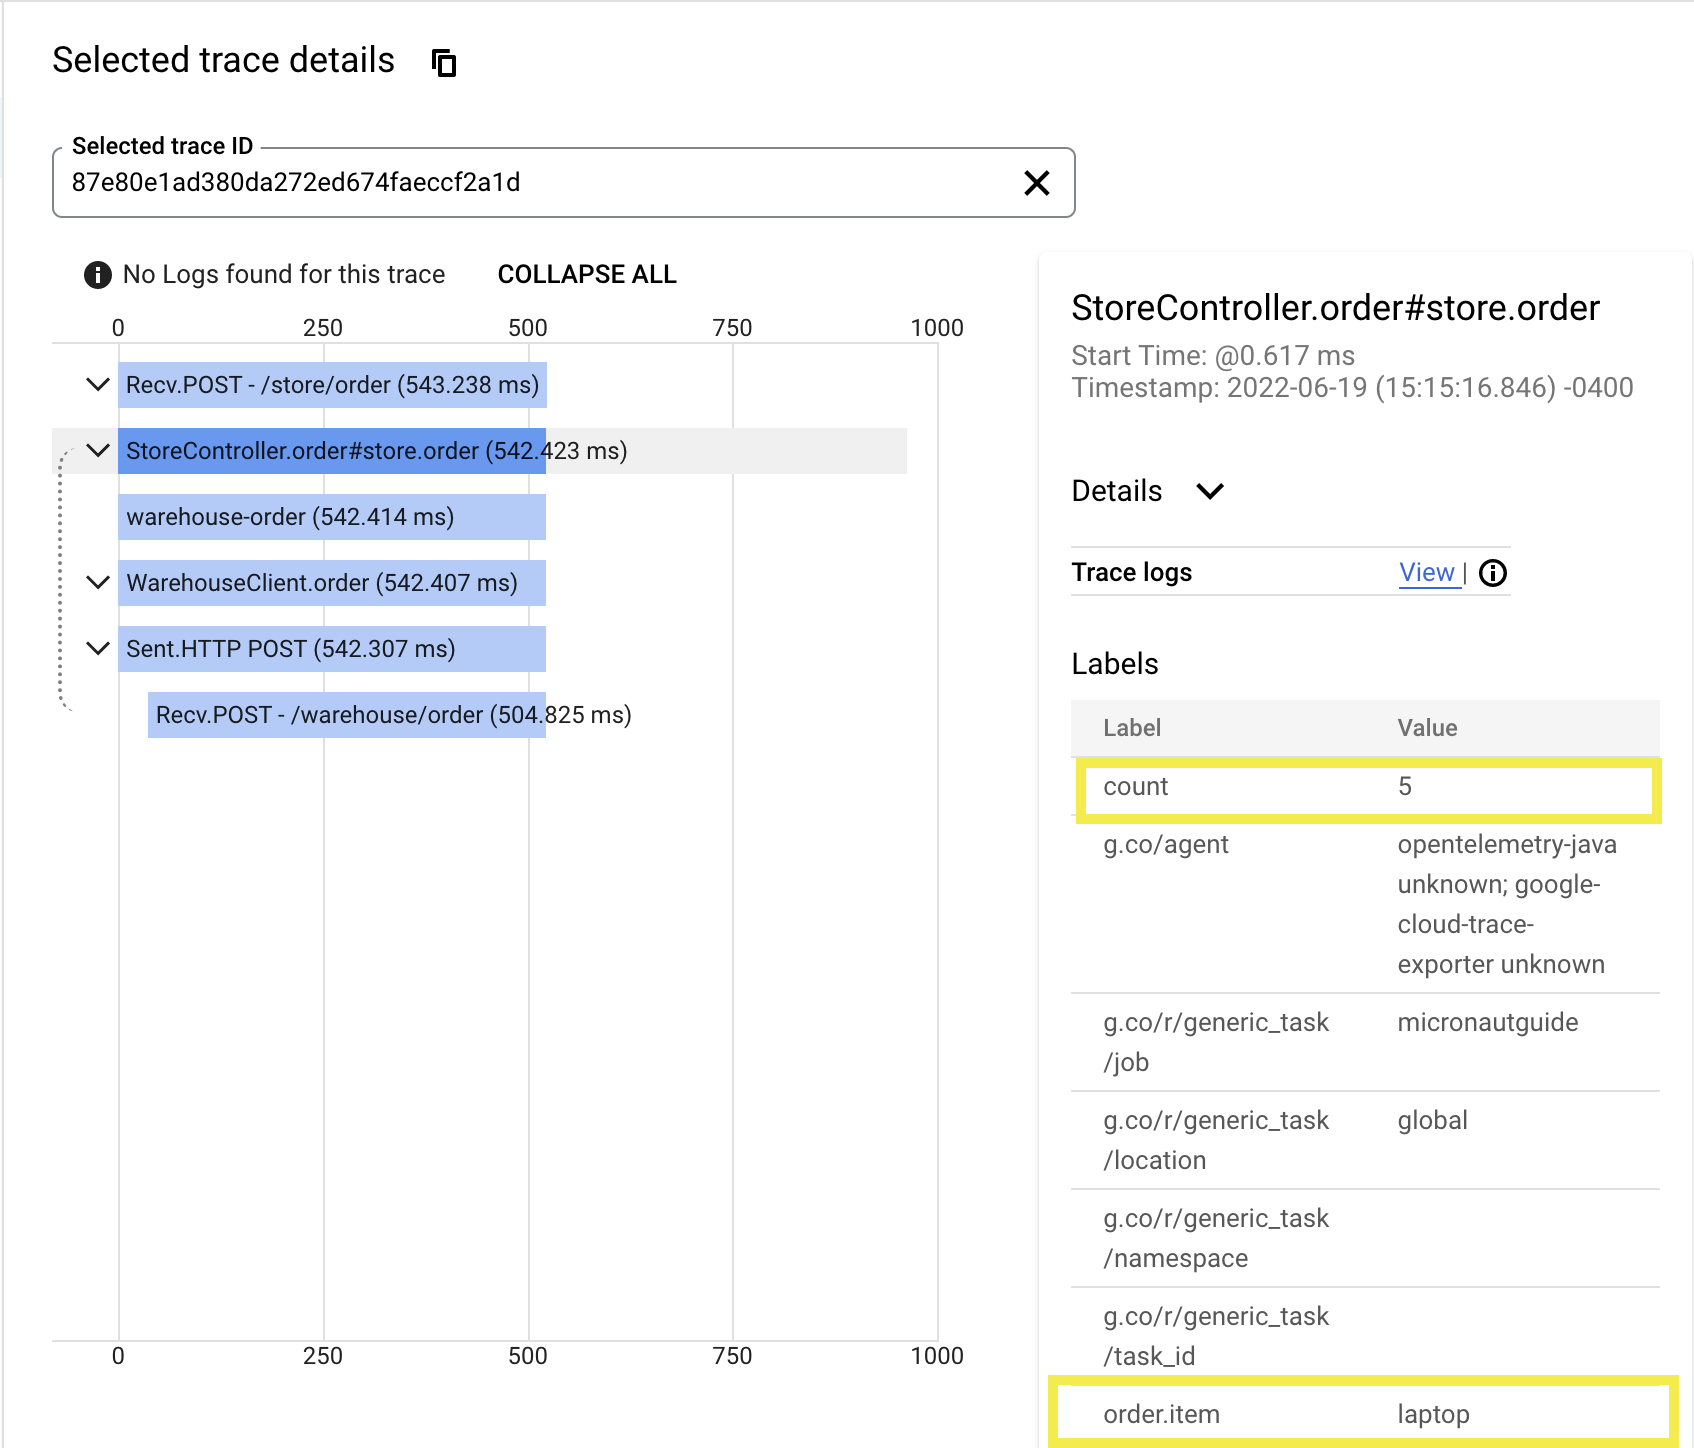
Selecting a different span will show you the labels (also known as attributes/tags) and other details of the span.
4.3. Get Inventory #
Send an HTTP GET request to the /store/inventory endpoint to get the inventory:
curl http://localhost:8080/store/inventory
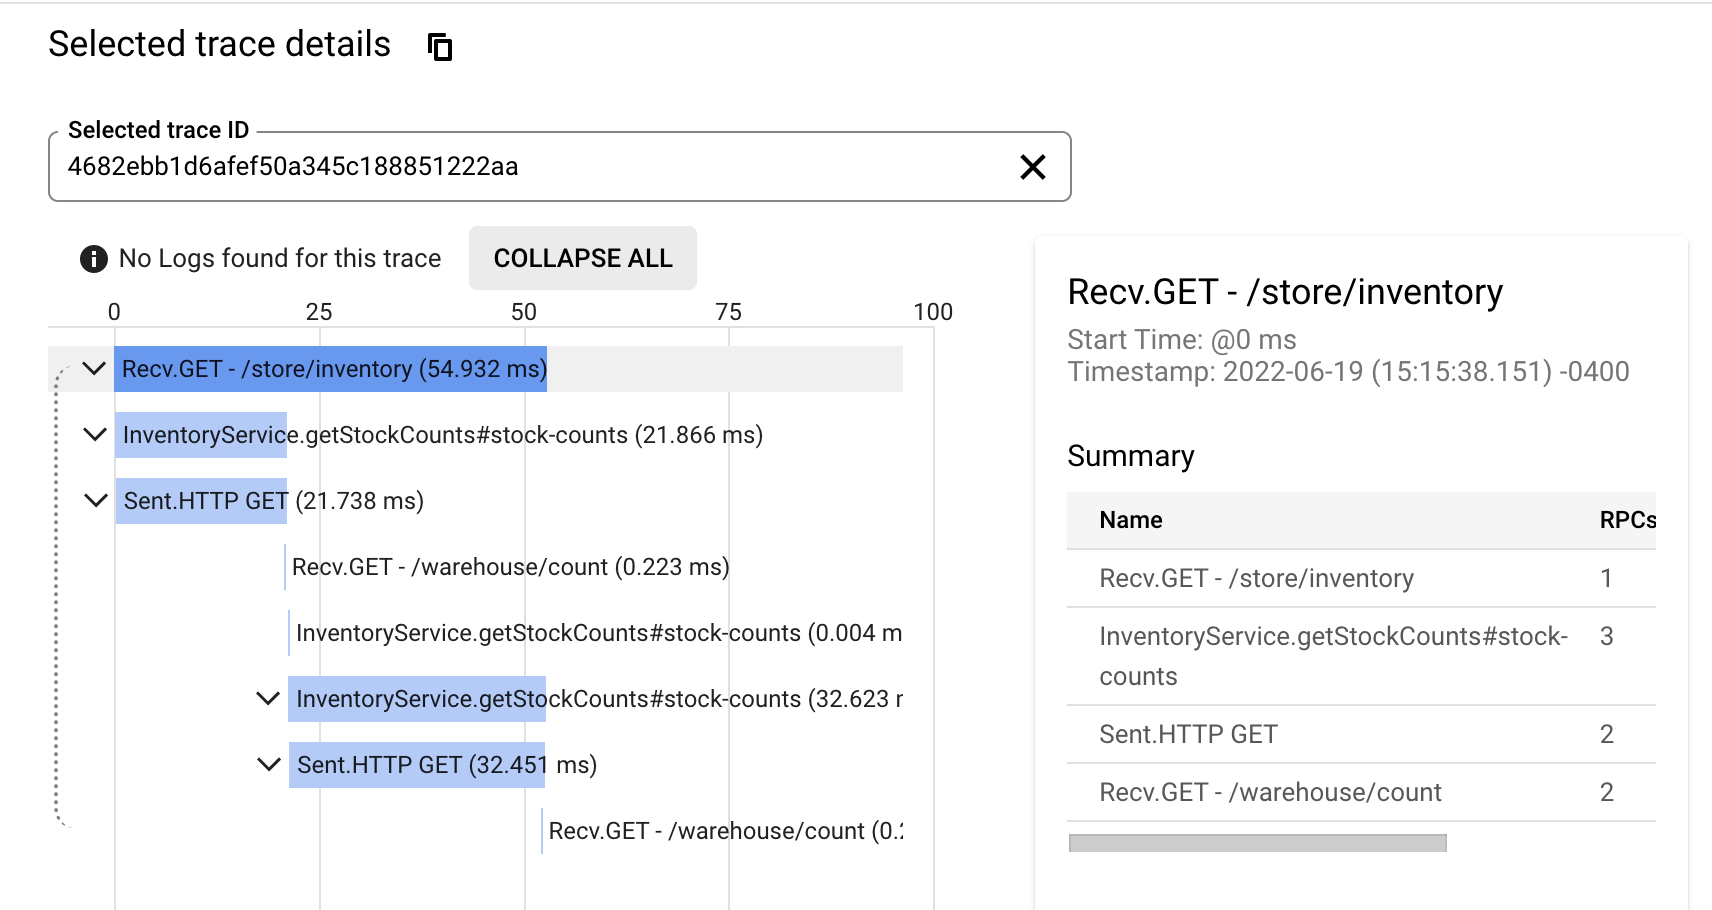
Looking at the trace, you may conclude that retrieving the items sequentially might not be the best design choice.
5. Generate a Native Executable Using GraalVM #
GCN supports compiling a Java application ahead-of-time into a native executable using GraalVM Native Image. You can use the Gradle plugin for GraalVM Native Image building/Maven plugin for GraalVM Native Image building. Packaged as a native executable, it significantly reduces application startup time and memory footprint.
To generate a native executable, run the following command:
./gradlew :gcp:nativeCompile./mvnw install -pl lib -am
./mvnw package -pl gcp -Dpackaging=native-image6. Run and Test the Native Executable #
Run the native executable, using the option -Dmicronaut.application.name to set the name of the application as “gcp-native-demo”, as follows:
gcp/build/native/nativeCompile/gcp -Dmicronaut.application.name=gcp-native-demogcp/target/gcp -Dmicronaut.application.name=gcp-native-demoThe native executable starts instantaneously.
6.1. Get Item Counts #
-
Repeat the test from step 4.1 by sending an HTTP GET request to the
/store/inventory/{item}endpoint to get the count of an item:curl http://localhost:8080/store/inventory/laptop -
Review the trace output in Trace Explorer: you should see a new row in the list of Traces that represents the request from the native executable:
Notice that the native executable requests are processed a lot faster than its original.
-
Click the trace name to view its details. Each span is represented by a blue bar.
6.2. Order Items #
-
Repeat the test from step 4.2 by sending an HTTP POST request to the
/store/orderendpoint to order an item:curl -X "POST" "http://localhost:8080/store/order" \ -H 'Content-Type: application/json; charset=utf-8' \ -d $'{"item":"laptop", "count":5}'You should see a new row in the Trace Explorer that represents the POST request.
-
Click the most recent trace name to view its details.
-
Click the span named
gcp-native-demo: StoreController.order#store.orderto view its details showing the custom span attributes:countandorder.item.
7. Clean up #
When you have completed the guide, you can clean up the resources you created on Google Cloud Platform so you will not be billed for them in the future.
7.1. Delete the Project #
The easiest way to eliminate billing is to delete the project you created.
Deleting a project has the following consequences:
-
If you used an existing project, you will also delete any other work you have done in the project.
-
You cannot reuse the project ID of a deleted project. If you created a custom project ID that you plan to use in the future, you should delete the resources inside the project instead. This ensures that URLs that use the project ID, such as an appspot.com URL, remain available.
-
If you are exploring multiple guides, reusing projects instead of deleting them prevents you from exceeding project quota limits.
7.1.1. Via the CLI
To delete the project using the Google Cloud CLI, run the following command:
gcloud projects delete gcn-guides
7.1.2. Via the Cloud Platform Console
-
In the Cloud Platform Console, go to the Projects page.
-
In the project list, select the project you want to delete and click Delete project. Select the check box next to the project name and click Delete project.
-
In the dialog box, enter the project ID, and then click Shut down to delete the project.
Summary #
This guide demonstrated how to create and trace a Micronaut application using Google Cloud Trace.