Setting OCI DevOps Build and Development Pipelines in VS Code
The OCI DevOps Tools extension provides support for the Oracle Cloud Infrastructure (OCI) DevOps service in VS Code. It allows you to transition from local to cloud-based application development and manage your source code remotely. The extension offers a complete generate-build-deploy-delete project workflow.
The OCI DevOps service is a continuous integration/continuous delivery (CI/CD) platform for developers to simplify and automate their software development lifecycle.
This guide describes how to set up OCI DevOps service pipelines in VS Code so you can build and deploy your application in Oracle Cloud Infrastructure.
1. Configure Access to OCI #
The prerequisites for using the OCI DevOps service from VS Code are that you have an OCI account and create the .oci/config file with appropriate API keys. Follow the OCI documentation to complete these tasks (if you have not yet done so):
- Create an Oracle Cloud Infrastructure account. A free account is sufficient.
- Setup an API Key to access OCI.
- Create .oci/config file to access OCI services.
- Install the OCI CLI.
Also, install the following software:
gitto work with the Git repositories provided by the OCI DevOps service.kubectlto deploy your application to Oracle Container Engine for Kubernetes (OKE).- (Optional) A Docker-API compatible container runtime, such as Rancher Desktop or Docker, to pull container images from the OCI Container Registry. It requires you to login to OCI Container Registry by running
docker login <region-key>.ocir.io.
2. Install Extensions #
Follow Installing Graal Cloud Native Tools to install the necessary extensions in VS Code.
3. Install GraalVM #
GraalVM provides the Native Image ahead-of-time compilation technology. Download and install GraalVM.
4. Create a Java Application #
You can create an application using the Graal Cloud Native Launcher or open an existing one. For this guide, create a new application.
-
Go to View, Command Palette, search for “Graal Cloud Native”, and invoke the Graal Cloud Native: Create New Project quick action:

- Follow the command prompts to generate a new Maven or Gradle project. For example, to create a simple Java server application:
- Select the Micronaut version: Default
- Select the application type: Application
- Select the project Java (this is the JDK that will be used to build your project): GraalVM
- Provide project name: devops-demo
- Provide base package: com.example
- Select Graal Cloud Native services: None. Click OK to confirm.
- Select Graal Cloud Native Features to be included in the project: Click OK to confirm the selected features.
- Select build tool: Gradle (Groovy)
- Select test framework: JUnit
- Select cloud providers to support: OCI. Click OK to confirm.
- Select whether you want to generate sample code: Yes
- Finally, you are asked to select the destination directory on your local disk and whether to open the new project in a new window or add it to the current workspace. The project is created and opened in the VS Code window.
5. Set Access to Oracle Container Engine for Kubernetes (OKE) #
You will package your server application in OCI and deploy it to Oracle Container Engine for Kubernetes (OKE). For that you need to create a Kubernetes cluster (if you do not already have one).
- Create a Kubernetes cluster in the Oracle Cloud console, with default settings, using the Quick Create workflow:
- Open the navigation menu and click Developer Services.
- Under Containers, click Kubernetes Clusters (OKE).
- Then click Create Cluster and choose Quick Create option. It takes a few minutes to create a cluster.
- Set local access to your cluster so you can manage it using
kubectl. To set local access, review the information that is displayed after OKE Quick Create completes in the Oracle Cloud Console. Otherwise, from the Oracle Cloud Console perform the following steps:- Open your newly created OKE cluster (Developer Services > Kubernetes Clusters (OKE)).
- Click Access Cluster.
- In the Access Your Cluster window, select Local Access, and run the commands tied to your user ID from your VS Code terminal window (View > Terminal). Make sure you access your cluster via the VCN-Native public endpoint.
Alternatively, see the Setting Up Local Access to Clusters OCI guide for more information.
Note: On Windows,
kubectlis typically installed within the Kubernetes extension and is not added to the system path. Windows users should configure a proxy in the .kube/config file to successfully deploy a project to OCI: add aproxy-urlproperty undercluster:
clusters:
- name: "dev"
 cluster:
 proxy-url: http://user:password@proxy:port
 ...
Note: If VS Code fails to locate a Kubernetes cluster (OKE), or you have not created it yet, the extension will suggest you create one directly in VS Code. However, you are required to setup OKE.
6. Deploy to OCI #
Now you can proceed to create an OCI DevOps project from VS Code:
-
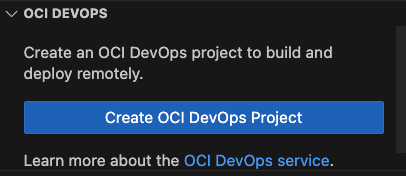
Having your project opened in VS Code, expand the new OCI DevOps panel in the Explorer.
-
Click Create OCI DevOps Project to push the project from your local system to a newly created OCI DevOps project:
Note: If you have not enabled access to OCI or misconfigured your OCI profile, the operation will fail with a message similar to: Failed to read compartments: The required information to complete authentication was not provided or was incorrect.
You will see a notification Local sources will be pushed to a remote OCI code repository…. Select Confirm to proceed.
-
Follow the command prompts:
- Select your OCI profile (if you have several profiles in your .oci/config file).
- Select your compartment in OCI.
- Select the OKE cluster where you will deploy your application.
- Enter a unique DevOps project name (must be unique per tenancy). By default, the OCI DevOps project name maps the application opened in your VS Code window or workspace.
Depending on your setup, you might be asked to:
- Confirm SSH keys for Git operations and add the OCI DevOps Git server to
sshthe config/known_hosts file. Select Yes to proceed. - If the permissions on your SSH config file and keys, or the directory containing them, are incorrect you will see a dialog box that informs you of this and asks if it can resolve this issue by updating the permissions. Select Yes to proceed.
Then the DevOps project generation starts and a progress indicator provides you with feedback :

There is also a log for the action available in the OUTPUT window: open View > Output and select OCI DevOps Tools from the drop-down list.
It should take about two minutes to generate an OCI DevOps project.
As the deployment is taking place you may see dialog boxes which are the result of project audits. These will detail if your project is using any libraries that have known Critical Vulnerabilities or Exposures (CVEs).

At this step, the extension creates the necessary OCI resources, all of which are described here.
You can view your application files stored in the OCI DevOps project code repository by clicking the ellipsis (…) in the OCI DEVOPS panel and then Open Folder Code Repository in Oracle Cloud Console:

Once successfully created, a subset of existing actions is displayed in the OCI DevOps panel:
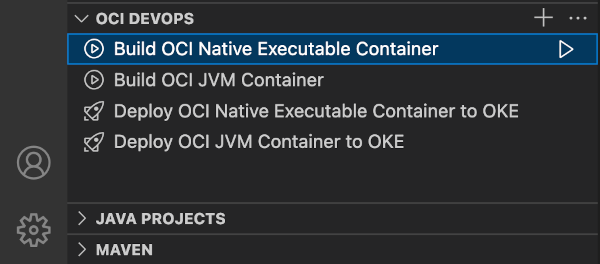
You can immediately perform the following actions on your OCI DevOps project:
- Build OCI Native Executable Container: to create a container image containing a native executable of your application.
- Deploy OCI Native Executable Container to OKE: to deploy a container image containing a native executable of your application to the Kubernetes cluster.
All these actions will be performed on a remote host.
7. Build a Container Image in OCI and Deploy It to OKE #
Now is the easiest part: build a container image containing a native executable for your application remotely in OCI and deploy it to OKE from VS Code.
-
Hover over the Build OCI Native Executable Container action and click the “play” icon. This action uses a custom build runner shape that you may be charged for. A dialog box asks you to confirm this once, or permanently. You may also choose to cancel the build of the container if you do not wish to incur possible charges.

The action starts and you can follow the progress in the OUTPUT window (go to View > OUTPUT and select the action name). Once completed, you can see a small download icon next to the play icon to download the build output (in this case a container image containing a native executable):

The build of the container with the native executable may take up to 15 minutes to complete.
-
Start the Deploy OCI Docker Native Executable to OKE action. When all stages are complete and the OKE deployment has succeeded, the action icon changes color to green, and the icon Open in Browser appears:

The container image is built and pushed to the OCI Container Registry. To check if the container image has been successfully built, go to the Oracle Cloud Console, select Developer Services, then Container Registry, and select your compartment.
8. Add More CI/CD Actions #
The build and deployment targets in the OCI DevOps panel are not limited to the four listed above. There are many more: you can add an existing build pipeline, a build artifact, a container repository, and so on. (Click the + icon to view a full list.)

Summary #
Thanks to Graal Cloud Native Tools for VS Code, you can easily create build and deployment pipelines along with source code management in the OCI DevOps service. Using the OCI DevOps Tools you can transition between local and cloud-based application development and deployment.