Creating a Database Application and Connecting to an Oracle Autonomous Database
This guide shows you how to use the Graal Cloud Native tools in VS Code to create a Java application from an existing Oracle Autonomous Database schema.
After completing this guide you will understand how to create entity and repository classes from an existing database schema tables, with no coding, and quickly build a simple CRUD application that lets you interact with the data stored in the database. All this is possible to accomplish from within VS Code thanks to Graal Cloud Native and Tools for Micronaut® Framework.
Prerequisites #
- JDK 17 or higher. See Setting up Your Desktop. Oracle GraalVM is a fast and efficient JDK from Oracle.
- An Oracle Cloud Infrastructure account. See Setting up Your Cloud Accounts.
- An Oracle Cloud Infrastructure compartment.
- Graal Cloud Native Extension Pack. See Installing Graal Cloud Native Extension Pack.
- Optional: The Oracle Developer VS Code extension. See Installing Oracle Developer Tools for VS Code.
1. Provision an Oracle Autonomous Database #
-
In the Oracle Cloud Console, open the navigation menu, click Oracle Database. Under Autonomous Database, click Autonomous Transaction Processing.
-
Click Create Autonomous Database and accept the default name for the database.
-
Select Transaction Processing and Serverless. If you are using a trial account, make sure you select Always Free.
-
Create an admin password (must be at least 12 characters and contain a number and an uppercase letter) and select Secure access from everywhere as the network access type.
-
Select License Included and click Create Autonomous Database to create your database.
-
On the Autonomous Database Details screen click Copy to copy the OCID of the database. (This is a unique identifier for your database instance which you will need later.)
2. Install a Sample Schema into the Database #
Install one of the sample schemas that Oracle supplies into your new Oracle Autonomous Database. For completing this guide, use the Oracle Sample HR Schema.
2.1. Connect to the Autonomous Database #
Follow these steps to connect to your database: Connecting Using Oracle Cloud Infrastructure Explorer to Connect Without Using Credentials Files (Walletless).
2.2. Install the Sample Schema #
Now that you are connected to your database, install the HR schema. This schema is a great place to start from.
Follow these steps: Installation of the Sample Schemas.
3. Create a Graal Cloud Native Project #
Now create a new Graal Cloud Native project with support for the Oracle Database Server and Micronaut Data.
-
Go to View, Command Palette, search for “Graal Cloud Native”, and invoke the Graal Cloud Native: Create New Project quick action:

-
Step through the project creation wizard. The following list details how you should respond to each prompt:
- Pick GCN Version: 4.3.7
- Pick an Application type: Application
- Pick Project Java: Select your JDK installation
- Provide project name: dbsample
- Provide base package: com.example
- Pick project language: Java
- Pick project services: Database
-
Pick project features: Oracle Cloud Autonomous Transaction Processing (ATP) (as shown in the screenshot below):

- Pick the build tool: Maven or Gradle
- Pick test framework: JUnit
- Select cloud providers to support: Oracle Cloud Infrastructure
- Pick generate sample code: No
-
Save the project and open it in a new VS Code window.
- Remove the following two lines from application.properties:
datasources.default.ocid= datasources.default.walletPassword= - Remove the Flyway dependency from your build file:
Edit the file oci/build.gradle to remove the flyway dependency.
     implementation("io.micronaut.flyway:micronaut-flyway")
     runtimeOnly("org.flywaydb:flyway-database-oracle")
Edit the file oci/pom.xml to remove the flyway dependency.<dependency> <groupId>org.flywaydb</groupId> <artifactId>flyway-database-oracle</artifactId> <scope>runtime</scope> </dependency> <dependency> <groupId>io.micronaut.flyway</groupId> <artifactId>micronaut-flyway</artifactId> <scope>compile</scope> </dependency>
4. Connect to the Oracle Autonomous Database #
Now connect the VS Code developer tooling to your Oracle Autonomous Database.
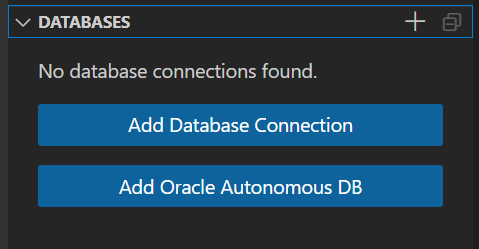
As you have the application opened, VS Code should show the Explorer panel. Within the Explorer panel, open the DATABASES pane, as shown in the screenshot below, and click Add Oracle Autonomous DB. (This is also available in the Command Palette).
It launches a database connection wizard. Follow the prompts:
- Select the OCI profile that you wish to use (if you have multiple OCI profiles).
- From the list of compartments, select the compartment that contains your database.
- From the list of databases, select your database.
- Enter the username for the database. It is the
HRschema user. -
Enter the password for the database. It is the
HRschema user password.Now the database is added to the DATABASES view in the Explorer panel. The database wallet is downloaded, and ready to use:

-
Open the database in the view, then right-click, and select Connect to Database from the menu:

If the credentials you provided (username or password) are incorrect, it will fail to connect.
Once you are connected to the database, you can browse the schema and see that several tables have been created from the schema.

5. Create Micronaut Data Entities from Tables #
You can generate Micronaut Data Entities and Repository Interfaces from a connected database within VS Code!
- With the database connection setup, return to the Files view in the activity bar that shows the files within your Maven or Gradle project.
-
Open the src folder, as shown in the screenshot blow, right-click the example package and select New from Template. It launches a wizard to create Micronaut Data Entity classes directly from the database schema tables.

-
When prompted, select Micronaut, then Micronaut Data Entity Classes from Database. It starts reading tables from the default database connected:

-
The wizard then displays a selectable list of the available tables within the database schema that you can create corresponding entities. Select all:

- Click Enter.
The Entity classes are generated with all annotations, constructors, attributes, getters, and setters.
6. Create Micronaut Data Repositories #
In the same way, you can generate Micronaut Data Repositories for the corresponding Entity classes.
- In the src folder, right-click the example package, and select New From Template from the menu.
-
When prompted, select Micronaut, then Micronaut Data Repository Interfaces from Entity:

-
From the list of entities, select the Entities for which you want to create corresponding repositories. Select all.
- Click Enter.
7. Create a REST Controller #
You can also create a REST Controller from a template.
-
In the src folder, right-click the example package, and select New From Template.
-
When prompted, select Micronaut, then Micronaut Controller Class:

It creates a Micronaut Controller class with a default GET endpoint.
-
Add the constructor with the
Employeerepository. Replace the default class with this:@Controller("/employees") public class EmployeeController { private final EmployeeRepository repo; public EmployeeController(EmployeeRepository repo) { this.repo = repo; } @Get(uri = "/", produces = "text/plain") public String index() { return repo.findAll().stream().map(e -> e.getLastName()).collect(Collectors.joining("\n")); } }
Now you have a complete Java application that exposes some REST endpoints and stores data in an Oracle Autonomous Database database using Micronaut Data JDBC.
8. Run the Application #
To run the application, there is no need to configure your database connection in your project application.properties or application.yml files.
All you need is to keep the database connection active, and then run your application using CodeLens in the Application.java file (Run main, Debug main, Run with Continuous Mode):

When the application is running, send an HTTP GET request to the employees endpoint from a new Terminal window:
curl localhost:8080/employees
The application runs seamlessly against a database configured for your project. Learn more about database management in VS Code in the Database Features extension documentation.
Summary #
This guide provides a detailed walkthrough for creating a Java application in VS Code using Graal Cloud Native tools, based on an Oracle Autonomous Database schema. It begins with instructions on setting up and running the application locally, ensuring a foundational understanding of the development process. Key steps include:
- Creating and connecting to an Oracle Autonomous Database.
- Installing a sample schema and creating a Graal Cloud Native Project.
- Generating Micronaut Data Entities and Repositories from database tables.
- Developing a REST Controller and running the application locally for initial testing.
By the end of this guide, you will be equipped with the knowledge to not only develop a Java application using an existing database schema but also to deploy and manage it both locally and in the Oracle Cloud environment.