Database Features
The Database connection features are available in VS Code as part of the Tools for Micronaut</a>® Framework extension. The extension provides the drivers that are supported by Graal Cloud Native Tools and used by Apache NetBeans Language Server, such as Oracle Autonomous Database, MySQL, and Postgres database drivers.
Prerequisite #
Usage #
Once the extension is installed, the DATABASES view appears in the VS Code Explorer panel:

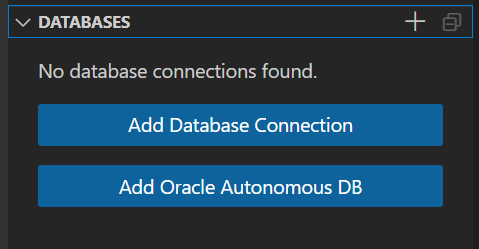
Expand DATABASES to see the initial view. It provides two actions:
- Add Database Connection: to connect to MySQL, Postgres, or Oracle Database from localhost or remote. You can also enable it by clicking + to the left of DATABASES.
-
Add Oracle Autonomous DB: to add a connection to an Oracle Autonomous Database. (This is alternatively available in the Command Palette).
Connect to an Oracle Autonomous Database #
To connect to an Oracle Autonomous Database, follow the steps below:
- Expand the DATABASES view in the Explorer panel and click Add Oracle Autonomous DB. If there are existing databases in the view, you can skip to step 6.
- From the list of compartments, select the compartment that contains your database.
- From the list of databases, select your database.
- Enter the username for the database.
-
Enter the password for the database.
The database is added to the DATABASES view in the Explorer panel. The database wallet will be downloaded, and is ready to use:

-
Select the database in the view, then right-click, and select Connect to Database from the menu:

If the credentials you provided (username or password) are incorrect, it will fail to connect.
Connect to a MySQL Database #
To connect to a MySQL Database, follow the steps below:
- Expand the DATABASES view in the Explorer panel and click Add Oracle Autonomous DB. If there are existing databases in the view, you can skip to step 6.
-
Choose MySQL from the menu:

-
Provide the localhost URL to connect to a MySQL database:

- Enter the username for the database.
-
Enter the password for the database.
The MySQL database is added to the DATABASES view in the Explorer panel. Here is a MySQL database connection example:

- Select the database in the view, then right-click, and select Connect to Database from the menu.
It takes the jdbc driver as default name, but you can always change it from Properties. To change the properties of a database connection, select the database in the DATABASES view, right-click and then select Properties from the menu.
Set a Default Connection #
To set a preferable database connection as default, select the database in the DATABASES view, right-click, and then select Set as Default Connection from the menu.
Disconnect from a Database #
Right-click database name, then click Disconnect from Database:

Change Database Properties #
To change the properties of a database connection, select the database in the DATABASES view, right-click and then select Properties from the menu.

Note: Disconnect from the database before attempting to change its properties. You cannot change the properties of a connected database.
There are two modes to access the database properties:
- Read Write: when you are disconnected from a database, you can change the properties.
- Read Only: if your database connection is active, all properties are read only, which means you cannot modify anything:

Database Explorer #
After a successful connection to a database, you can explore the tables and columns from the tree view under the database name:

You can delete a column or table by right-clicking on it, then Delete:

Create Entity Classes from an Existing Database Schema #
One of the main features is that you can generate Micronaut Data Entity classes (Java classes with annotation @Entity) and Repository Interfaces from a connected database within VS Code!
To create Entity classes, follow these steps:
- Create a new Micronaut project in VS Code (or open an existing one).
- Create a new Java package in your project, for example,
com.example.micronaut.entities. -
Right-click the package name and select New From Template from the menu:

-
When prompted, select Micronaut, then Micronaut Data Entity Classes from Database. It starts reading tables from the default database connected:

-
From the list of tables, select the tables for which you want to create corresponding entities.

- Click Enter.
The classes are generated with all annotations, constructors, attributes, getters and setters.
Create Repository Classes from an Existing Database Schema #
You can generate Micronaut Data Repository Interfaces from Entity classes in the same project. Follow these steps:
- Create a new Java package in your project, for example,
com.example.micronaut.repositories. - Right-click the package name and select New From Template from the menu.
-
When prompted, select Micronaut, then Micronaut Data Repository Interfaces from Entity:

-
From the list of entities, select the Entities for which you want to create corresponding repositories:

- Click Enter.
Code Completion Finders #
Apache NetBeans Language Server enables the code completion feature for JPA finders in the repositories generated by the extensions.

It shows errors for incorrect methods. In the example below, the method findByAddress() should take a parameter.

The parameter should have the same type as the address attribute. If type is mismatched, it will throw an error with the correct type:

Running a Database Application #
If your Java application uses a database, there is no need to configure your database connection in your project application.properties or application.yml files.
Just connect to this database in your VS Code and then run your application using CodeLens in the Application.java file.
Running the application from CodeLens (Run main, Debug main, Run with Continuous Mode) allow your application to connect to the database:

Once your application is run, you can see a full command to run it in a VS Code Terminal.
VS Code sets several environment variables for this process: DATASOURCES_DEFAULT_URL, DATASOURCES_DEFAULT_DRIVER_CLASS_NAME, DATASOURCES_DEFAULT_USERNAME, DATASOURCES_DEFAULT_OCID, and DATASOURCES_DEFAULT_PASSWORD.
This allows to run the application seamlessly against a database configured for your project.
Feedback #
If you have suggestions for new features, or if you have found a bug: