Deploy a Micronaut Microservices Application to the Google Kubernetes Engine
This guide shows how to deploy a Micronaut microservices application to the Google Kubernetes Engine (GKE) using the Micronaut Kubernetes module.
GKE is a managed Kubernetes service for deploying containerized applications to the cloud.
The guide shows how to use Kubernetes Service Discovery and Distributed Configuration to connect several microservices, and discover how Micronaut integration with Kubernetes simplifies deployment to GKE.
Prerequisites #
- JDK 17 or higher. See Setting up Your Desktop.
- A Google Cloud Platform (GCP) account. See Setting up Your Cloud Accounts.
- The Google Cloud CLI authenticated with your Google credentials. (Run
gcloud initfor quick authentication.) - A Docker-API compatible container runtime such as Rancher Desktop or Docker installed to run MySQL and to run tests using Testcontainers.
jq: a lightweight and flexible command-line JSON processor.kubectlto deploy the application to GKE.
Note: This guide uses paid services; you may need to enable billing in Google Cloud to complete some steps in this guide.
A note regarding your development environment
Consider using Visual Studio Code that provides native support for developing applications with the Graal Cloud Native Tools extension.
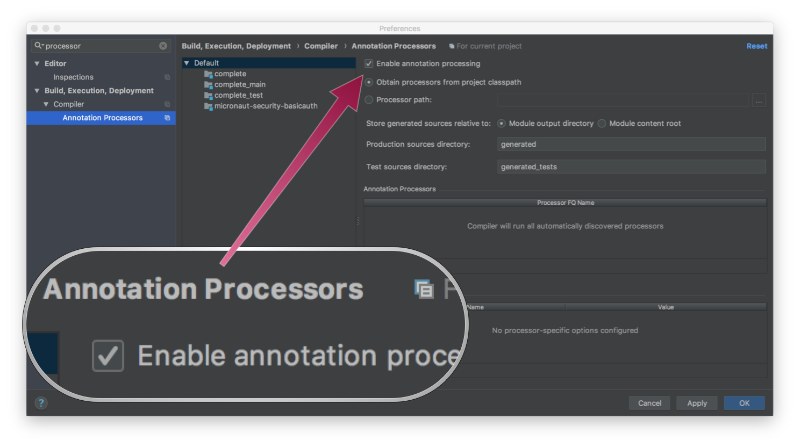
Note: If you use IntelliJ IDEA, enable annotation processing.
Windows platform: The GCN guides are compatible with Gradle only. Maven support is coming soon.
1. Create or Download a Microservices Application #
You can create a microservices application from scratch by following this guide, or you can download the completed example in Java:
The application ZIP file will be downloaded in your default downloads directory. Unzip it, open in your code editor, and proceed to the next steps.
The application consists of three microservices:
- users - contains customer data that can place orders on items, also a new customer can be created. It requires HTTP basic authentication to access it.
- orders - contains all orders that customers have created as well as available items that customers can order. This microservice also enables the creation of new orders. It requires HTTP basic authentication to access it.
- api - acts as a gateway to the orders and users microservices. It combines results from both microservices and checks data when a customer creates a new order.
Note: By default, a Micronaut application detects its runtime environment. A detected environment (in this case, k8s) overrides the default specified environment (in this case, gcp). This means that you should locate your configuration in the application-k8s.properties and bootstrap-k8s.properties files. Alternatively, you can specify the
gcpenvironment passing it as a command-line option (-Dmicronaut.environments=gcp) or via an environment variable (MICRONAUT_ENVIRONMENTS=gcp).
2. Set Up GKE #
In this section, you take the steps to set up GKE for your application: create a project, enable the Google Cloud Container Registry API, configure Google Cloud Docker, enable the Google Cloud Kubernetes Engine API, and create a GKE cluster.
2.1. Create a Google Cloud Project #
Create a project in GCP and switch to it:
export PROJECT_ID=gcn-guides
gcloud projects create $PROJECT_ID
gcloud config set project $PROJECT_ID
Note: The project id must be unique, so you may need to provide an alternative.
Note: If you want to switch to an existing project use
gcloud projects listto list all the existing projects.
2.2. Enable the Google Cloud Container Registry API #
You need somewhere to store your container images, so enable the Google Cloud Container Registry API for your project via the Google Cloud CLI:
gcloud services enable containerregistry.googleapis.com
2.3. Configure Google Cloud Docker #
Run auth configure-docker via the Google Cloud CLI, as follows:
gcloud auth configure-docker
You should see output similar to:
Adding credentials for all GCR repositories.
WARNING: A long list of credential helpers may cause delays running 'docker build'. We recommend passing the registry name to configure only the registry you are using.
After update, the following will be written to your Docker config file located at [~/.docker/config.json]:
 {
  "credHelpers": {
    "gcr.io": "gcloud",
    "us.gcr.io": "gcloud",
    "eu.gcr.io": "gcloud",
    "asia.gcr.io": "gcloud",
    "staging-k8s.gcr.io": "gcloud",
    "marketplace.gcr.io": "gcloud"
  }
}
2.4. Enable the Google Cloud Kubernetes Engine API #
To use the Kubernetes Engine API, enable it for your project via the Google Cloud CLI:
gcloud services enable container.googleapis.com
2.5. Create a GKE Cluster #
Create a cluster named “gcn-k8s” and use two n1-standard-2 instances as GKE nodes. Everything will be deployed on your default Google Cloud region. Create the “gcn-k8s” Kubernetes cluster, as follows:
gcloud container clusters create gcn-k8s --machine-type n1-standard-2 --num-nodes 2 --disk-type pd-standard
3. Prepare Microservices #
3.1. Export Environment Variables #
Define some environment variables to make deploying process easier:
GCP_PROJECT_IDto store your GCP project id.GCP_REGIONto store GCP region code.GKE_CLUSTER_NAMEto store the name of your cluster.
For example:
export GCP_PROJECT_ID="$(gcloud config get-value project)"
export GCP_REGION="$(gcloud config get-value compute/region)"
export GKE_CLUSTER_NAME="gcn-k8s"
3.2. Build a Container Image of the Native Users Microservice #
To build a container image of the native users microservice named “users”, run the following command from the users/ directory:
Note: If you encounter problems building a container image, try the following:
- Gradle: from the users/build/docker/native-main/ directory, run
docker build . -t users -f DockerfileNative.- Maven: from the users/target/ directory, run
docker build . -t users -f Dockerfile.
Note: Ensure that you construct container images for the correct CPU architecture. For instance, if you are using AArch64, modify the
DOCKER_DEFAULT_PLATFORMenvironment variable to the valuelinux/amd64. Alternatively, you have the option to use AArch64 instances within your Kubernetes cluster.
3.3. Prepare the Users Microservice #
-
Export the users microservice container image repository to the
USERS_REPOSITORYenvironment variable:export USERS_REPOSITORY="gcr.io/$GCP_PROJECT_ID/users" -
Edit the file named users/k8s-gcp.yml as follows:
apiVersion: apps/v1
kind: Deployment
metadata:
   namespace: gcn-k8s
   name: "users"
spec:
   selector:
      matchLabels:
         app: "users"
   template:
      metadata:
         labels:
            app: "users"
      spec:
         serviceAccountName: gcn-service
         containers:
            - name: "users"
              image: gcr.io/<gcp-project-id>/users:latest  # <1>
              imagePullPolicy: Always  # <2>
              ports:
                 - name: http
                   containerPort: 8080
              readinessProbe:
                 httpGet:
                    path: /health/readiness
                    port: 8080
                 initialDelaySeconds: 5
                 timeoutSeconds: 3
              livenessProbe:
                 httpGet:
                    path: /health/liveness
                    port: 8080
                 initialDelaySeconds: 5
                 timeoutSeconds: 3
                 failureThreshold: 10
              env:
                 - name: MICRONAUT_ENVIRONMENTS
                   value: "gcp"
         imagePullSecrets:
            - name: gcpsersecret
---
apiVersion: v1
kind: Service
metadata:
   namespace: gcn-k8s
   name: "users"
spec:
   selector:
      app: "users"
   type: NodePort
   ports:
      - protocol: "TCP"
        port: 8080
1 The URI of the repository that you created in GKE. Change the
<project-id>to your Google project id. You can achieve this by runningsed -i'' -e "s/<project-id>/$GCP_PROJECT_ID/" users/k8s-gcp.yml.2 Change
imagePullPolicytoAlways.3 A secret required to pull container images from Google Container Registry.
-
Tag an existing users microservice container image:
docker tag users-gcp:latest ${USERS_REPOSITORY}:latest -
Push the tagged users microservice container image to the remote repository:
docker push ${USERS_REPOSITORY}:latest
3.4. Build a Container Image of the Native Orders Microservice #
To build a container image of the native orders microservice named “orders”, run the following command from the orders/ directory:
Note: If you encounter problems building a container image, try the following:
- Gradle: from the orders/build/docker/native-main/ directory, run
docker build . -t orders -f DockerfileNative.- Maven: from the orders/target/ directory, run
docker build . -t orders -f Dockerfile.
Note: Ensure that you construct container images for the correct CPU architecture. For instance, if you are using AArch64, modify the
DOCKER_DEFAULT_PLATFORMenvironment variable to the valuelinux/amd64. Alternatively, you have the option to use AArch64 instances within your Kubernetes cluster.
3.5. Prepare the Orders Microservice #
-
Export the orders microservice container image repository to the
ORDERS_REPOSITORYenvironment variable:export ORDERS_REPOSITORY="gcr.io/$GCP_PROJECT_ID/orders" -
Edit the file named orders/k8s-gcp.yml as follows:
apiVersion: apps/v1
kind: Deployment
metadata:
  namespace: gcn-k8s
  name: "orders"
spec:
  selector:
    matchLabels:
      app: "orders"
  template:
    metadata:
      labels:
        app: "orders"
    spec:
      serviceAccountName: gcn-service
      containers:
        - name: "orders"
          image: gcr.io/<gcp-project-id>/orders:latest
          imagePullPolicy: Always  # <2>
          ports:
            - name: http
              containerPort: 8080
          readinessProbe:
            httpGet:
              path: /health/readiness
              port: 8080
            initialDelaySeconds: 5
            timeoutSeconds: 3
          livenessProbe:
            httpGet:
              path: /health/liveness
              port: 8080
            initialDelaySeconds: 5
            timeoutSeconds: 3
            failureThreshold: 10
          env:
            - name: MICRONAUT_ENVIRONMENTS
              value: "gcp"
      imagePullSecrets:
        - name: gcpsersecret
---
apiVersion: v1
kind: Service
metadata:
  namespace: gcn-k8s
  name: "orders"
spec:
  selector:
    app: "orders"
  type: NodePort
  ports:
    - protocol: "TCP"
      port: 8080
1 The URI of the repository that you created in GKE. Change the
to your Google project id. You can achieve this by running sed -i'' -e "s/<project-id>/$GCP_PROJECT_ID/" orders/k8s-gcp.yml.2 Change
imagePullPolicytoAlways.3 A secret required to pull container images from Google Container Registry.
-
Tag an existing orders microservice container image:
docker tag orders-gcp:latest ${ORDERS_REPOSITORY}:latest -
Push the tagged orders microservice container image to the remote repository:
docker push ${ORDERS_REPOSITORY}:latest
3.6. Build a Container Image of the Native API (Gateway) Microservice #
To build a container image of the native api microservice named “api”, run the following command from the api/ directory:
Note: If you encounter problems building a container image, try the following:
- Gradle: from the api/build/docker/native-main/ directory, run
docker build . -t api -f DockerfileNative.- Maven: from the api/target/ directory, run
docker build . -t api -f Dockerfile.
Note: Ensure that you construct container images for the correct CPU architecture. For instance, if you are using AArch64, modify the
DOCKER_DEFAULT_PLATFORMenvironment variable to the valuelinux/amd64. Alternatively, you have the option to use AArch64 instances within your Kubernetes cluster.
3.7. Prepare the API Microservice #
-
Export the api microservice container image repository to the
API_REPOSITORYenvironment variable:export API_REPOSITORY="gcr.io/$GCP_PROJECT_ID/api" -
Edit the file named api/k8s-gcp.yml as follows:
 apiVersion: apps/v1
 kind: Deployment
 metadata:
    namespace: gcn-k8s
    name: "api"
 spec:
    selector:
       matchLabels:
          app: "api"
    template:
       metadata:
          labels:
             app: "api"
       spec:
          serviceAccountName: gcn-service
          containers:
             - name: "api"
               image: gcr.io/<gcp-project-id>/api:latest  # <1>
               imagePullPolicy: Always  # <2>
               ports:
                  - name: http
                    containerPort: 8080
               readinessProbe:
                  httpGet:
                     path: /health/readiness
                     port: 8080
                  initialDelaySeconds: 5
                  timeoutSeconds: 3
               livenessProbe:
                  httpGet:
                     path: /health/liveness
                     port: 8080
                  initialDelaySeconds: 5
                  timeoutSeconds: 3
                  failureThreshold: 10
               env:
                  - name: MICRONAUT_ENVIRONMENTS
                    value: "gcp"
          imagePullSecrets:
             - name: gcpsersecret
 ---
 apiVersion: v1
 kind: Service
 metadata:
    namespace: gcn-k8s
    name: "api"
 spec:
    selector:
       app: "api"
    type: LoadBalancer
    ports:
       - protocol: "TCP"
         port: 8080
1 The URI of the repository that you created in GKE. Change the
<project-id>to your Google project id. You can achieve this by runningsed -i'' -e "s/<project-id>/$GCP_PROJECT_ID/" api/k8s-gcp.yml.2 Change
imagePullPolicytoAlways.3 A secret required to pull container images from Google Container Registry.
-
Tag an existing api microservice container image:
docker tag api-gcp:latest ${API_REPOSITORY}:latest -
Push the tagged api microservice container image to the remote repository:
docker push ${API_REPOSITORY}:latest
4. Deploy Microservices to GKE #
-
Create a directory for a
kubectlconfiguration:mkdir -p $HOME/.kube -
Install the Google
kubectlcomponent:gcloud components install kubectl -
Generate a
kubectlconfiguration for authentication to GKE:gcloud container clusters get-credentials gcn-k8s -
Set
KUBECONFIGto the created config file, as shown below. (This variable is consumed bykubectl.)export KUBECONFIG=$HOME/.kube/config -
Deploy the auth.yml file that you created in the Deploy a Micronaut Microservices Application to a Local Kubernetes Cluster guide:
kubectl apply -f auth.yml -
Create a secret named “gcpsersecret” for authentication to Google Cloud Container Registry using the command below. (GKE needs credentials to be able to pull your microservice container images.)
kubectl create secret docker-registry gcpsersecret \ --docker-server=gcr.io \ --docker-username=oauth3accesstoken \ --docker-password="$(gcloud auth print-access-token)" \ --docker-email=your@email.com -
Deploy the users microservice:
kubectl apply -f users/k8s-gcp.yml -
Deploy the orders microservice:
kubectl apply -f orders/k8s-gcp.yml -
Run the next command to deploy the api microservice:
kubectl apply -f api/k8s-gcp.yml
5. Test Integration Between the Microservices Deployed to GKE #
- Run the following command to check the status of the pods and make sure that all of them have the status “Running”:
kubectl get pods -n=gcn-k8sNAME READY STATUS RESTARTS AGE api-6fb4cd949f-kxxx8 1/1 Running 0 2d1h orders-595887ddd6-6lzp4 1/1 Running 0 2d1h users-df6f78cd7-lgnzx 1/1 Running 0 2d1h
-
Run this command to check the status of the microservices:
kubectl get services -n=gcn-k8sNAME TYPE CLUSTER-IP EXTERNAL-IP PORT(S) AGE api LoadBalancer 10.100.208.154 <redacted> 8080:31171/TCP 20m orders NodePort 10.100.157.155 <none> 8080:30742/TCP 20m users NodePort 10.100.126.97 <none> 8080:31580/TCP 20m
If
EXTERNAL-IPis in a<pending>state, wait a couple of seconds and then run the command again. -
Retrieve the URL of the api microservice and set it as the value of the $API_URL environment variable:
export API_URL=http://$(kubectl get svc api -n=gcn-k8s -o json | jq -r '.status.loadBalancer.ingress[0].ip'):8080 -
Run a
curlcommand to create a new user via the api microservice:curl -X "POST" "$API_URL/api/users" \ -H 'Content-Type: application/json; charset=utf-8' \ -d '{ "first_name": "Nemanja", "last_name": "Mikic", "username": "nmikic" }'Your output should look like:
{ "id":1, "username":"nmikic", "first_name":"Nemanja", "last_name":"Mikic" } -
Run a
curlcommand to create a new order via the api microservice:curl -X "POST" "$API_URL/api/orders" \ -H 'Content-Type: application/json; charset=utf-8' \ -d '{ "user_id": 1, "item_ids": [1,2] }'Your output should include details of the order, as follows:
{ "id": 1, "user": { "first_name": "Nemanja", "last_name": "Mikic", "id": 1, "username": "nmikic" }, "items": [ { "id": 1, "name": "Banana", "price": 1.5 }, { "id": 2, "name": "Kiwi", "price": 2.5 } ], "total": 4.0 } -
Run a
curlcommand to list the orders:curl "$API_URL/api/orders" \ -H 'Content-Type: application/json; charset=utf-8'You should see output that is similar to the following:
[ { "id": 1, "user": { "first_name": "Nemanja", "last_name": "Mikic", "id": 1, "username": "nmikic" }, "items": [ { "id": 1, "name": "Banana", "price": 1.5 }, { "id": 2, "name": "Kiwi", "price": 2.5 } ], "total": 4.0 } ] -
Try to place an order for a user who does not exist (with
id100). Run acurlcommand:curl -X "POST" "$API_URL/api/orders" \ -H 'Content-Type: application/json; charset=utf-8' \ -d '{ "user_id": 100, "item_ids": [1,2] }'You should see the following error message:
 {
   "message": "Bad Request",
   "_links": {
     "self": [
       {
         "href": "/api/orders",
         "templated": false
       }
     ]
   },
   "_embedded": {
     "errors": [
       {
         "message": "User with id 100 doesn't exist"
       }
     ]
   }
 }
6. Delete Kubernetes Resources #
To delete all Kubernetes resources that were created in this guide, run this command:
kubectl delete namespaces gcn-k8s
Delete the gcn-k8s/users artifacts container repository:
gcloud container images delete ${USERS_REPOSITORY} --force-delete-tags --quiet
Delete the gcn-k8s/orders artifacts container repository:
gcloud container images delete ${ORDERS_REPOSITORY} --force-delete-tags --quiet
Delete the gcn-k8s/api artifacts container repository:
gcloud container images delete ${API_REPOSITORY} --force-delete-tags --quiet
Finally, delete the gcn-k8s GKE cluster:
gcloud container clusters delete gcn-k8s
7. Clean up #
When you have completed the guide, you can clean up the resources you created on Google Cloud Platform so you will not be billed for them in the future.
7.1. Delete the Project #
The easiest way to eliminate billing is to delete the project you created.
Deleting a project has the following consequences:
-
If you used an existing project, you will also delete any other work you have done in the project.
-
You cannot reuse the project ID of a deleted project. If you created a custom project ID that you plan to use in the future, you should delete the resources inside the project instead. This ensures that URLs that use the project ID, such as an appspot.com URL, remain available.
-
If you are exploring multiple guides, reusing projects instead of deleting them prevents you from exceeding project quota limits.
7.1.1. Via the CLI
To delete the project using the Google Cloud CLI, run the following command:
gcloud projects delete gcn-guides
7.1.2. Via the Cloud Platform Console
-
In the Cloud Platform Console, go to the Projects page.
-
In the project list, select the project you want to delete and click Delete project. Select the check box next to the project name and click Delete project.
-
In the dialog box, enter the project ID, and then click Shut down to delete the project.
Summary #
This guide demonstrated how to use Kubernetes Service Discovery and Distributed Configuration, provided with the Micronaut Kubernetes integration, to connect three microservices, and to deploy these microservices to a Kubernetes cluster on the Google Kubernetes Engine.