Publish Application Logs to Google Cloud Logging
This guide describes how to create an application that publishes logs to Google Cloud Logging. Typically, application logs are written to stdout and to files, but the Micronaut Logging module supports multiple logging frameworks such as Logback, and logging to various other appenders, to email, a database, or other destinations.
Google Cloud Logging is a logging service from Google Cloud that has fully managed, real-time log management with storage, search, analysis and alerting at exabyte scale.
Prerequisites #
- JDK 17 or higher. See Setting up Your Desktop.
- A Google Cloud Platform (GCP) account. See Setting up Your Cloud Accounts.
- The Google Cloud CLI. (The CLI is part of the Google Cloud SDK; for more information, see Cloud SDK.)
- The GCN CLI. See Setting up Your Desktop. (Optional.)
Note: This guide uses paid services; you may need to enable billing in Google Cloud to complete some steps in this guide.
Follow the steps below to create the application from scratch. However, you can also download the completed example in Java:
A note regarding your development environment
Consider using Visual Studio Code that provides native support for developing applications with the Graal Cloud Native extension.
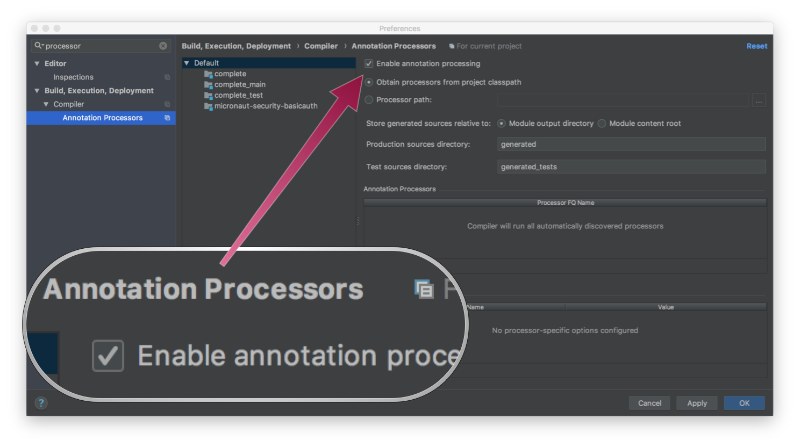
If you use IntelliJ IDEA, enable annotation processing.
Windows platform: The GCN guides are compatible with Gradle only. Maven support is coming soon.
1. Create the Application #
Create an application using the GCN Launcher.
-
Open the GCN Launcher in advanced mode.
- Create a new project using the following selections.
- Project Type: Application (Default)
- Project Name: gcp-logging-demo
- Base Package: com.example (Default)
- Clouds: GCP
- Language: Java (Default)
- Build Tool: Gradle (Groovy) or Maven
- Test Framework: JUnit (Default)
- Java Version: 17 (Default)
- Micronaut Version: (Default)
- Cloud Services: Logging
- Features: GraalVM Native Image (Default)
- Sample Code: Yes (Default)
- Click Generate Project, then click Download Zip. The GCN Launcher creates an application with the default package
com.examplein a directory named gcp-logging-demo. The application ZIP file will be downloaded in your default downloads directory. Unzip it, open in your code editor, and proceed to the next steps.
Alternatively, use the GCN CLI as follows:
gcn create-app com.example.gcp-logging-demo \
    --clouds=gcp \
    --services=logging \
    --features=graalvm \
    --build=gradle \
    --jdk=17 \
    --lang=java
gcn create-app com.example.gcp-logging-demo \
--clouds=gcp \
--services=logging \
--features=graalvm \
--build=maven \
--jdk=17 \
--lang=javaThe GCN Launcher creates a multimodule project with two subprojects: gcp for Google Cloud Platform, and lib. You develop the application logic in the gcp subproject. If your application is to be deployed to multiple cloud providers, use the lib subproject to create classes that can be shared between the providers. This enables you to separate the code that is different between cloud providers, while keeping most of the implementation in the common lib subproject.
The Logging service that you selected at the project generation step bundles Logback, Jackson Databind, and other necessary dependencies. The Logback appender publishes logs to Google Cloud Logging.
1.1. Controller Class #
The example code includes a controller in a file named gcp/src/main/java/com/example/LogController.java, which enables you to send POST requests to publish a message to a log:
package com.example;

import io.micronaut.http.annotation.Body;
import io.micronaut.http.annotation.Controller;
import io.micronaut.http.annotation.Post;
import org.slf4j.Logger;
import org.slf4j.LoggerFactory;

@Controller
class LogController {

    private static final Logger LOG = LoggerFactory.getLogger(LogController.class);

    @Post("/log")
    void log(@Body String message) {
        LOG.info(message);
    }
}
Windows platform: The GCN guides are compatible with Gradle only. Maven support is coming soon.
2. Get Started with Google Cloud Logging #
To use Google Cloud Logging, configure GCP as follows:
2.1. Create a Google Cloud Platform Project #
Create a new GCP project named “gcn-guides” (use the instructions in Creating and managing projects), then follow the steps below.
- Initialize the Cloud SDK:
gcloud init - Log in to the Google Cloud Platform:
gcloud auth login - Authenticate application default credentials:
gcloud auth application-default login - Select your project:
gcloud config set project gcn-guides
2.3. Enable the Logging API #
Enable the Logging API using this command:
gcloud services enable logging.googleapis.com
3. Configure Appender #
The GCN Launcher provided a file named gcp/src/main/resources/logback.xml containing the configuration for an appender that publishes log statements to Google Cloud Logging.
Note: You can un-comment the STDOUT appender as the ‘emergency’ appender. See the file for details.
You do not have to provide any further configuration, so you can proceed to run the application, publishing the logs.
4. Run the Application, Publish and View Logs #
-
Run the application using the following command (it will start the application on port 8080):
- Send some
curlrequests to test logging:curl -id '{"message":"your message here"}' \ -H "Content-Type: application/json" \ -X POST http://localhost:8080/log - In the Google Cloud console, open the navigation menu, go to Logs Explorer and select your project in the top-left, to view the logs published by your application.
5. Generate a Native Executable Using GraalVM #
GCN supports compiling a Java application ahead-of-time into a native executable using GraalVM Native Image. You can use the Gradle plugin for GraalVM Native Image building/Maven plugin for GraalVM Native Image building. Packaged as a native executable, it significantly reduces application startup time and memory footprint.
To generate a native executable, run the following command:
./gradlew :gcp:nativeCompileThe native executable is created in the gcp/build/native/nativeCompile/ directory and can be run with the following command:
gcp/build/native/nativeCompile/gcp./mvnw install -pl lib -am
./mvnw package -pl gcp -Dpackaging=native-imageThe native executable is created in the gcp/target/ directory and can be run with the following command:
gcp/target/gcp6. Run and Test the Native Executable #
Run the native executable, and then perform the same request as in step 4.
7. Clean up #
When you have completed the guide, you can clean up the resources you created on Google Cloud Platform so you will not be billed for them in the future.
7.1. Delete the Project #
The easiest way to eliminate billing is to delete the project you created.
Deleting a project has the following consequences:
-
If you used an existing project, you will also delete any other work you have done in the project.
-
You cannot reuse the project ID of a deleted project. If you created a custom project ID that you plan to use in the future, you should delete the resources inside the project instead. This ensures that URLs that use the project ID, such as an appspot.com URL, remain available.
-
If you are exploring multiple guides, reusing projects instead of deleting them prevents you from exceeding project quota limits.
7.1.1. Via the CLI
To delete the project using the Google Cloud CLI, run the following command:
gcloud projects delete gcn-guides
7.1.2. Via the Cloud Platform Console
-
In the Cloud Platform Console, go to the Projects page.
-
In the project list, select the project you want to delete and click Delete project. Select the check box next to the project name and click Delete project.
-
In the dialog box, enter the project ID, and then click Shut down to delete the project.
Summary #
This guide demonstrated how to create an application that publishes logs to Google Cloud Logging. Then, using the GCP console, you viewed the logs produced by the application. Finally, you saw how to build a native executable for this application with GraalVM Native Image, and ran it to test publishing logs to Google Cloud Logging.