Running a Database Application in Oracle Cloud and Storing Properties in OCI Vault from VS Code
This guide shows you how to connect a Java application to an Oracle Autonomous Database and securely store connection properties in an Oracle Cloud Infrastructure (OCI) Vault from within VS Code. This enables you to deploy the same application to different containers that will securely connect to a database using isolated connections.
The OCI Vault service is a management service that stores and manages master encryption keys and secrets for secure access to resources.
Prerequisites #
- JDK 17 or higher. See Setting up Your Desktop. Oracle GraalVM is a fast and efficient JDK from Oracle.
- An Oracle Cloud Infrastructure account. See Setting up Your Cloud Accounts.
- An Oracle Cloud Infrastructure compartment.
- Graal Cloud Native Extension Pack. See Installing Graal Cloud Native Extension Pack.
1. Create a Database Application #
Create a database application with support for the Oracle Database Server and Micronaut Data.
- In your VS Code window, go to View, Command Palette, search for “Graal Cloud Native”, and invoke the Graal Cloud Native: Create New Project quick action.
-
Step through the project creation wizard. The following list details how you should respond to each prompt:
- Pick GCN Version: 4.3.7
- Pick an Application type: Application
- Pick Project Java: Select your JDK installation
- Provide project name: dbsample
- Provide base package: com.example
- Pick project language: Java
- Pick project services: Database
-
Pick project features: Oracle Cloud Autonomous Transaction Processing (ATP) (as shown in the screenshot below):

- Pick the build tool: Maven or Gradle
- Pick the test framework: JUnit
- Select cloud providers to support: Oracle Cloud Infrastructure
- Pick generate sample code: Yes
- Save the project and open it in a new VS Code window.
The project creation wizard creates a sample application with all necessary files for you: a domain entity, a repository interface, a controller, a service class, and even tests. It is sufficient to follow this guide.
-
Open the dbsample/oci/src/main/resources/application.properties file and:
- Remove the following two lines:
datasources.default.ocid= datasources.default.walletPassword= - Add this line:
flyway.datasources.default.baseline-on-migrate=true
- Remove the following two lines:
- Add the dependency to integrate Micronaut with Oracle Cloud Infrastructure Vault:
implementation("io.micronaut.oraclecloud:micronaut-oraclecloud-vault")<dependency>
<groupId>io.micronaut.oraclecloud</groupId>
<artifactId>micronaut-oraclecloud-vault</artifactId>
</dependency>1.1. Verify Flyway Configuration #
The sample project includes Flyway for database migrations. Flyway reads migration file(s) in the lib/src/main/resources/db/migration/ directory, runs them if necessary, and verifies that the configured datasource is consistent with them. Learn more in the Micronaut integration with Flyway documentation.
The migration file with the sample database schema, lib/src/main/resources/db/migration/V1__schema.sql, was also created for you by the project creation wizard:
CREATE TABLE "GENRE" (
   "ID"    NUMBER(19) PRIMARY KEY NOT NULL,
   "NAME"  VARCHAR(255) NOT NULL
);
CREATE SEQUENCE "GENRE_SEQ" MINVALUE 1 START WITH 1 NOCACHE NOCYCLE;
During application startup, Flyway runs the commands in the SQL file and creates the schema needed for the application.
2. Create an Oracle Cloud Infrastructure Autonomous Database #
-
In the Oracle Cloud Console, open the navigation menu, click Oracle Database. Under Autonomous Database, click Autonomous Transaction Processing.
-
Click Create Autonomous Database and accept the default name for the database.
-
Select Transaction Processing and Serverless. If you are using a trial account, make sure you select Always Free.
-
Create an admin password (must be at least 12 characters and contain a number and an uppercase letter) and select Secure access from everywhere as the network access type.
-
Click Create Autonomous Database to create your database.
-
On the Autonomous Database Details screen click Copy to copy the OCID of the database. (This is a unique identifier which you will need later.)
2.1. Create a User #
-
When the database has been provisioned, on the Autonomous Database Details page, click Database Actions. (If necessary, log in with username “ADMIN” and the admin password you created earlier.)
-
Click SQL to open the SQL console.
- Copy and paste the following SQL commands into the worksheet:
 CREATE USER gcn_user IDENTIFIED BY "XXXXXXXXX";
 GRANT CONNECT, RESOURCE TO gcn_user;
 GRANT UNLIMITED TABLESPACE TO gcn_user;
 GRANT CREATE SESSION TO gcn_user;
Create a schema user password (must be at least 12 characters and contain a number and an uppercase letter) and replace the text “XXXXXXXXX” with that password.
- Click Run Script to run the SQL commands.
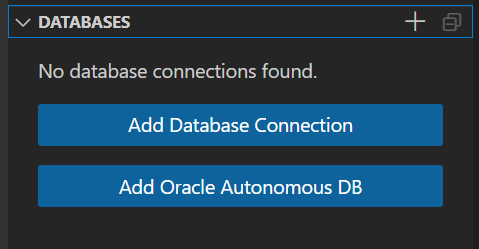
3. Connect to Your Oracle Cloud Infrastructure Autonomous Database in VS Code #
Now connect the VS Code developer tooling to your database.
Within the Explorer panel, open the DATABASES pane, as shown in the screenshot below, and click Add Oracle Autonomous DB. (This is also available in the Command Palette).
It launches a database connection wizard. Follow the prompts:
- Select the OCI profile that you wish to use (if you have multiple OCI profiles).
- From the list of compartments, select the compartment that contains your database.
- From the list of databases, select your database.
- Enter the username for the database.
-
Enter the password for the database. Very shortly, the database will be added to the DATABASES view in the Explorer panel.
-
Open the database in the view, then right-click, and select Connect to Database from the menu:
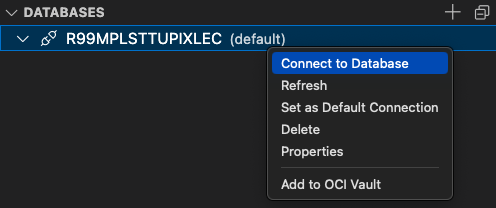
If the credentials you provided (username or password) are incorrect, it will fail to connect.
Once you are connected to the database, you can see empty Tables, Views, and Procedures.
4. Run the Application #
Now run your application, connected to the Oracle Autonomous Database, and send an HTTP GET request to test it.
-
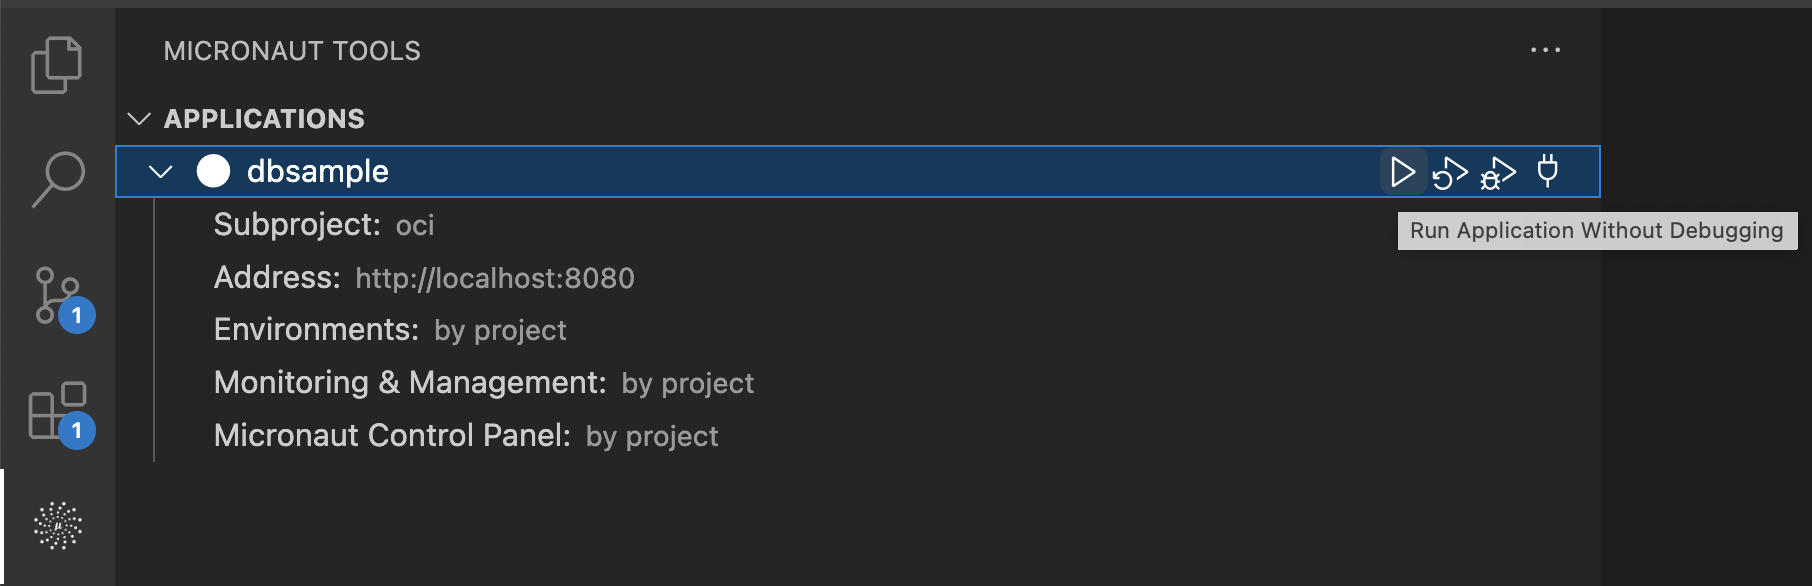
Navigate to the Micronaut Tools view and open your application.
-
Click the Run Application Without Debugging icon:
The progress will be indicated in the Output view.
-
When the application is running, send an HTTP GET request. Open a new Terminal window and run this command to test creating and storing a new
Genrein the database:curl -X "POST" "http://localhost:8080/genres" \ -H 'Content-Type: application/json; charset=utf-8' \ -d $'{ "name": "music" }'You should see a response similar to:
{"id":1,"name":"music"} -
Confirm that the new
Genreis saved in the database by listing its contents:curl localhost:8080/genres/list
The application runs seamlessly against a database configured for your project. Learn more about database management in VS Code from the Database Features extension documentation.
5. Create an Oracle Cloud Infrastructure Vault and Master Encryption Key #
Next create an OCI Vault and a Master Encryption Key. This setup is essential before proceeding with the subsequent steps.
-
In the Oracle Cloud Console, open the navigation menu, click Identity & Security. Under Key Management & Secret Management, click Create Vault.
-
Select a compartment in which you want to create the vault. Enter a name for the vault. Do not select Make it virtual private vault. Click Create Vault.
-
Once your vault is created, open it. Under resources, click Master Encryption Keys, and then click Create Key.
-
Choose Software for Protection Mode.
-
Enter a name to identify the key.
-
For Key Shape: Algorithm, select the default, and click Create Key.
6. Set Access to Oracle Container Engine for Kubernetes (OKE) #
You will package your server application in OCI and deploy it to Oracle Container Engine for Kubernetes (OKE). For that you need to create a Kubernetes cluster (if you do not already have one).
- Create a Kubernetes cluster in the Oracle Cloud console, with default settings, using the Quick Create workflow:
- Open the navigation menu and click Developer Services.
- Under Containers, click Kubernetes Clusters (OKE).
- Then click Create Cluster and choose Quick Create option. It takes a few minutes to create a cluster.
- Set local access to your cluster so you can manage it using
kubectl. To set local access, review the information that is displayed after OKE Quick Create completes in the Oracle Cloud Console. Otherwise, from the Oracle Cloud Console perform the following steps:- Open your newly created OKE cluster (Developer Services > Kubernetes Clusters (OKE)).
- Click Access Cluster.
- In the Access Your Cluster window, select Local Access, and run the commands tied to your user ID from your VS Code terminal window (View > Terminal). Make sure you access your cluster via the VCN-Native public endpoint.
Alternatively, see the Setting Up Local Access to Clusters OCI guide for more information.
Note: On Windows,
kubectlis typically installed within the Kubernetes extension and is not added to the system path. Windows users should configure a proxy in the .kube/config file to successfully deploy a project to OCI: add aproxy-urlproperty undercluster:
clusters:
- name: "dev"
cluster:
proxy-url: http://user:password@proxy:port
...
Note: If VS Code fails to locate a Kubernetes cluster (OKE), or you have not created it yet, the extension will suggest you create one directly in VS Code. However, you are required to setup OKE.
7. Set Up an Oracle Cloud Infrastructure DevOps Project in VS Code #
Return to your VS Code window and create a DevOps Project as described below.
This also involves creating a ConfigMap artifact, which will later be used to store information about the selected Vault for database credential storage.
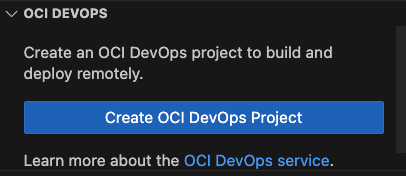
-
Expand the OCI DevOps pane in the Explorer.
-
Click Create OCI DevOps Project to push the project from your local system to a newly created DevOps project:
You will see a notification Local sources will be pushed to a remote OCI code repository…. Select Confirm to proceed.
-
Follow the command prompts:
- Select your Oracle Cloud Infrastructure profile (if you have several profiles in your .oci/config file).
- Select your compartment in Oracle Cloud Infrastructure.
- Select the OKE cluster where you will deploy your application.
- Enter a unique DevOps project name (must be unique per tenancy). By default, the DevOps project name maps the application opened in your VS Code window or workspace.
Then the DevOps project generation starts and a progress indicator provides you with feedback: it should take about two minutes to generate an OCI DevOps project.
At this step, the extension creates the necessary OCI resources, all of which are described here.
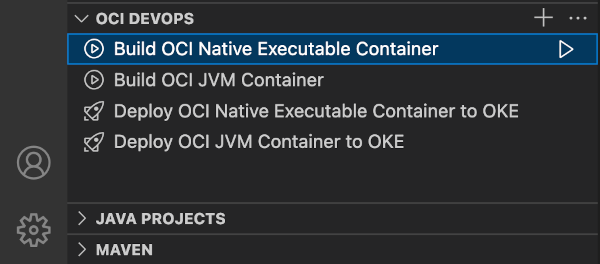
Once successfully created, a subset of existing actions is displayed in the OCI DevOps pane:
Learn more about DevOps Tools from the extension documentation.
8. Add Database Credentials to Oracle Cloud Infrastructure Vault #
Now store your database connection properties in the OCI Vault.
- Return to the DATABASES pane in VS Code.
- Right-click on your database.
-
Select Add to OCI Vault from the context menu and follow the instructions. Follow the prompts: select your compartment, select your Vault, enter a Datasource name.

Shortly, you see a confirmation pop-up window in the bottom right corner that secrets were created or updated:

This step encrypts and securely stores your database credentials in a Vault.
If the DevOps Project includes a ConfigMap artifact, this command will add the OCIDs of the Vault and its compartment, along with a placeholder for datasource properties.
9. Build and Run the Project in OCI #
- Return to the OCI DevOps pane and run the Build OCI Native Executable Container pipeline. It creates a container image containing a native executable of your application.
- Run the deploy pipeline, Deploy OCI Native Executable Container to OKE, to create a
ConfigMapresource with all necessary information for the application to use the OCI Vault and connect to Oracle Autonomous Database. This step also involves creating a deployment from the container built in step 1.
10. Access the Application #
Access the application by clicking the Open in Browser icon in the Deployment pipeline. This action initiates port forwarding, enabling you to interact with your application running in OCI as if it were running locally.
To test the application’s functionality, send an HTTP GET request.
Open a new Terminal window and run this command to test creating and storing a new Genre in the database:
 curl -X "POST" "http://localhost:8080/genres" \
     -H 'Content-Type: application/json; charset=utf-8' \
     -d $'{ "name": "music" }'
Summary #
This guide demonstrated how to leverage the Oracle Cloud Infrastructure DevOps and Vault services for cloud deployments. This includes:
- Setting up a DevOps Project
- Securely adding database credentials to a Vault
- Building and deploying the project to Oracle Cloud Infrastructure
- Accessing the application through Oracle Cloud Infrastructure, including port forwarding and local testing
Using the OCI Vault support, you can deploy your Java application to different containers that will securely connect to a database using isolated connections.